Authors: Paulina Bukieda, Katharina Meyer, Michael Engelmann & Bernhard Weller
Source: Glass Structures & Engineering (2024)
DOI: https://doi.org/10.1007/s40940-024-00272-1
Abstract
In the building industry, different types of glass edges are used depending on their application and function. A widespread assumption is that the edge strength increases with the degree of optical finishing. This corresponds with the European standardisation, which targets an adjustment of the bending strength in form of edge finishing factors. Thereby the highest edge strength is set with polished edges. This article presents research which shows that the recommended edge finishing factors of annealed glass can be insufficient, particularly for the polished edge. Comparison with previous scientific studies confirms a high scatter in the edge strengths of different manufacturers. However, there are no generally valid grinding process parameters that can be associated with a high edge strength. Consequently, general edge strength values have to be questioned, as they potentially lead to safety concerns. Thus, the processes have to be investigated individually. For this purpose, an examination method with fracture tests and a microscopic defect analysis for process optimisation is introduced. Based on the results of two different edge grinding machines, the formation of defects is presented and their potential of causing early breakage is discussed. In an overall evaluation, approaches are proposed on how the manufacturing of glass edges with high edge strength can be verified and included in the design.
1 Motivation
1.1 Glass edges—types and function
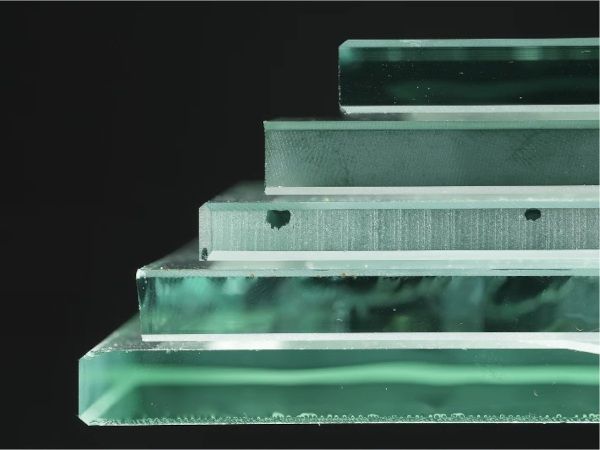
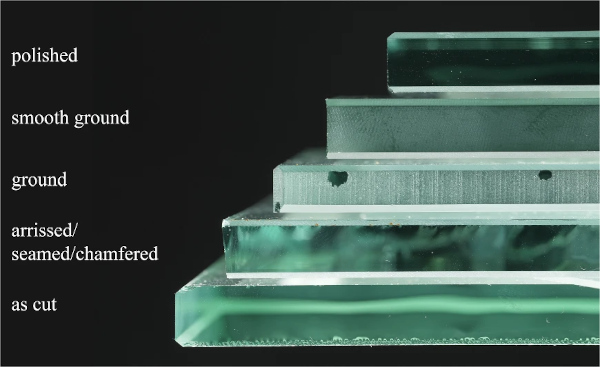
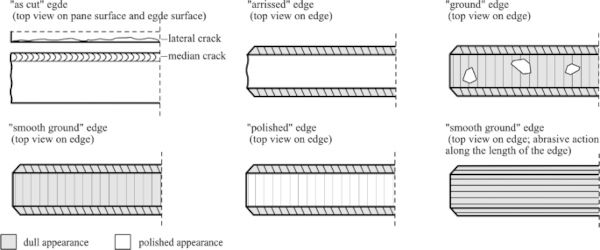
In the building industry, common glass edges are classified as “as cut”, “arrissed” – also known as “seamed” or “chamfered” –, “ground” to size, “smooth ground” and “polished”. Descriptions of their optical appearance and shape refer to their manufacturing process and are given in DIN 1249-11 (2017), EN 1863-1 (2012), EN 12150-1 (2020) and ISO 12543-5 (2021). An example of their appearance is shown in Fig. 1.
“As cut” edges are usually sharp and carry a risk of injury. They are produced on automated mechanical cutting tables to obtain the desired size and can be further processed in abrasive processes like grinding and polishing. A description of the manufacturing processes can be found in Bukieda et al. (2020).
The additional finishing creates further functions of the glass edge: To create an “arrissed” edge, the sharp margins of the “as cut” edge are removed by small chamfers, usually with an inclination of about 45°. This provides a cut protection and creates the well-known shape of a further processed edge with two chamfers. “As cut” or “arrissed” edges are often used in windows or facade constructions where the edges are covered by a frame. The further edge finishing types are produced by subsequent processing steps on the edge surface. Here, the dimensional accuracy and visual appearance are gradually increased. “Ground” edges are fit to size, removing an existing oversize of incorrect breaks from the cutting process.
Incorrect breaks cause a sharp protrusion (overbreak or underbreak) at the junction of the edge and the glass surface. Blank spots on the edge surface are tolerable. “Smooth ground” edges are completely processed on the surface and show a milky appearance with no blank spots. “Polished” edges represent the highest degree of optical finishing with a transparent edge surface. “Smooth ground” and “polished” edges are often used in visible areas. “Ground” edges are rarely requested, as the processing differences between “ground” and “smooth ground” are negligible. However, a “ground” edge might be produced sometimes even though “arrissed” was ordered. This issue was observed in the present own examination as well as in previous research on “arrissed” edges (Kleuderlein et al. 2014, Vandebroek 2014).
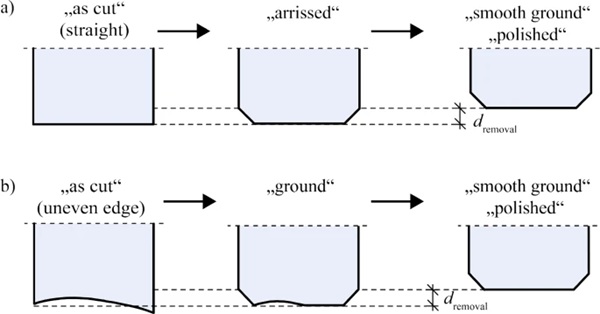
Figure 2 illustrates the cross sections machined depending on the quality of the “as cut” edge. In the case of a straight cut (Fig. 2a), the edge grinding machine can only remove the chamfer, to produce an arrissed edge with no material removal at the edge, or it can remove a defined grinding depth to produce a smooth or polished edge. In the case of a “as cut” edge with an uneven edge due to an incorrect break (Fig. 2b), a “ground” edge can be automatically produced. During the process, the glass pane is moved through a defined height. The material removal stations are fixed in height and cannot be adjusted hydraulically. As a result, the uneven edge surface is removed to some extent. This systematic effect can be avoided by increasing the “as cut” quality or by visual inspection of the edge surface at the manufacturer.
Other processes such as water-jet cutting or laser cutting, which results in a different optical appearance of the edge, are also available for shaping glass. However, they are rarely used in industrial manufacturing and therefore excluded from this study.
1.2 Glass edge strength—current assumptions
The growing size and energy requirements of windows and facades lead to increasing mechanical and thermal loads in the edge. In practice, it is widely believed that the mechanical resistance of annealed glass edges improves with an increasing degree of optical finishing. Some standards recommend the use of a certain edge finishing type for a high mechanical resistance. The French standard NF DTU39 (2017) specifies a proof for thermal loads in window glazing. Therein a “smooth ground” edge is recommended for high thermal loads. The current pre-standard of the future Eurocode of Glass Structures CEN/TS 19100–1 (2021) proposes different edge finishing factors.
These reduce the strength of the “as cut”, “arrissed”, “ground” and “smooth ground” edges whereas the “polished” edge is not reduced, therefore assumed to have the highest mechanical quality. The latter recommendation goes back to an examination on polished edges of one manufacturer, which resulted in high strength values for the “polished” edge. (Feldmann et al. 2023, Vandebroek et al. 2012). However, scientific studies on the edge strength of different edge finishing types and manufacturers show a high variance in edge strength, regardless of the type of edge finish (Lindqvist 2013, Vandebroek 2014, Kleuderlein et al. 2014). An “as cut” edge from one manufacturer may have a higher edge strength than a further processed edge from a second manufacturer.
During the production of glass edges, hard cutting and grinding tools mechanically interfere with glass, resulting in defects at the glass surface. As the strength of glass depends on the surface quality, the manufacturing process influences the mechanical strength of the glass edge. Therefore, generalised edge strength factors need to be questioned or combined with defined quality proofs. For “as cut” glass edges, the cutting force and the cutting wheel (type, dimensions and angle) were identified as significant process parameters that influence the edge strength Ensslen and Müller-Braun (2017), (Müller-Braun et al. 2018). Additionally, correlations between the lateral cracks and the strength were presented, allowing the development of a non-destructive testing method (Müller-Braun 2021). To the best of our knowledge, there is currently no information available on the correlations between the optical quality of further processed glass edges and their process parameters during production. The studies of Lindqvist (2013), Vandebroek (2014) and Kleuderlein et al. (2014) were conducted with a focus on the different edge finishing types, rather than on the process parameters.
In order to meet high acting stresses in the edges, heat-strengthened or fully tempered glass is used. Thermally toughened glass offers a higher edge strength, but is significantly more expensive due to the need for additional manufacturing steps. Nevertheless, annealed glass is preferably used in window and facade constructions. Thus, a profound knowledge about the edge strength in dependance of the edge finishing type, is necessary to ensure safe, resilient and durable constructions.
1.3 Scope
This article presents examinations on edge strength of annealed glass with a focus on the manufacturing process of different edge finishing types. For this purpose, an examination method using fracture tests and microscopic defect analysis for an individual process optimisation is presented with some exemplary results. In an overall evaluation, the results of the determined edge strength are discussed and compared with literature. Based on the results of the fracture causing defects as well as a comparison of two different manufacturing processes of the polished edge, the potential to prevent premature fracture is discussed. Finally, approaches are proposed on how the production of glass edges with high edge strength can be verified and included in the design.
2 State of the art
2.1 Previous studies
To gain information on the strength of glass edges, different approaches of destructive and non-destructive examinations were followed (Lindqvist 2013, Vandebroek 2014, Kleuderlein et al. 2014, Lohr 2019 and Müller-Braun 2021). Thereby different sizes of specimen, loading rates and edge finishing types (mostly “as cut”, “arrissed” and “smooth ground”) of annealed glass were examined. Lohr (2019) examined the “polished” edge of thermally toughened glass.
Investigations of the “polished” edge of annealed glass can be found in the studies of Vandebroek et al. (2012) and Lindqvist (2013). Both examinations contain destructive four-point bending tests and a microscopic measurement of the flaw depth c of the fracture causing defect. Lindqvist (2013) examined the edge surface before breakage by classifying defects, that might cause a fracture, and measuring their geometry. Therefore, a scanning electron microscope (SEM) and golden coated specimens were used. Vandebroek (2012) measured the flaw depth, which is visible after the breakage at the fracture mirror (see Fig. 3).

The measured flaw depth is part of a proposed edge strength model based on a fracture mechanical analysis and the time dependent crack propagation. The studies used experimental results to validate the investigated method. As a result, measuring the flaw depth could be used to predict the strength and life time of glass edges using the rules of fracture mechanics.
2.2 Formation of cracks
Manufacturing processes are essentially the intentional exploitation of cracks in the brittle material and targeted application of fracture mechanics. The formation of cracks is based on the brittle behaviour of glass in contact with hard and sharp tools (see Fig. 4). When a hard tool applies pressure to glass, a minimum flow zone is formed, with glass chips in the contact area. The glass is compressed underneath, creating a hydrostatic compressive stress field. As the pressure increases, cracks propagate through the glass. The remaining crack system consists of shallow, clod-shaped lateral cracks on the glass surface, perpendicular to the penetrating tool, and deep cracks in the direction of force application. Radial cracks also occur at perpendicular to the scored line. The crack system always occurs simultaneously. A detailed description can be found in Schula (2015).

In the cutting process, the glass is scored with a diamond wheel, creating median cracks which are further opened by bending. The glass breaks along the scored line. The resulting cut edge has visible median cracks on the edge surface and lateral cracks on the glass surface on the scored side (see also Fig. 12).
During the grinding and polishing processes, the “as cut” edge surface is removed by the floe shaped lateral cracks. Median cracks remain perpendicular to the processing direction. Rotating multi-grain, so-called cup wheels, with different degrees of hardness and grain sizes are used at several stations on automatic edge grinding machines. The cup wheels become finer and softer towards the end of the process. Rough grinding wheels—usually diamond-set—are used for material removal during grinding, while fine grinding wheels are used for surface smoothing (polishing). Grinding wheels, parallel to the edge, process the edge surface, inclined grinding wheels remove the transition area between edge and pane surface and create chamfers.
2.3 Principles of the strength determination
The strength of glass is dependent on surface quality and tensile stresses. On a microscopic level glass breaks at an existing surface defect when the crack propagation velocity reaches the critical value of the critical stress intensity factor KIC. Equation 1 describes the intrinsic strength level in which no subcritical crack growth occurs. It is dependent on the applied tensile stress σmax, the crack geometry Y and crack depth c.
![]()
Nevertheless, environmental conditions affect the breaking stresses immensely due to subcritical crack growth. The crack propagation v (increase of the crack depth c towards the time t) depends on the type of glass and the environmental conditions. Equation 2 is taking the relationship between the stress intensity factor KI, the initial crack velocity v0 and environmental conditions, which are represented by the crack velocity parameter N, into account. There are numerous investigations on the environmental conditions, which prove an increasing crack growth with higher temperature and humidity. Laboratory conditions (humidity and temperature) are often described by the crack velocity parameter N = 16 (Haldimann 2006) or N = 18,3 (Kerkhof et al. 1981).

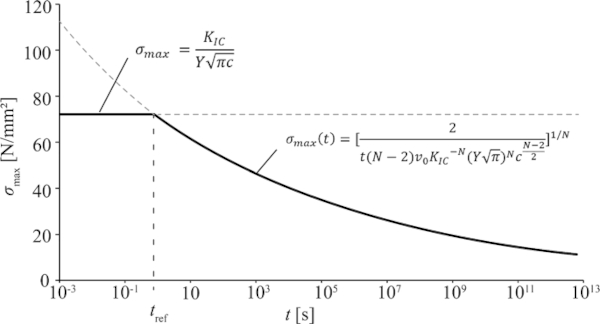
Figure 5 shows an exemplary stress-time relationship of subcritical crack growth and the related stress equations, which were determined from Eqs. (1) and (2). Until a crossing point of tref the intrinsic strength level is shown with maximum breaking stresses that are only dependent on the crack geometry. The right side expresses the time-dependent decrease of the breaking stresses in dependence of the environmental conditions.
In practice, the breaking stress values σmax of glass are obtained in experimental breaking tests with specified test conditions. These include a defined stress rate and permitted temperature and humidity ranges. (DIN EN 1288-3 (2000), DIN EN 1288-5 (2000)) In order to compare different test conditions, the effective time teff is taken into account. This means that the stress corresponds to a period during which the maximum stress acts uniformly. The failure time tmax of a stress rate is converted according to Eq. (3). Equation (4) can be used to convert different breaking stresses, assuming that a similar crack has the same energy integral under different stress histories.

A further influence is the size effect, which describes the statistical distribution of a crack population on different areas A. Thus, the probability of a critical defect increases with the size of the loaded area. To compare different investigated glass surfaces, Eq. (5) is used. This equation utilises the shape parameter of the Weibull distribution, β, which has been derived from the statistical evaluation of breaking tests.
![]()
2.4 Determined edge strengths
The working group Edge Strength of the Fachverband Konstruktiver Glasbau e.V. (FKG) examined the strength of “as cut”, “arrissed” and “smooth ground” (later referred to as “ground” in their publications) using four-point bending tests with bending around the strong axis. Edges of five different manufacturers and different glass thicknesses were tested (Kleuderlein et al. 2014). The strength values of 8 mm annealed glass for the “as cut” edge ranged from about 38 N/mm2 to 43 N/mm2, for the “arrissed” edge from 46 to 64 N/mm2 and for the “smooth ground” edge from 37 to 47 N/mm2.
In order to be able to compare the results of the “polished” edge strength values from the studies of Lindqvist (2013) and Vandebroek et al. (2012) with our own investigations, we determined adjusted stress values fadj taking into account the size effect (Eq. 5). Table 1 shows the details of the polished specimens tested by Lindqvist (2013) polished–A and polished–B and by Vandebroek et al. (2012) polished–C. The table presents the tested size and quantity n of the specimen, the stress rate and the determined stress values in terms of mean values σmean, standard deviation sd, the Weibull parameters λ and β, the determined strength fk,Weibull as well as the measured crack depth c.
Table 1 Overview of experimental results on determined edge strength values of Lindqvist (2013) and Vandebroek (2012) - Full size table
The examination of small size specimens and high loading rates polished–A and polished–B results in a big difference which correlates with the measured values of the flaw depth c. Nevertheless, a link to the manufacturing process is missing. The determined adjusted strength values fadj are presenting values of about 58 N/mm2 and 125 N/mm2. This confirms the large scatter due to the manufacturing process. The specimens of the test series polished-C were bigger in size. The determined adjusted strength resulted in fadj is 63 N/mm2.
3 Examination method and results
3.1 Examination method
To identify influences from the manufacturing process, we developed an examination method that includes microscopic surface analyses, four-point bending tests, and defect analysis (Lohr 2019 and Bukieda 2023). This method determines the edge strength, identifies fracture causing defects and allows the traceability of their origin in the manufacturing process. With this knowledge, an individual process optimisation can be derived to improve the edge strength. Figure 6 provides an overview of the examination steps.
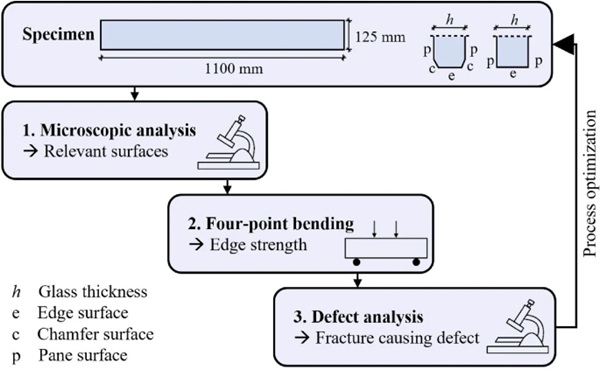
To ensure representative and comparable strength values, the size of the test specimen is adjusted to the four-point bending test of flat glass according to EN 1288–3 (2000). This method has been well established in various edge strength studies (Müller-Braun 2021; Lohr 2019; Kleuderlein et al. 2014). The specimens measure 1100 mm x 125 mm. During the first step, a digital microscope is used to analyse and record the edge surface (e), the chamfer surfaces (c), and the pane surfaces (p) near the transition area. The relevant area of the edge is within the load application of the subsequent four-point bending tests, where the highest bending tensile stresses occur and therefore, the highest probability of fracture exists. The specimens were then tested in-pane using a four-point bending tests. The test set-up and procedure are based on EN 1288–3 (2000). In the final step, the defects causing fracture are identified and analysed. The exact location of the fracture within the specimen is determined and the fracture fragment is recorded. This allows the identification of the defect, causing the fracture on the previously recorded microscopic images. The defect’s appearance enables conclusions to be drawn about its origin and the processing parameters of the glass edge. A more detailed description and example images of the specimen, microscopic analysis, four-point bending tests and defect analysis can be found in (Bukieda et al. 2020).
3.2 Overview of examined process parameters
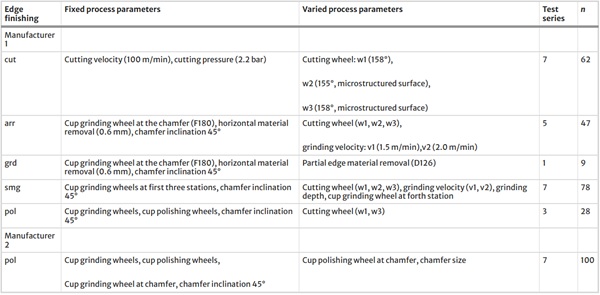
As part of these investigations, different process parameters were varied within one manufacturing process (Manufacturer 1) depending on the type of edge finishing to determine their influence on the edge strength. The investigations were carried out iteratively. After detecting fracture causing defects, the manufacturing processes parameters were optimised to reduce the defects. The edges examined were “as cut” (cut), “arrissed” (arr), “smooth ground” (smg) and “polished” (pol). “Ground” edge specimens were produced from a series of requested “arrissed” edges. The results were considered in a separate “ground” (grd) test series. In addition, a second manufacturing process (Manufacturer 2) that specialises in the production of high-gloss polishes was considered to further investigate the quality of the “polished” edge. Table 2 provides an overview of the examined edge finishing types, including fixed and variable process parameters, the number of test series, and the total number of specimens (Bukieda 2023).
Table 2 Overview of process parameters investigated depending on the edge finishing types - Full size table
Manufacturer 1 uses an automatic cutting table (Optimax 6133 by HEGLA GmbH & Co. KG) to cut the glass. The optimisation process included a variation of cutting wheels with different cutting angles and surface structures. The study examined a conventional cutting wheel (w1) and microstructured cutting wheels (w2 and w3), which perforate the glass surface during the scoring process. Figure 7 illustrates the difference between the surface of the used cutting wheels and their resulting scoring line on the glass surface. The results showed that cutting wheels with a microstructured surface resulted in a smaller crack system and higher edge strength. Therefore, the “as cut” edge condition was also considered as a parameter for the further processed edge finishing types: “arrissed”, “smooth ground”, and “polished”. The influence and a detailed description of the parameters can be found in Bukieda and Weller (2022).
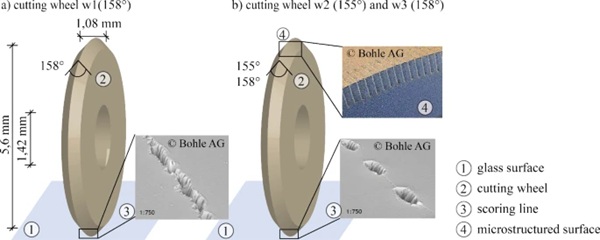
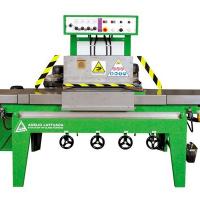
The grinding and polishing process at Manufacturer 1 is carried out on a vertical edge grinding machine (Waldemar Knittel Glasbearbeitungs GmbH) with a total of eleven grinding and polishing stations. The first five stations remove (grind) the material on the edge surface at fixed height positions. This is followed by two inclined grinding wheels for chamfering and four polishing wheels for smoothing the edge surface (Bukieda and Weller 2022).
Manufacturer 2 produces the polished edge on a vertical edge grinding machine with eleven stations (Rock 11, Neptun srl). The first three stations are used for material removal, followed by two inclined cup wheels for each chamfer (one for grinding and one for polishing), and four stations for polishing the edge surface. The influence of the examined parameters and a detailed description of the manufacturing process at Manufacturer 2 are presented seperatly in Bukieda et al. (2020).
3.3 Overall results of the edge strength
In this section the evaluation process is exemplarily explained for the “as cut” and “smooth ground” test series to derive the procedure for obtaining the presented overall results of the edge strength. Detailed results for all examined process parameters in dependance of the edge finishing type can be found in Bukieda (2023).
The breaking stresses of each test series were analysed using the boxplot distribution. Figure 8 shows the distribution of breaking stress distribution within the “as cut” (Fig. 8a) and “smooth ground” (Fig. 8b) test series. The characteristic bending strength of annealed glass fk,ann. of 45 N/mm2 and a characteristic edge strength fk,edge of 36 N/mm2 are also plotted as dashed lines. The “as cut” test series represent production at three different times (I, II, III) and with three different cutting wheels (w1, w2, w3), while all other process parameters were kept constant. The conventional cutting wheel w1 was produced in all three production times, while the microstructured cutting wheels w2 and w3 alternated. The median values for the “as cut” series ranged from 33.97 to 67.36 N/mm2.
Significance tests (ANOVA) with a p-value of 5% indicate that there is a relevant influence of cutting wheel examined, but not on different production times. Thus, the cutting wheel produced reproducible results. The results were then grouped as series with the same cutting wheel to increase the sample size for statistical analysis and to determine the edge strength. The various parameters within the edge finish of a “smooth ground” edge showed no significant differences that could be attributed to any of the examined parameter. The median values ranged from 44.80 to 55.11 N/mm2. All test series were therefore grouped together to determine edge strength. All test series presented in Table 2 were checked for significant parameters within the same edge finishing type and manufacturer.

The overall results are shown in Fig. 9. For the “arrissed “ test series, a significant influence of the cutting wheel was found. This results in the grouped test series arr–w1–all and arr–w3–all. The “ground” edge from Manufacturer 1 was not examined with different process parameters and therefore only eight specimens are tested (grd–all). The “polished” test series from Manufacturer 1 showed no significant changes. As no parameter (Table 2) with a significant influence on the edge strength could be determined for the edge finishing types “smooth ground” and “polished” for Manufacturer 1; all the test series examined were grouped into smg–all and pol–all for overall observation.

An influence of the type of cup polishing wheel for the chamfer surface was detected as a significant process parameter within the “polished” test series of Manufacturer 2 (Bukieda et al. 2020). Therefore, the preferred cup polishing wheel for the chamfer was examined in two larger test series (n = 30) with a variation of the chamfer size. Due to a large scatter and a large number of breakages outside the load application area, the two “polished” test series from Manufacturer 2 did not show a significant difference and were therefore grouped together (pol–2–all) in Fig. 9. For the grouped test series the edge strength fk,Weibull was determined using a two-parameter Weibull distribution, which corresponds to the 5% fractile value. This value is shown as × and numerically in Fig. 9.
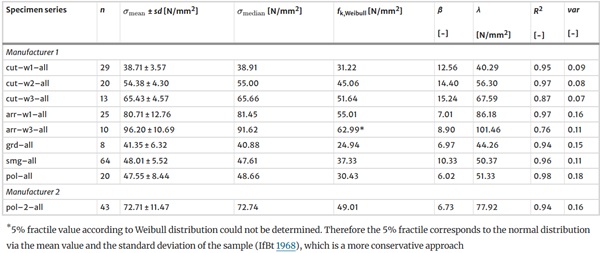
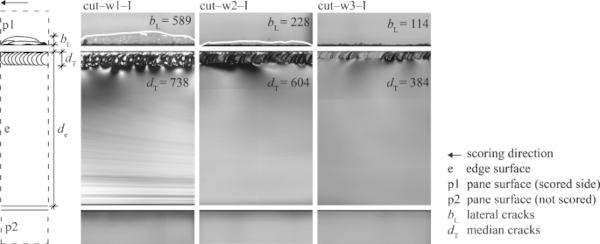
In the “as cut” test series with the cutting wheel w1 (cut–w1–all), the characteristic edge strength fk,edge of 36 N/mm2 (dashed line) was undercut. The use of the microstructured cutting wheels w2 and w3 resulted in the production of a smaller crack system and a 65% increase in edge strength from 31.22 to 51.64 N/mm2 (cut–w3–all). The images of the characteristic surfaces of the cut–w1–I, cut–w2–I and cut–w3–I test series in Fig. 10 show a reduction in the crack system. The formation of median cracks dT is visible on the edge surface (e), while lateral cracks bL are visible on the pane surface 1 (p1). In particular, the lateral cracks are significantly reduced by the use of a microstructured cutting wheel. The determined strength values of the test series cut–w2–all and cut–w3–I are higher than the characteristic bending strength of annealed glass fk,ann. of 45 N/mm2 (dashed line). It is therefore worth considering whether determine the actual edge strength of annealed glass would allow a more efficient design.
The results of the “arrissed” edge also showed an influence of the cutting wheel on the edge strength. The edge strength of the “arrissed” test series was the highest for Manufacturer 1, with values of 54.87 N/mm2 and 62.99 N/mm2, compared to all other edge finishing types and their processing parameters. An edge strength of 37.33 N/mm2 was determined for the “smooth ground” edge. Only 30.43 N/mm2 was measured for the “polished” edge from Manufacturer 1. This value is well below the standardised characteristic edge strength fk,edge – despite the high level of optical finish with a macroscopically polished edge quality. Nevertheless, an edge strength of 49.01 N/mm2 was verified for the “polished” test series from Manufacturer 2 (pol–2–all). It should be noted that Manufacturer 2 provided 10 mm thick specimens. The corresponding strength resulting from the size effect (Eq. 5) is 47.41 N/mm2.
Thus, higher edge strength of polished edges is possible, depending on the manufacturing process, but is not necessarily associated with high strength. In fact, the example from Manufacturer 1 shows that the edge strength is at a lower level and can even be below the current standardised limits. An interference of the grinding tools into the glass edge surface reduces the strength. In the results presented, it is the “ground” series with inhomogenous surface interference that shows the lowest strength values.
Table 3 contains the corresponding numerical values: the number of valid tests n, the mean breaking stress value σmean of each grouped test series and its standard deviation sd, the median σmedian, the strength value fk,Weibull, the shape β and the slope λ parameters of the Weibull distribution, the coefficient of determination R2 and the variation var. The test results of individual specimens are published in Bukieda (2023).
Table 3 Mechanical parameters of the grouped test series - Full size table
The corresponding diagrams of the Weibull distributions and their confidence intervals (dashed lines) are presented in Fig. 12 for each edge finishing type. The individual values of the breaking stresses are represented by points. The parameters of the Weibull distribution are determined from the regression line. The confidence intervals are determined as lower and upper confidence intervals with a probability of 95%. The shape parameter β of the Weibull distribution corresponds to the slope of the regression line and represents the dispersion of the data. The slope parameter λ symbolises the value with a probability of 63.21%. At the lower confidence interval, the value of the 5% fractile is determined, which corresponds to the characteristic strength fk,Weibull. An evaluation of the sample with the selected distribution is carried out using the representation of the confidence intervals in the probability distribution and the coefficient of determination R2.
For the grouped test series cut-w3-all (Fig. 11a), arr-w3-all (Fig. 11b) and grd-all (Fig. 11c), the lower confidence intervals deviate significantly from the regression line in the lower stress range. This indicates that the number of low breaking stresses determined to cover this range is insufficient to provide a high level of confidence. The above mentioned series show a low number of valid tests due to the fact that cutting the specimens with the cutting wheel w3 makes the cut opening process more difficult. Cutting wheel w3 causes small median cracks, resulting in a higher probability of incorrect, uneven breakage.
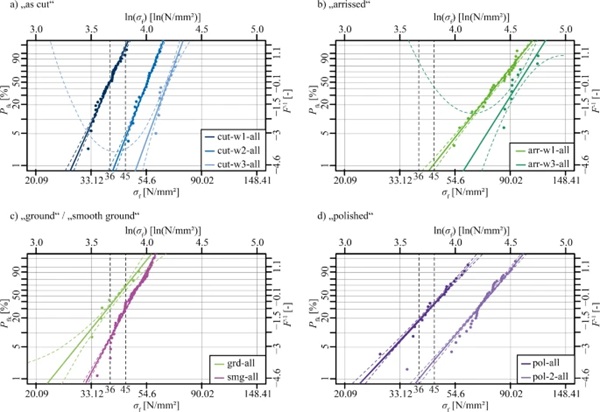
In general, the results show a high degree of dispersion. The values of the shape parameter β for the “arrissed”, “ground” and “polished” edges are in the low range with values between 6.02 and 8.90 and are comparable to the results of Blank (1990) and Siebert (1999) for undamaged annealed glass. For the “as cut” and “smooth ground” test series, the values of the shape parameter β are higher, but with 10.33 to 15.24 below the values for sandblasted damaged glass, which are in the range of 18.5 till 39.9. Further examinations should consider a deeper elaboration of the statistics, according to Ballarini et al. (2014), to take into account the effect of damaged surfaces.
The resulting edge strength ranges of five manufacturers from the study by the working group Edge Strength of the FKG (Kleuderlein et al. 2014) are shown as shaded areas in Fig. 9. For the edge finishing types “as cut” (blue), “arrissed” (green) and “smooth ground” (magenta), all values determined were above the characteristic edge strength of 36 N/mm2. For the own test series of “as cut” edges, the edge strength was in the lower and upper ranges of the scatter. A targeted and microscopically proven crack reduction in the manufacturing process was associated with higher edge strengths. The determined edge strength value of the test series arr–w1–all is in the upper strength range, while the values of the arr–w3–all test series exceed the range of the study by the working group Edge Strength. For arr–w3–all, only ten valid test specimens are available, due to the production of a “ground “specimen as part of the production of the arr–w2–II test series. These are considered separately in the grd–all test series which results in low breaking stresses and a 5% fractile value of 24.94 N/mm2. The values of the grd–all test series are lower than the range of values of the “arrissed” edge in the earlier study by the working group Edge Strength.
3.4 Fracture causing defects
The defect analysis enables the localisation of fracture origins in dependence of the edge finishing type, in order to further optimise the process:
- As cut: the fractures always originate from the transition area between the edge and the pane surface on the scored side. Thus, the process-dependent lateral and median cracks cause breakage.
- Arrissed: glass fractures were mostly found at the chamfer surface or at the transition area between the chamfer and the edge surface. Remaining defects from the cutting process (lateral and median cracks) and the grinding process used to produce the chamfer were critical.
- Ground: beginning or end of the ground areas on the edge surface (next to a blank spot) initiated fracture.
- Smooth ground: 90% of the cracks started from the edge surface, where the microscopic images showed a typical grinding pattern.
- Polished: The fracture origins were distributed on the chamfer and the edge surfaces.”Polished” specimen from Manufacturer 1 exhibit 70% fracture origins from the edge surface and 25% from the transition area or the chamfer surface. Whereas, the “polished” specimen of Manufacturer 2 origin with 60% from the transition area or the chamfer surface and 25% from the edge surface. This confirms the need for an individual process analysis.
Due to the polishing process the microscopic images provide more detailed information about the fracture causing defects. The grinding and polishing process of Manufacturer 2 produces highly polished microscopic surfaces. Therefore, the defect analysis allows a finer categorisation of facture causing defects. Figure 12 shows the defined categories and the corresponding breaking stresses. The defects are divided in “after processing” introduced defects and defects occurring “from the process “(grinding scrapers, dots as well as chipping and conchoidals at the transition area between chamfer and edge). In particular, clearly visible individual scratches increase the potential for early breakage. Defects caused during the manufacturing process have been specifically reduced in further optimisation steps. Defects caused after processing, characterised by the fact that they are not related to the surface characteristics, are attributed to handling or transport.
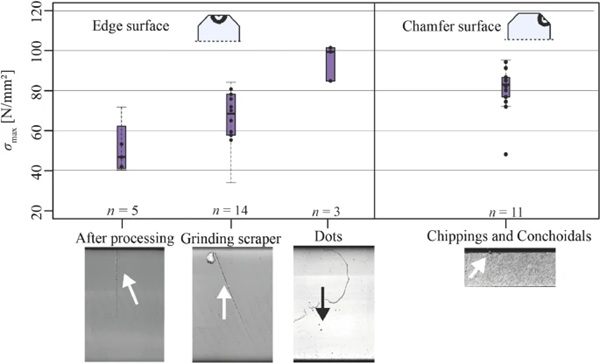
From this observation, recommendations can be derived for Manufacturer 2 to prevent the introduction of fracture causing defects and to improve the process. In this case an edge protection during handling and logistics and a sharpening of the grinding wheels can be recommended. However, clearly visible defects were not always responsible for the breakage. The defect analysis provides an indication of the introduction of fracture causing defects and enables a process optimisation. However, it is not yet possible to predict the origin of breakage or the edge strength of processed glass edges using optical measurement alone.
4 Discussion
4.1 “As cut” edge — potential of high edge strength and non-destructive tests
With regard to the “as cut” edge, there is a correlation between optical and mechanical quality. This has already been demonstrated in Figs. 9, 10. An optical measurement of lateral cracks bL and the determined edge strength fk.Weibull can be described in edge strength classes (KFK) according to Müller-Braun (2021). Table 4 compares the mean values of the measured lateral cracks within the test series and the determined edge strength values fk,Weibull of the own investigations with the assumptions of the corresponding edge strength classes.
Table 4 Assignment of the analyzed test series (fk,Weibull, bL) to the edge strength classes (KFK) and the corresponding edge strength according to Müller-Braun (2021) - Full size table
The test results show that the grouped test series cut–w1–all have the largest lateral cracks and are assigned to edge strength class KFK 0. However, the associated characteristic value fk,KFK of 36 N/mm2 could not be achieved. In the cut–w2–all test series, the lateral crack widths are between 200 μm and 400 μm and correspond to edge strength class KFK A. The 5% fractile value of 45.06 N/mm2 is above the minimum value of 40 N/mm2. The cut–w3–all test series yielded a minimum lateral crack measurement of 157 μm and a maximum 5% fractile value of 51.64 N/mm2. This resulted in an achieved characteristic bending tensile strength of 45 N/mm2 for edge strength class KFK B in annealed glass. The assignment of edge strength classes for the grouped cut–w2–all and cut–w3–all test series was consistent with 5% fractile values obtained.
The present investigations confirm that the adjustment of the cutting process parameters leads to improved edge quality, and that there is a correlation between lateral crack formation and edge strength. This highlights the potential of non-destructive testing in optimising manufacturer specific cutting processes to improve edge quality.
4.2 Further processed edges—influence of the material removing cup wheels
Examination of various grinding process parameters for the “smooth ground” edge from Manufacturer 1 showed no significant effect on the edge strength. In addition, all of the “polished” edges of Manufacturer 1 showed breaking stresses in the same range as the “smooth ground” edges, indicating no improvement through polishing. A comparison of other process parameters can be made by examining and analysing the “polished” edge from Manufacturer 2 with significantly higher edge strength values.
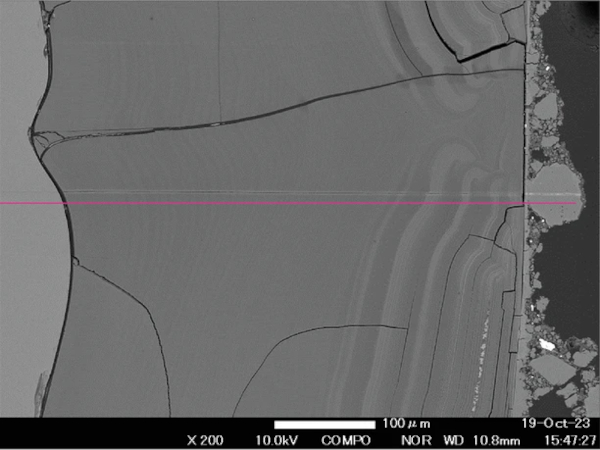
On a macroscopic level both “polished” edges fulfil the optical requirements of a shiny and smooth surface. The microscopic images in Fig. 13 show a clear difference. The polished surface of Manufacturer 1 is rich in contrast with a visible grinding pattern, while the polished surface of Manufacturer 2 is much brighter with almost no visible pattern. The cup wheels used for polishing smooth the surfaces but cannot remove deep defects as shown in the failure analysis. The high edge strength of Manufacturer 2 correlates with the microscopic appearance and the lower crack depth.

Comparing the manufacturing process of Manufacturer 1 and Manufacturer 2, there are significant differences in the grain sizes of the rough grinding wheels used to remove material in the grinding process. Manufacturer 1 uses a four-station process to remove material, using diamond grain sizes of 231 µm, 181 µm, 126 µm, and 107 µm, achieve a total material removal of 2 mm from the edge surface. Meanwhile, Manufacturer 2 uses three cup grinding wheels with grain sizes of 151 µm, 76 µm, and 54 µm to remove 1 mm of material.
According to Hayashida et al. (1972), it is assumed that the interfering diamond grain causes cracks in the glass that are three times its diameter in depth. Based on this assumption and the adjustment of each station to remove the depth cracks introduced by the previous station, the ground surface of Manufacturer 1 should be left with a crack depth of 321 µm and the ground surface of Manufacturer 2 with a crack depth of 162 µm. Figure 13 compares the two manufacturers based on the calculated deep crack depths according to the diamond grain sizes and the resulting microscopic surface appearance. From Eq. 1 the assumed remaining crack depth c of 321 μm for Manufacturer 1 and 162 μm for Manufacturer 2 correspond to the breaking stresses of 35.46 N/mm2 and 49.91 N/mm2 respectively. Compared to the experimentally determined breaking stresses of Manufacturer 1 and Manufacturer 2, the calculated breaking stresses are each in the lower range of the results (see Fig. 9). This means that the approximation formula of three times the grain size is supported by these results. Consequently, the grain of the last cup grinding wheel has a high influence on the mechanical quality of the edge.
It is therefore assumed that the grain size of the grinding stations has a significant influence on the microscopic appearance and the edge strength. The finer grinding wheels used by Manufacturer 2 result in a higher edge strength, which is correlated with the microscopic appearance.
4.3 Resulting recommendation for the production process
Based on the results of this study, the following conclusions can be drawn for the production of glass edge finishing types in order to achieve high edge strength:
- As cut: Use microstructured cutting wheels to reduce the formation of lateral cracks. Reduce the cutting and breaking force to such an extent that an even “as cut” edges is produced in order to avoid oversize with additional grinding amount. For a further adjustment of cutting process parameters consult Müller-Braun (2021).
- Arrissed: Complete removal of deep and lateral cracks from the cut edge and production of a homogeneous seam in the edge grinding machine is necessary.
- Ground: Partial removing of the edge surface appears to reduce the edge strength due to uneven material removal.
- Smooth ground polished: Select the finest grain sizes possible and spread the material removal over several stations. It is important that the rough grinding wheels remove only as much material as can be compensated by the wheels that follow. If necessary, carry out the targeted material removal in two grinding steps with a reduced grinding depth.
- Edge protection should be taken into account during logistics and handling for all edge finishing types.
We assume that the use of finer grinding tools will reduce the median crack depth during the grinding and polishing process, which will have a positive effect on the edge strength. The machine configuration and the grinding wheels used vary from manufacturer to manufacturer. They are usually selected a unique time based on the maximum amount of material to be removed during the usual production process of the manufacturer. Rougher cup grinding wheels are required for thick monolithic or laminated glass. Changing grinding wheels is a time-consuming process due to the need to manually adjust the height of the position and the initial grinding required. To achieve optimum results when grinding glass of different thicknesses, it is recommended to that the first station be “switched off” when working on thinner monolithic glass. This can be achieved by processing the glass pane in a higher position. On the other hand, if the last fine grinding station is subject to high levels of wear due to the grinding of thicker (laminated) glass, it is worth considering whether this grinding station can be manually adjusted within the production process.
Due to the existing differences, individual consideration of the glass edge strength is required, which must be determined experimentally. Additional information on the depth of the median crack, which is most likely to cause breakage, and correlations between depth and surface appearance need to be part of further investigations. Further examinations may enable future non-destructive testing methods and quality management.
5 Recommendations for design
5.1 Separation of mechanical and optical quality
The study did not confirm the assumption that edge strength increases with the type of processing. Therefore, it is necessary and recommended to clearly separate the mechanical edge quality, i.e. the edge strength, from the optical description.
The international product standards, such as EN 1863-1 (2012), EN 12150-1 (2020) and ISO 12543-5 (2021), provide a description of the optical quality of different edge finishing types. However, the text does not provide a clear description of the “as cut” edge and the shape of processed edges. Furthermore, it is not applicable to annealed glass. In Germany, the edge finishing types are defined in DIN 1249-11 (2017). This standard is independent of the glass product and specifies the optical appearance. Figure 14 proposes the optical definition according to the production processes of industrial cutting, as well as grinding and polishing with an edge grinding machine and a CNC machine. The standards EN 12150-1 (2020), EN 1863-1 (2012) and ISO 12543-5 (2021) have been considered in the proposal. At an international level, there is a need to define edge finishing types of annealed glass.
5.2 Action side — determination of thermal loads
For glass elements supported on four sides with the main load direction perpendicular to the pane, such as windows or facades, the mechanical loads at the edge are neglected because the critical stresses typically occur in the centre of the pane. With the introduction of the Eurocode Glass (CEN/TS 19100-1), verifications at the glass edge have become even more important. It is now necessary to detect tensile stresses in the edge areas that can be caused by in-pane mechanical loading. CEN/TS 19100-1 also requires the consideration of thermal loads acting on insulating glass units. Thermal loads occur when there are different temperatures within a glass pane. To simplify, the coefficient of thermal expansion of glass is used to convert the maximum temperature differences in a glass pane into thermal stresses.
Due to the large number of parameters and the transient climatic environmental conditions that influence each other, it is advisable to calculate pane temperatures for insulating glazing or complex facade constructions using a computerised procedure. Schwind et al. (2022) provides a detailed description of the physical background behind the development of thermal loads and their implementation in numerical calculation models. He discusses the use of double and triple insulating glazing.
However, there is no specification of the parameters and environmental conditions for determining thermal loads. There is also a need for design information on load durations and combination values.
5.3 Resistance side — determination of edge strength
The current design values for the edge strength of annealed glass are considered to be the lower limit of the qualities available on the market. The research presented shows that these values can be undercut (and potentially be on the unsafe side) and can also vary widely within a single manufacturing process. In particular, the production of “ground” and “polished” edges introduces defects that can lead to a significant reduction in the edge strength. Thus, a general edge strength specification according to different edge finishing types is currently not recommended due to the high scatter of qualities and process parameters. However, the results show that high edge strength is possible. More knowledge of the manufacturing processes is needed to generate generally valid and safe correction factors. Based on to the results, we do not recommend to attribute the “polished” edge with an edge finishing factor of 1.0 without product and process-specific proof. A general reduction of 80% of the characteristic bending strength seems to be more representative.
The results of this research show that glass edge strength can be improved by analysing and optimising the manufacturing processes for specific edge finishing types. This is particularly necessary when manufacturers receive complaints about annealed glass edges or need to deliver high edge strength for complex projects. To enable the option of higher edge quality based on experimental determination, a test procedure needs to be established. The determination of the characteristic bending strength in four-point bending about the weak axis according to EN 1288-3 includes the edge strength. A pure statement on edge strength can also be made if only the tests with edge failure are evaluated. However, a differentiation according to the cause of fracture is associated with a higher amount of time during the test procedure. In addition, the number of tests must be increased to obtain a sufficient number of edge failure. Testing around the strong axis, as presented in this paper, increases the probability of fracture starting from the edge. This allows a direct determination of the edge strength and a comparison of the edge qualities of different edge finishing types. A proposal to extend EN 1288 to include the four-point bending test towards the strong axis has already been submitted (DIN EN 1288-6).
6 Summary and outlook
The presented results of the determined edge strength and the comparison with previous scientific studies confirm a high scatter in the edge strength depending on the edge finishing type and the manufacturing process. Currently recommended edge finishing factors of annealed glass can be insufficient. General process grinding and polishing parameters associated with high edge strength have not yet been defined. Recommendations for the use of grinding tools will be required. Until then, individual manufacturing processes need to be investigated and the determination of the edge strength needs to be proven experimentally.
Optimisation of manufacturing processes to reduce the introduction of defects is possible and is associated with higher mechanical edge quality. In addition, the edge strength needs to be consistent with clear optical definitions, as “minimum” optical qualities to prevent an installation of poorly manufactured edge qualities, which is generally possible.
Further understanding of the manufacturing processes and minimising the resulting crack depth in annealed glass edges is also likely to have a positive impact on the chemical and thermal strengthening of glass edges.

