Source: Glass Structures & Engineering
Authors: Daniel Massimino, Ethan Townsend, Charlotte Folinus, Michael Stern & Kaitlyn Becker
DOI: https://doi.org/10.1007/s40940-024-00279-8
Abstract
In comparison to traditional glass casting, glass additive manufacturing (AM) presents an opportunity to increase design flexibility and reduce tooling costs for the production of highly variable geometries. While the latter has been extensively explored for masonry units, there is minimal research on the former for its viability to produce structural building components. This paper encompasses design, manufacturing, and experimental testing to assess the feasibility of using glass AM to produce interlocking masonry units for the construction industry. The glass 3D printer employed in this study is capable of printing a maximum volume of 32.5 × 32.5 × 38 cm–suitable for producing full-size masonry units. As part of this work, we discuss how to adapt design guidelines for glass AM to produce interlocking units. To evaluate fabrication ease and structural performance, three fabrication methods, Fully Hollow, Print-Cast, and Fully Printed, are compared. To compare the accuracy, repeatability, and structural capacity of each masonry unit, geometric analysis, surface roughness, and mechanical testing is conducted. Results varied by fabrication method, with average strength ranging from 3.64−42.3 MPa for initial fracture and 64.0–118 MPa for ultimate strength. Accuracy in print dimensions was less than 1 mm with a standard deviation of 0.14–1.6 mm. Results demonstrated that Fully Hollow masonry units provide a more immediate path to implementation, while Fully Printed units have the potential to provide an entirely glass, transparent, and circular building component fabrication method.
1 Introduction
As of 2018, the construction industry constituted 39% of the world’s carbon equivalent greenhouse emissions (IEA 2018). As operational efficiencies of building units have improved, attention is increasingly focused on reducing the embodied carbon in the construction industry as a way to improve sustainability. One effort to reduce embodied carbon is the development and implementation of circular building elements, components that can be disassembled and reused at the end of a building’s life (Fang et al. 2023). Another strategy is applying advanced manufacturing techniques, such as additive manufacturing (AM), to create more mass- and material-efficient structures that decrease overall waste and emissions (Fang et al. 2023). Glass has been identified as a construction material with favorable reclaimability, recyclability, and high strength characteristics for a circular building material (Bristogianni et al. 2019). Its implementation with AM for the built environment remains relatively under-researched (Tessman et al. 2022).
AM presents an opportunity to create highly customized glass objects with far less tooling or mold materials (Fang et al. 2023). Objects designed without the constraints of traditional manufacturing techniques can be more mass-efficient, optimized for structural performance, and capable of creating new aesthetic opportunities. AM has been investigated for its potential in architectural applications with materials such as ceramics, metals, and concrete (Tessman et al. 2022). Our research investigates the possibility of implementing glass AM as a viable fabrication method for creating building components, specifically interlocking masonry units. In this introduction and background, we will broadly discuss glass building components and will narrow the focus of this paper to producing interlocking masonry units with glass AM.
Designing glass AM building components required defining boundaries and constraints to the process. Producing building components that are wholly transparent, self-supporting, and capable of enabling circular construction were the self-imposed constraints of this study. Aesthetics motivated transparency by eliminating any opaque hardware within the building system. Transparent, self-supported printed units present a new development in the field. Previous work by MIT’s Mediated Matter group produced glass AM structures that relied on interior, opaque retaining components to provide stability (Inamura et al. 2018a). Creating a circular construction component required replacing the adhesives currently used in glass construction to avoid glass contamination and support deconstruction for reuse. We studied existing strategies to achieve circularity in our designs.
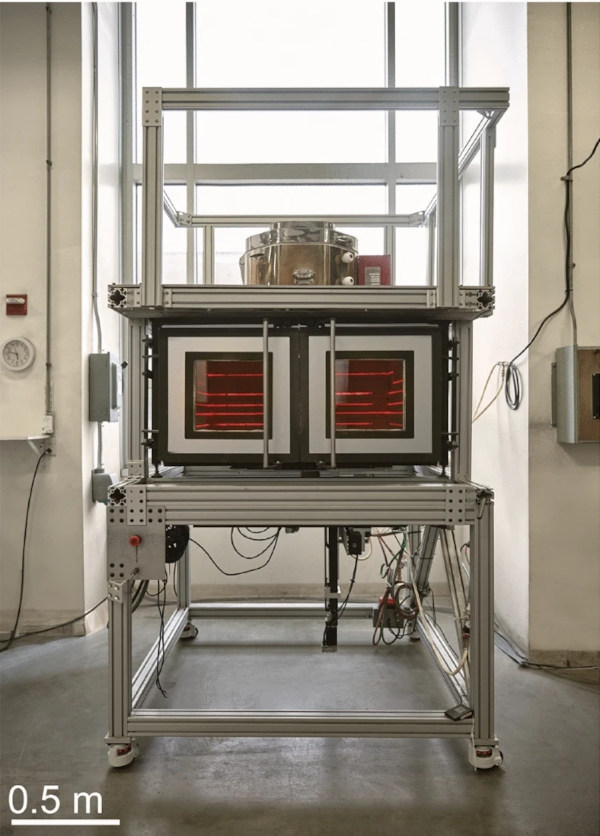
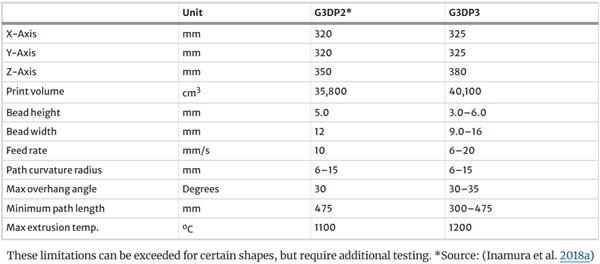
Utilizing a glass AM technology also required adapting existing cast or pressed glass designs to the constraints of the glass AM. The printer utilized in this paper, Glass 3D Printer 3 (G3DP3), is the third iteration of a molten glass printer currently owned and operated by Evenline Inc. and shown in Fig. 1. G3DP3 is capable of printing objects up to 32.5 × 32.5 × 38 cm in size. This constraint limits the size of a single building component, and motivates our decision to design and produce masonry units that can aggregate into larger structures. Cast and hollow, pressed glass blocks are the major options for glass masonry units in today’s architecture. These traditional forming methods require disposable molds for complex shapes or expensive, and reusable molds for simpler shapes (Oikonomopoulou et al. 2020). Pressed glass additionally relies on reusable molds made of materials that are robust enough to withstand high forces from the hydraulic press, and the high cost of molds limits design variation (Tooley 1984).
After considering all of our requirements—transparent, self-supporting, and circular— glass interlocking masonry units presented one path to satisfy our production and self-imposed constraints. Interlocking units would allow us to remove adhesives and instead rely on glass features to resist lateral loads. Manufacturing interlocking units with glass AM though required producing features that interface with each other, raising questions about how these new methods may impact the structural integrity of individual units. This paper investigates methods for the additive manufacturing of interlocking units and tests units from a small production run.
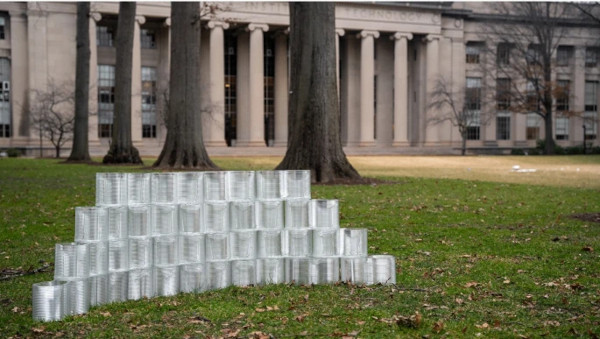
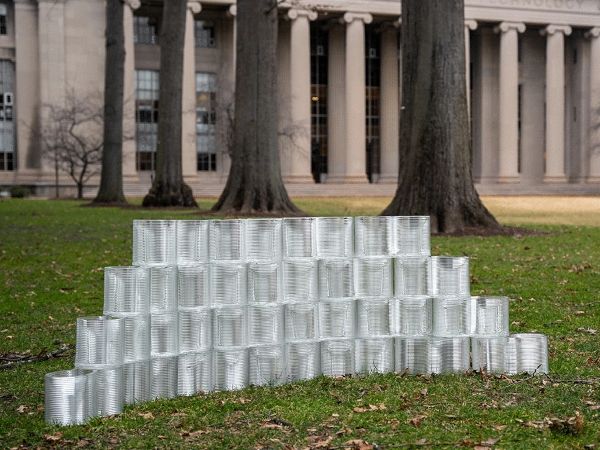
Our research leverages the lessons learned from existing structural glass research and develops options for generating interlocking glass masonry with glass AM. It assesses three design and fabrication strategies: Fully Hollow, Print-Cast, and Fully Printed. We print masonry units using each strategy and characterize their performance using geometric analysis, surface analysis, and mechanical testing. The end result is shown in Fig. 2 as an assembled wall made of these printed units. Using these data, we develop short- and long-term recommendations for future work toward the development of a long-term, large-scale architectural demonstration of interlocking units made with glass AM.
2 Background
Strategies and designs for implementing glass AM were informed by existing research in interlocking cast glass masonry and other work using previous versions of the G3DP3. Here we discuss these two topics, which influenced the experimental design and analysis in this paper: first, interlocking cast glass masonry, and then, second, the development of glass additive manufacturing for architectural applications.
2.1 Interlocking cast glass masonry
This section describes the state of the art for glass masonry construction and explains our motivation for selecting interlocking masonry units as the focus for applying glass AM in the construction field. Before diving into glass masonry, it is worth noting that glass in the building industry has typically been dominated by implementing various products from a float glass production facility into a building’s envelope (Oikonomopoulou et al. 2018b). It is only recently that casting has become a viable option for structural glass production by incrementally addressing concerns such as fire protection, vandalism, and strength of the material (Oikonomopoulou et al. 2015). One of the main concerns when utilizing structural glass is the material’s brittleness (Shelby 2005). Upon reaching the material yield strength at localized areas, glass structures can catastrophically collapse without visual warning. One way structural engineers and architects have responded to this issue is by laminating multiple panes of glass for redundancy (Njisse 2003). When a single pane fails, the remaining units will hold the structural loads until repairs can be made. In this design, individual failure does not affect the structural integrity of the whole building.
Masonry units provide a different method for redundancy. Similar to the laminated float pane strategy, the failure of one masonry unit does not critically impact the global structure and safely allows for a localized failure. The loads from the failed unit will be distributed to the remaining intact structure. Fully-solid, soda-lime masonry units have been installed using these strategies in projects such the Crystal House and Atocha Memorial (Oikonomopoulou et al. 2018b). In the case of the Crystal House, the failure of the facade has also been isolated from the rest of the building’s structure because of fire protection concerns. The scale of existing cast glass masonry units allows for an easy analog to G3DP3’s capabilities for printing similarly sized objects. Cast glass masonry units can provide transferable structural strategies when implementing glass AM as a production method for construction components.
As an alternative to cast units, traditional hollow glass blocks are manufactured by fusing two pressed glass halves together. However, these hollow blocks are not certified for use in structural load-bearing walls because blocks with thinner walls (6–19 mm) are susceptible to buckling behavior (Oikonomopoulou et al. 2015). The glass printer used in this work, G3DP3, creates a 13 mm nominal wall thickness, making its products less susceptible to local buckling behavior in each unit. Although we learned from hollow block designs and considered buckling behavior while designing our units, we ultimately used cast glass masonry as the main inspiration for our designs. We found that cast glass masonry designs introduced by researchers at TU Delft were intended for use as structural load-bearing members, unlike their pressed glass counterparts, and were thus a helpful reference in the process of defining functional requirements and designing masonry units for AM (Oikonomopoulou et al. 2018a).
To address the goals of transparency and self-supporting structure, we considered existing cast glass masonry projects. In these projects, an interlayer is used between units to avoid glass-to-glass contact, level any non-planar surfaces between units, maintain position, and resist lateral loads. For previous cast glass masonry projects, adhesives were used as an interlayer, but adhesives can limit the possibility for deconstruction and risk contamination, making the glass masonry units difficult to recycle (Oikonomopoulou and Bristogianni 2022). Researchers at TU Delft have introduced the possibility of using dry, interlocking glass masonry units as a method for construction that allows for disassembly and reuse of individual units (Oikonomopoulou et al. 2018a). Our goals of a transparent, self-supporting, and circular design were aligned with the rationale for utilizing interlocking units. For these reasons, we explored strategies for designing interlocking units for glass AM.
Because installed examples of cast interlocking masonry and their adhesively bonded alternatives exist, the question arises: why use glass AM to produce interlocking masonry? First, glass AM could be selected over other previously mentioned manufacturing technologies in circumstances where many different geometries are required for aesthetic or structural use cases. These intentional variations can be implemented with glass AM without added tooling or manufacturing costs. The lower cost for different designs could also open the opportunity to size individual units according to their specific structure loads. It’s worth noting that, while this freedom of design variation is one of the most attractive properties of AM, the experimental work in this paper focuses on testing multiples of the same masonry unit to evaluate the viability and repeatability of this glass AM technology.
Secondly, glass AM could be selected for optics and aesthetics which are only available with the layered deposition process, and can be altered by varying printing parameters such as feed rate or color mid-print. Ceramic AM has explored building applications for this reason, leading to highly varied shapes and textures in facade designs (Wolf et al. 2022).
Lastly, the build volume of G3DP3 is well suited for producing masonry scale structures. While the product scale is not unique to glass AM, as compared to other glass manufacturing processes, it is an important enabling factor. These motivations sparked the interest for this feasibility study, but the glass AM machine set many of the requirements, as explained in the following sections.
2.2 Development of glass additive manufacturing for architectural applications
In this study, we continue research formulated in the MIT Mediated Matter Group. Outside of the Mediated Matter Group, research in glass AM for building components has investigated the opportunity for totally transparent and monolithic glass connection design. In 2012, Rammig aimed to construct all glass connection designs by directly melting soda-lime rod onto glass plate using a torch (Rammig 2012). Later, different researchers relied on locally melting glass rod with a laser and fusing it to a sheet glass build plate to create all glass connections (Seel et al. 2018). These technologies could be effective in creating small scale connections, but have not demonstrated the ability to create entire units large enough for load bearing use.
The glass units produced for this viability study were made by G3DP3, a printer owned and operated by Evenline Inc. The first molten glass 3D printer, G3DP1, was developed in 2015 by MIT’s Mediated Matter group (Klein et al. 2015). Some testing was performed to understand the change in anisotropy as a result of printing in an annealing chamber, but sample sizes were small and three-point bending fixtures instead of four-point bending fixtures were utilized (Klein et al. 2015), which we return to discuss for future work. G3DP2 was developed in 2018 and focused on producing larger hollow body objects (Inamura et al. 2018a). G3DP2’s body of research performed structural proof testing prior to the installation of 3.7 m tall columns made of stacked printed glass objects (Inamura et al. 2018a).
In this paper, we extended this work to include different loading conditions representative of basic masonry structures, increased the sample size for testing of repeat geometries, measured the dimensional variation between units, and included surface roughness characterization. In the previously assembled columns, structural loads were supported by internal retaining hardware (Inamura et al. 2018a). In this paper, we formulate a structural system that uses interlocking geometries to resist lateral loads. Using G3DP2, advancements in 2017 developed side-by-side deposition and fusion during printing (Lizardo 2017). This allowed for a print bead to be extruded next to an existing layer, fusing different areas of the tool path together and creating the capability for water tight seals. In this paper, we leveraged side-by-side deposition to print interlocking features.
Our research uses the latest version of this printer, G3DP3. Since these prior publications (Klein et al. 2015; Inamura et al. 2018a), progress has been made by the authors on upgrading components to decrease system and operating costs, improve tool paths to allow for smaller variation among prints, and fine-tuning thermal control during printing. The upgraded G3DP3 also has been improved to reduce the cost of the crucible and other refractory elements, while enabling printing at elevated temperatures. A summary of performance improvements are shown in Table 1 and a picture of the current machine is shown in Fig. 1.
Table 1 Glass 3D printer 2 (G3DP2) and 3 (G3DP3) printer characteristics based on proven prints - Full size table
3 Methods
We designed, manufactured, and characterized interlocking glass masonry with AM using the following steps.
- A glass interlocking masonry unit design was developed and prototyped based on existing designs proposed by researchers at TU Delft, and adapted for production using G3DP3. This is discussed in Sect. 4.1.
- Three manufacturing methods, Fully Hollow, Print-Cast, and Fully Printed, for generating these interlocking units using G3DP3 were developed and multiple identical units generated for characterization. This is discussed in Sect. 4.2.
- Glass masonry units produced with each manufacturing method were characterized to quantitatively compare them. Geometric analysis was used to define the accuracy and repeatability of each method’s final dimensions. Geometric data defined the baseline performance of G3DP3 and the relative change when introducing glass interlocking geometry. Surface roughness was measured to understand how the effect of printing onto different build platform materials compared to existing polishing processes. Surface roughness was also used to estimate stress concentration values that may affect performance during experimental mechanical testing. Finally, mechanical testing was used to analyze each method’s performance in terms of load carrying capacity. Two configurations of testing were utilized to test the strength of a unit when all faying surfaces (surfaces in contact with joints between masonry units) were evenly loaded and when a unit was spanning two others from above and below.
These characterization methods together were used to experimentally understand the relative advantages and disadvantages of each manufacturing method. Once collected, these data were used to provide recommendations for further research directions and eventual implementation.
4 Design and manufacturing
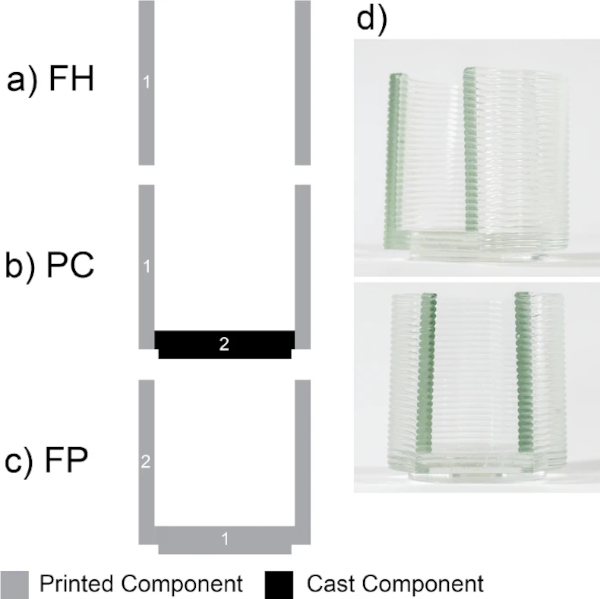
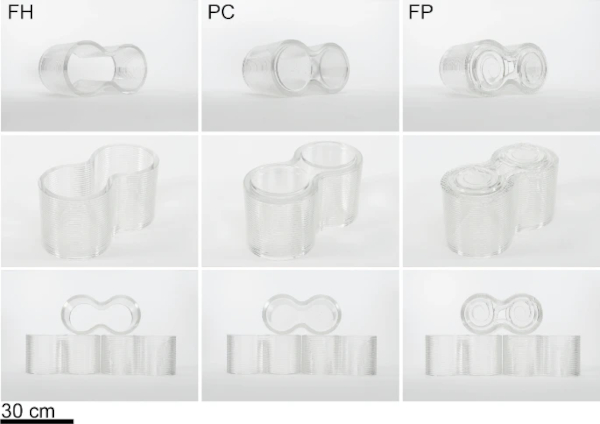
In this section, we detail the design process for choosing the baseline interlocking glass masonry unit shape. Next, we consider three manufacturing methods for generating these masonry units, and integrate those processes into the design. Finally, we lay out in detail each manufacturing process as represented in Fig. 3. Because the manufacturing strategy and the geometric design of printed glass masonry units are not independent from each other, they were considered and iterated upon in parallel; the manufacturing strategies are therefore listed below for context and will be discussed in further detail after the designs. The final results of these three methods are shown in Fig. 4 and are described as follows:
- Fully Hollow (FH): Print a hollow object with no glass interlocking feature on a ceramic build plate. A separately manufactured part provides an interlocking or locating feature between the units above and below, but is not produced in this paper.
- Print-Cast (PC): Position a FH masonry unit onto a graphite mold with negative features for the interlocking component. Ladle molten glass into both the printed body and graphite to create an interlocking unit.
- Fully Printed (FP): Print interlocking components into a graphite build plate with machined features and transition to printing the hollow body object above.
4.1 Masonry unit design
With these three approaches for manufacturing glass masonry units in mind, we shifted our focus to the design of a standard masonry unit using G3DP3’s functional requirements and dimensional specifications. We considered designs that could be printed by each manufacturing method and reasonably implemented into a build’s construction. We also considered the size of each unit to allow for mechanical testing at available facilities.
4.1.1 Functional requirements
To define the functional requirements for our glass masonry unit, we considered existing glass masonry and mitigated potential failure modes. Requirements for our initial printed masonry design were as follows:
- Interlocking elements with a free rotation constraint to enable for multiple assembly configurations.
- Interlocking elements that could be cast or printed.
- Maximum surface area for load transfer in hollow body walls to reduce stress.
- Minimal unsupported body wall surface area to reduce bending and tensile stresses.
- Toolpaths for the exterior walls and interior filled areas must conform to G3DP3’s process constraints (Table 1).
4.1.2 Dimensional specifications
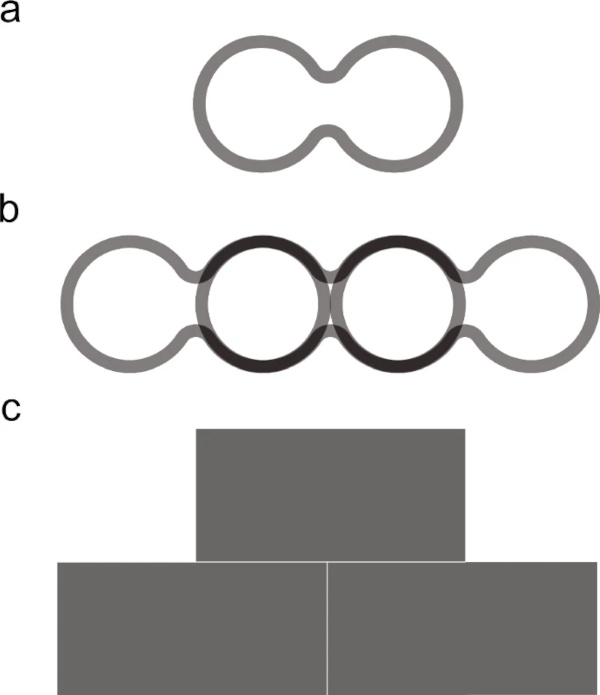
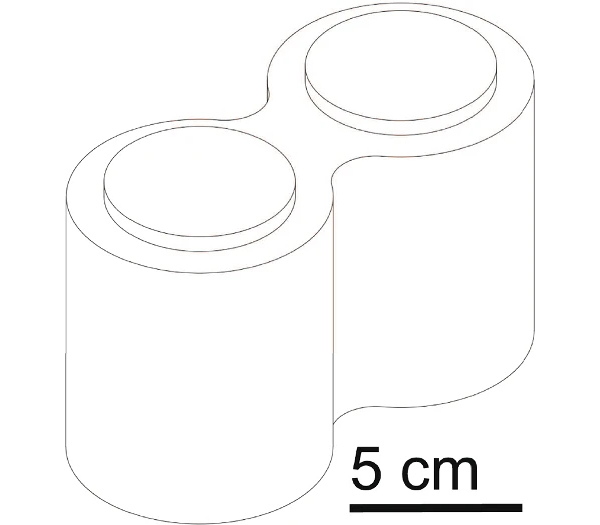
We used these functional requirements to assess existing designs by other researchers. The TU Delft Block Type E, referred here as the Figure Eight Design, was selected as the reference for our masonry units’ design (Oikonomopoulou et al. 2018a). The Figure Eight design has two hemispheres, one at either ends of a unit connected by solid cast glass, resembling the Arabic number eight. This design satisfied several requirements but was altered for compatibility with G3DP3 shape requirements (Table 1) and the need to operate with continuous extrusion. G3DP3 is not currently able to start and stop flow in the middle of printing an object. Our new design consists of two cylindrical nodes joined by continuous arcs, as shown in Fig. 4. To better interface with the hollow internal diameters of the nodes, interlocking features are also cylinders. The distance between each arc was kept to a minimum because of its direct relationship with the total amount of unsupported surface area in a Spanning Configuration. The supported areas where the faying surface is in contact with another surface above or below in a Spanning Configuration are visually represented in Fig. 5 as the darkest shade. The lower bound of the distance between each arc is thus constrained by the minimum radius requirements of the G3DP3.
Buckling behavior in the printed walls of each unit was checked to leverage the high compressive strength of glass. 200 MPa was assumed as compressive yield strength and 69.5 GPa was assumed to be the Young’s Modulus for our glass formulation, Spruce Pine PYW. The manufacturer of this glass batch does not provide mechanical properties, therefore the mean of experimental values from previous studies using similar material was used instead (Inamura et al. 2018a). These printed shapes most closely resemble a shell structure but, to conservatively estimate their buckling behavior and allow our analysis to be more geometrically agnostic, we modeled them as a column with a height (L) and thickness (h) equal to that of a single masonry unit’s wall and a length (b) equal to the approximate perimeter length of a single printed layer (Fig. 6).
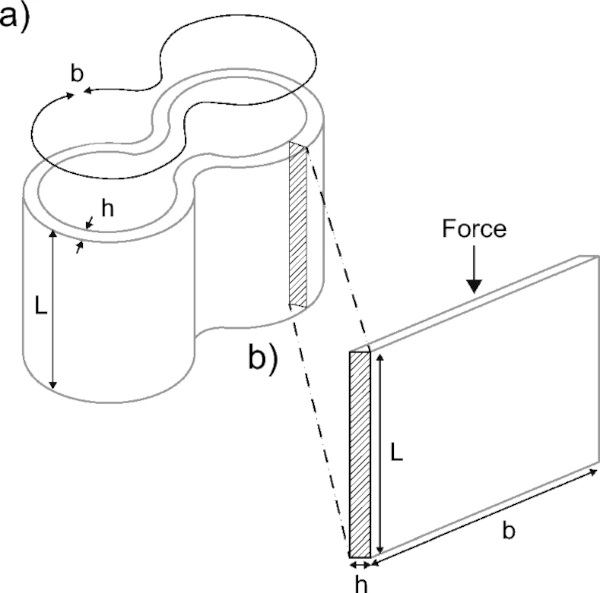
This assumption reduced the time for analysis and allowed for quick iterations of height during the design process. Modeling the buckling behavior as a column was assumed to yield more conservative results than a more accurate shell analysis. Shell structures gain additional strength from their non-planar geometry, and simplification to a planar column removes this geometry and additional supports, underestimating their strength. Conservative estimates were because the model assumes isotropic properties, despite previous research showing anisotropic behavior which may reduce buckling strength (Klein et al. 2015). We utilized Euler’s column buckling theory (Timoshenko and Gere 2009) to model an individual unit (Fig. 5):
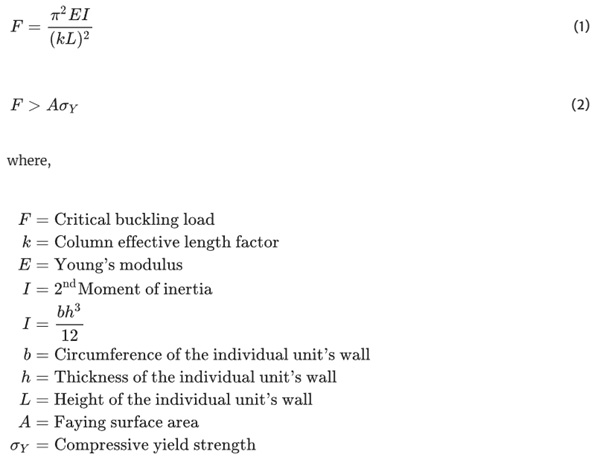
k was set equal to one to model the free rotation allowed at the top and bottom faying surfaces during experimental testing. The values used for calculation and results were as follows:
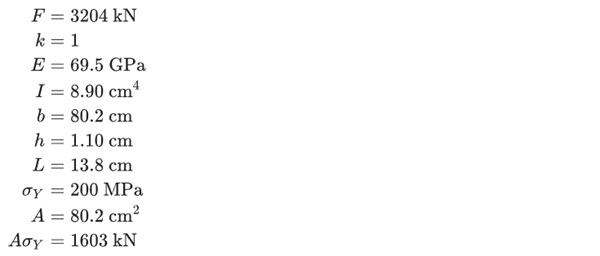
The risk of buckling behavior was eliminated by designing the allowable load (F) to be greater than the compressive yield strength times the area (Eq. 2). At the full height of G3DP3’s capability (38 cm) the buckling failure force was calculated to be far less than the compressive yield load. The critical buckling force at final unit height (13.8 cm) is greater than the compressive yield force because the buckling force is inversely proportional to the square of the height (L). Based on this information, units were printed at the full height capacity of G3DP3 and later cut in half for FH and PC masonry units, to maximize efficiency of printing time and annealing oven capacity. With the height determined, the final design of the baseline masonry unit was parametrically designed in Rhino and Grasshopper (Fig. 7).
4.2 Manufacturing process
Following the determination of generalized unit design and manufacturing methodologies, it was necessary to finalize a detailed process plan for each method and produce individual units for testing and evaluation. All units were printed with Spruce Pine PWV glass batch. Each of the three manufacturing methods is detailed in the following sections.
4.2.1 Fully hollow unit
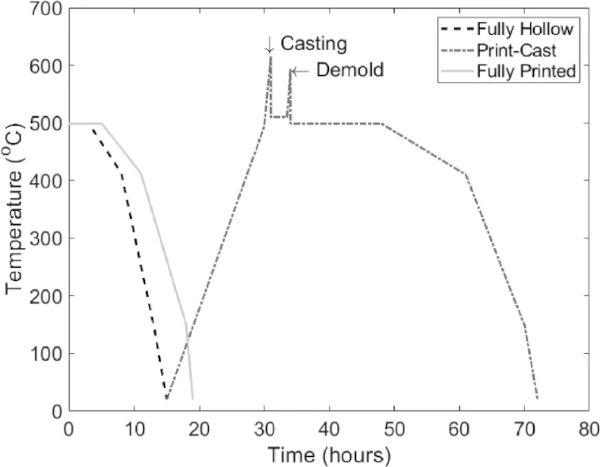
Printing the FH masonry unit design required few changes to G3DP3’s standard operating procedure. Prototype designs were printed on a ceramic build plate and assessed for thermal stability, and 14 cm outside diameter nodes were large enough to avoid instability or slumping caused by overheating in the enclosed interior of the unit. FH units were printed at double the nominal height, and later post-processed to yield two units per print. Each of the FH units underwent a standard annealing process to cool and release internal stresses, as seen in the program temperature profile in Fig. 8.
After annealing, double-height units were machined as follows:
- Saw off the top layer and the bottom three layers using a diamond bandsaw to remove remnants of lead-in and lead-out, the points where the print begins and ends. Saw double-height unit in half with +0.5 mm from final height dimension.
- Blanchard grind both sides of the unit to the final height, utilizing a sintered 325 grinding edge.
- Chamfer all outside edges with water fed upright belt sander and 220 grit silicon carbide belt.
- Chamfer all interior edges with pneumatic handheld belt sander and 220 grit silicon carbide belt.
- Lap with water fed lap wheel and 325 grit resin diamond smoothing pre-polish pad to remove blanchard texture.
- Lap with water fed lap wheel and 600 grit resin diamond smoothing pre-polish pad to remove 325 grit texture.
- Polish with a Cer-Optik Cerium Oxide.
Sawing units was performed to meet repeatable height requirements and to remove uneven surfaces from the lead-in and lead-out. Grinding was performed to achieve fine height tolerance. Polishing and beveling edges were performed to minimize stress concentrations related to surface roughness as a result of sawing and grinding.
4.2.2 Print-cast unit
Initial prototyping of the PC manufacturing process, print then separately cast, demonstrated a series of challenges. For the mold material, graphite was chosen for its ease of machining, relatively low cost, resistance to thermal shock, and fine surface finish (Kim et al. 2020). Graphite’s low coefficient of friction allows for easy demolding and creates a fine surface finish in glass. However, graphite oxidizes when in an oxygen environment and held at temperatures above 500 oC (Fekri et al. 2023). Thermal shock from casting into a printed object was mitigated by pre-heating the printed masonry unit and the graphite mold it is seated on top of, but this resulted in oxidation of the graphite.
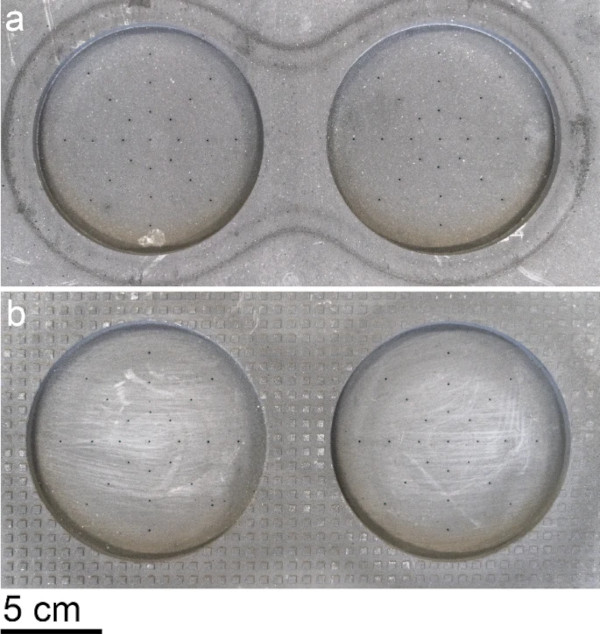
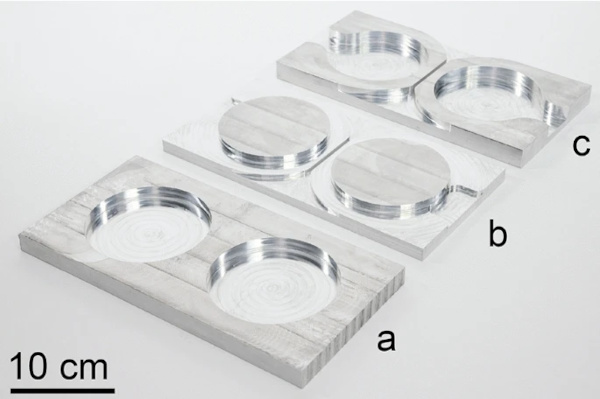
The casting and annealing kiln’s temperature programs for the PC manufacturing process are shown in Fig. 8. To mitigate the risk of thermal shock, the separately printed body was re-heated to the annealing point (500 oC) prior to casting. The annealing point is defined by Tooley (1984) as the temperature at which all internal stresses are relieved within 15 min, and it varies for different glass compositions. Graphite plates were used to mold the interlocking forms and were machined with shallow cylindrical pockets, similar to those shown in Fig. 9a. These plates were set in a glass casting kiln with a FH unit placed on top and aligned with the pockets for casting. After the kiln reached and was held at the annealing temperature, the kiln temperature was quickly spiked (heated) to 616 oC to prepare for casting.
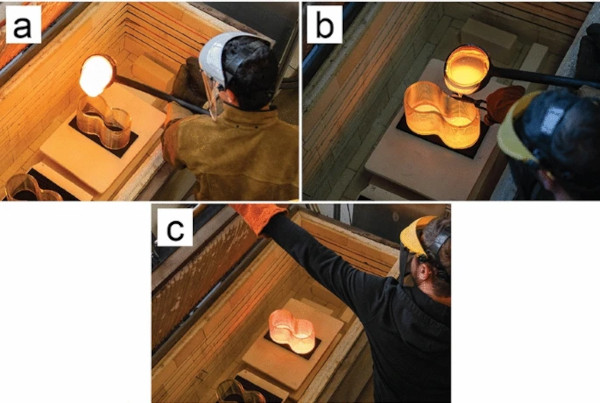
This jump in temperature created a higher temperature at the surface, which reduced the risk of thermal shock as molten glass for the bottom and interlocking features was ladled. Simultaneously, with a short heating period, the interior material of the walls remained below the softening point to promote stability. Increasing the temperature too much puts the part at risk of deforming. At 616 oC, graphite oxidation began to degrade the mold. If the part was cast into while too cold, there was a high risk of fracture from thermal shock, which did cause fracture in 3 specimens. Maintaining the temperature of the printed part between these two temperatures, softening and annealing, was paramount to maintaining dimensional accuracy and avoiding thermal shock. Once at the right temperature, molten glass was ladled into the printed body and the kiln door closed as shown in Fig. 10.
Parts were held at the annealing temperature for 2.5 h to allow for the cast part to cool and to reduce the internal stresses. During casting, the surfaces in contact with graphite exceeded the temperature required for oxidation to begin. This led to significant degradation of the mold during each use. After holding the unit at the annealing temperature to reduce internal thermal gradients, the kiln was heated again to 616 oC to quickly heat the exterior surface of the masonry and allow for the removal from the graphite mold. The unit was removed from the graphite mold to avoid cracking from the mismatched coefficients of thermal expansion between graphite and glass materials. Heating the outside layer reduced the risk of thermal shock during the physical handling required for demolding. The PC units were then brought through an extended annealing cycle to resolve additional thermal stresses created by the casting process. The relaxation of internal stresses in all intact units was checked with a cross-polarization method and indicated that stress was relaxed by the cycle shown in Fig. 8.
4.2.3 Fully printed unit
Printing all of the components of the masonry unit with interlocking features in the proposed design and dimensions required changes to the existing standard operating procedure of G3DP3. The 90o feature between the interlocking peg and sidewall was not within the overhang angle operating limits of G3DP3 per Table 1. Creating print support material was not easily implementable for G3DP3. Instead, a custom graphite build plate was designed, fabricated, and printed into (Fig. 9a). Unlike the PC process, in the FP process, the graphite build plate experienced minimal degradation. The print chamber of G3DP3 was kept at 490 oC, meaning oxidation only occurred during contact between molten glass and graphite. The first layer remained at elevated temperatures for a limited amount of time compared to the PC process, meaning oxidation was minimal during the printing process. While printing for this project, the minor oxidation degradation of the molds was too small to observe visually. Although the graphite was easy to machine and experienced minimal oxidation during printing, the fine surface finish of graphite presented other challenges in the printing process.
Previously, only ceramic build plates with a kiln wash were utilized in G3DP3. Without the high surface adhesion on ceramic build plates, printed glass slides along the surface of graphite at much lower lateral loads. As the glass slid, the lateral forces from the build plate’s movement caused local deformation and necking, leading to the part dislodging from the build plate. To avoid dislodging a masonry unit over the course of a print, a grid texture was machined into the graphite build plate for the first layer to slump into (Fig. 9b). The chosen geometry was a tessellated 1 mm x 1 mm square grid feature with 1 mm depth machined along the entire surface of the plate (Fig. 9b) to create localized patterns. The resulting geometry required a much higher lateral force to dislodge the part. This pattern eliminated localized deformation in the first layer of the print, but these millimeter scale features likely created much larger stress concentrations than the polished finish of the FH and PC units’ ground faying surfaces.
A compounding issue with the grid pattern was that the mill utilized for machining the tessellated pattern was not sufficiently trued. The mill induced a drift in the vertical dimension with respect to lateral travel and imposed a slight angular error in the bottom plane of the masonry unit with respect to G3DP3’s printing plane. These two discrepancies from the other two methods of manufacture were predicted to decrease the strength of the units during mechanical testing but the graphite plate could not be re-machined before printing.
Interlocking elements were printed by depositing glass side-by-side and with a two-layer thickness to avoid voids along the full depth of an interlocking element. We developed a tool path to fill this area horizontally to print the unit’s interlocking features. The final tool path leveraged previous work on joining neighboring beads (Lizardo 2017), but differed in its ability to fill large areas (14 cm diameter). Following printing in G3DP3, the faying surfaces of the FP units were sawed, chamfered, and polished according to Sect. 4.2.1.
5 Characterization
The strengths and weaknesses of each proposed method of manufacture were quantified with the following characterization methods:
- Geometric Analysis
- Surface Roughness
- Mechanical Testing
5.1 Geometric analysis
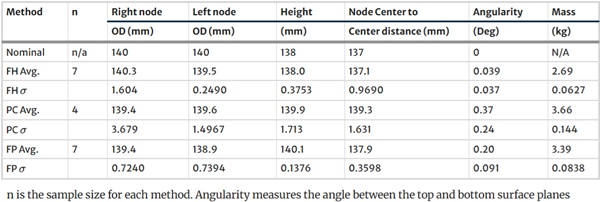
The accuracy and precision of each method’s geometry and mass were characterized to understand G3DP3’s performance and how these features affected mechanical strength. Each masonry unit’s mass was measured after the final machining processes. Geometry and dimensions were measured using a FARO Quantum Max Scan Arm Coordinate Measuring Machine (CMM) to characterize angularity between the top and bottom planes. Too much angularity would risk a high shear stress in the body of the unit, which could cause early failure especially when experienced between layers. The diameters of each node, their height, and the distance between the centers of each node were also measured and compared to nominally designed values using the CMM. This information was gathered and compared to subsequent testing to isolate variables that may have led to strengths below modeled expectations.
5.2 Surface roughness
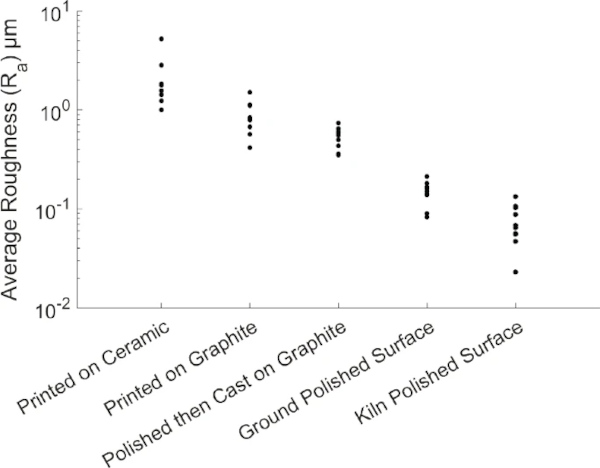
Surface roughness is known to have a large effect on the strength of glass materials, as it leads to stress concentrations (Persson 2023). To mitigate the effect of surface roughness on the strength of the masonry units, accessible faying surfaces were polished and their edges were filleted. PC and FP bottom faying surfaces could not be ground after casting/printing and were left with the as-printed surface. A Bruker-XT Profilometer was used to measure and record the surface profile of representative samples for each of the manufacturing methods. Per ISO 21,920, in the absence of a specification or tolerance, evaluation settings should be set by estimating the parameter of interest, in this case, the average roughness (Ra). After an initial reading, the profilometer settings were adjusted for an Ra between 0.06 and 1.2 μm. Five traces of two representative specimens were measured to understand how different areas of the same sample may vary. Size limits to the profilometer meant masonry units could not be directly sampled, but smaller representative samples were prepared identically to each unit’s faying surfaces and measured instead.
The 1 mm depth grid texture (Fig. 9b) in the FP bottom faying surface was excluded from that representative sample to study the potential surface roughness without the machined pattern. The representative samples were used as a proxy for the following surfaces:
- Printed on Ceramic: FH units before grinding
- Printed on Graphite: FP unit’s bottom surface without 1 mm scale depressions
- Polished then Cast on Graphite: PC unit’s bottom surface
- Ground Polished Surface: Both FH unit’s surfaces; FP unit’s top surface
- Kiln Polished Surface: PC unit’s top surface
In accordance with ISO 21,920 and the initial profile measurement readings, 4 mm long traces were performed for each sample. Traces were performed and processed in accordance with ISO 21,920 to gather Average Roughness (Ra), Mean Peak Width (Rsm), and the Maximum Peak Height (Rzi). To estimate the stress concentration factor (Kt) for each surface profile, the following analytical solution proposed by Gao (1991) and further supported by Medina (2015) and Cheng et al. (2017) was utilized:

where,

Further, the maximum Kt can be found at the lowest valley which simplifies to,

To connect this analysis with roughness readings it was assumed,

Estimated stress concentrations from the surface roughness of each representative surface were calculated using this information. As a reference, float glass average roughness readings using an atomic force microscope have been reported as ranging between 0.27−2.14 nm depending on manufacturing technique specifics (Fernáídez-Posada and Barron 2019).
5.3 Mechanical testing
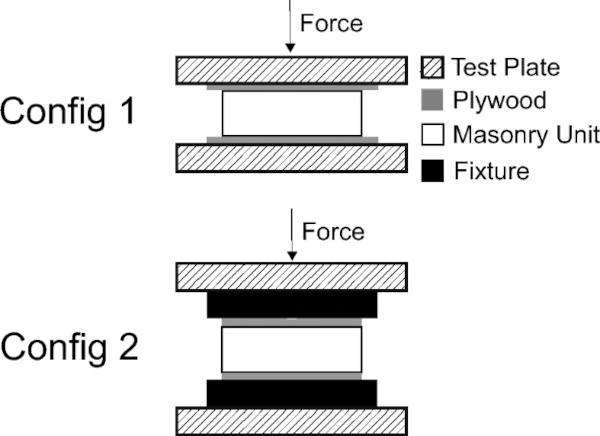
To experimentally validate strength, each method was tested on a Forney 2,669 kN Hydraulic Tester with a GCD-121–125 Linear Variable Differential Transformer (LVDT) and SP-12 String Pot. Specimens were tested at a target load rate of 4.45 kN/s and load control was performed manually using a dial to maintain the target load rate. Samples from each method were subjected to compressive testing in two configurations as shown in Fig. 11. FP and PC units were tested with the interlocking features on the bottom face of the setup.
Configuration 1, referred to as the Crush Configuration, was designed to measure the strength of an individual unit with the full circumference of the masonry unit walls loaded from above and supported from below. For PC and FP masonry units, 6061 aluminum fixtures were used to support only the walls and not the interlocking elements from below (Fig. 12a). Configuration 2 (Fig. 11), referred to as the Spanning Configuration, was designed to test and simulate the strength of a unit if in an assembly position, where two units would interlock from above (Fig. 12b) and two units interlock from below (Fig. 12c). The Spanning Configuration tests the performance of a unit amongst an assembly, rather than a standalone unit.
For each of the tests, a 6 mm layer of Lauan plywood was placed between glass surfaces and the testing fixture or plate to minimize stress concentrations resulting from contact between the fixture (machined plates in Fig. 12) and the glass masonry unit. Plywood of this thickness was utilized to allow for direct comparison to previous studies using a similar material (Oikonomopoulou 2019; Inamura et al. 2018b).
All compression tests except one (noted below) were conducted from no load, through first fracture, and until catastrophic failure. Displacement was measured using both an LVDT and string pot, collected in parallel to the applied compressive loading. First fracture force and stress were determined by syncing video recordings to the maximum recorded failure force. One sample of a FH masonry unit was tested until two fractures initiated and the test stopped prior to catastrophic failure to retain an intact failed block for further analysis. This unit’s performance is not included in ultimate force results.
6 Results
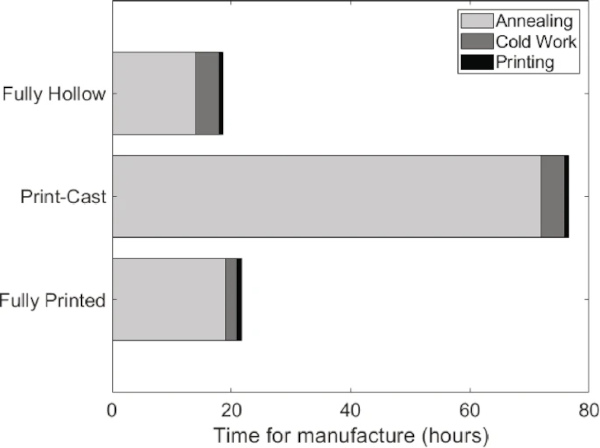
We produced seven FH and FP units with the processes described in Sect. 4.2. Six PC specimens were generated, but three of these sustained major fractures during the casting process as a result of thermal shock and only four were characterized and tested. Reference photos of each typology and method are shown in Fig. 4. All the units assembled together in a wall are shown in Fig. 2. Their time for manufacture can be found in Fig. 13. In this section, we will review the major results in each of the characterization tests described in Sect. 5.
6.1 Geometric analysis
Geometric and mass characterization results for each method can be found in Table 2. These data demonstrate that the FH method was most accurately manufactured when compared to nominal design dimensions. In most dimensions, PC had a much higher standard deviation. Cracks initiated in two PC units during the second annealing process, which may have been caused by the printed body being too cold during casting or too rapid of an annealing cycle. Additionally, one PC sample experienced large deformations after the casting, indicating the temperature was likely too high before, during, or after casting. These fractures and slumping behaviors indicate there is a narrow operating window for this method. Angularity between the top and bottom faying surfaces was an average of 0.039o in the FH units, benefitting from the grinding process. Angularity was almost an order of magnitude larger for both PC and FP, likely caused by slumping and deforming during the casting process in PC units. For FP units, the angle of the machined build plate surface relative to the G3DP3’s X-Y plane likely caused this angularity error. This is supported by the relatively low standard deviation of angularity in the FH and FP units compared to PC units.
Table 2 Print geometry and mass results - Full size table
6.2 Surface roughness
Average surface roughness values are shown in Fig. 14. The Printed on Graphite representative samples for printed on graphite surface finish did not include the 1 mm x 1 mm grid texture to isolate the surface roughness of printing on graphite from the effect of the machined texture. The surface roughness and stress concentrations from those features are expected to be much higher than the representative samples because the notch depth and radius are orders of magnitude larger. The polished surfaces that were in contact with the graphite mold during the PC casting process had a large change in average roughness from before to after casting. This is shown as the change in surface roughness from the Ground Polished Surface to the Polished then Cast on Graphite surface measurements in Fig. 14.
The estimated stress concentrations shown in Fig. 15 show similar trends to those in Fig. 14, with one exception. The Polished then Cast on Graphite surface representing the PC bottom surface has a higher estimated stress concentration factor than the Printed on Graphite surface representing the FP bottom surface. This can be attributed to a much smaller Rsm (the average wavelength of the periodic roughness profiles) of the Cast on Graphite surface data. These data are shown in the roughness profile charts in Fig. 16. Even with a similar amplitude, a smaller wavelength, per Eq. 4, led to a higher stress concentration factor in the Polished then Cast on Graphite surface when compared to the Printed on Graphite surface sample.
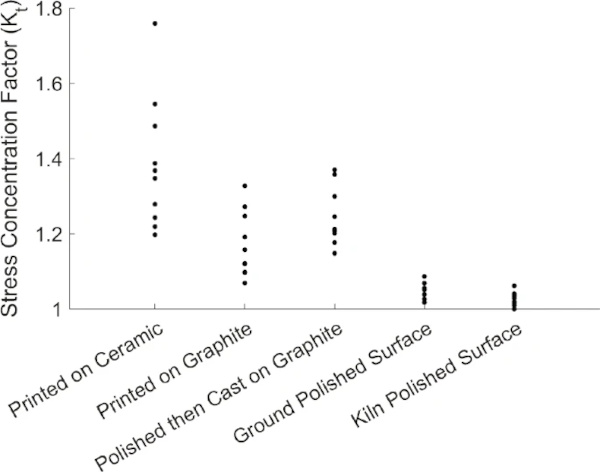
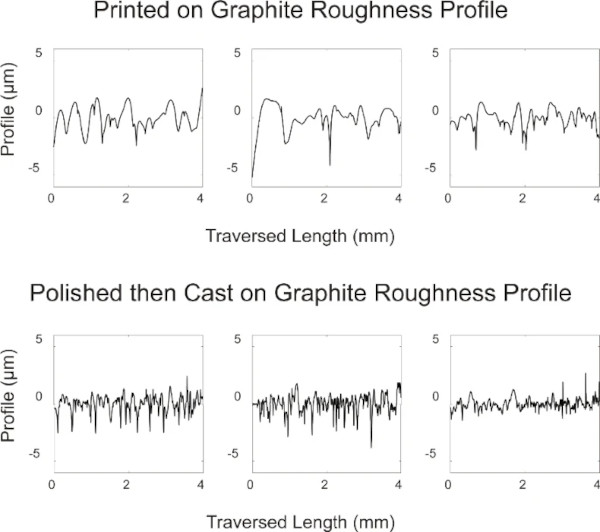
Table 3 Average mechanical testing applied load (kN) and stress (MPa) results in the Crush Configuration - Full size table
Table 4 Average mechanical testing applied load (kN) and stress (MPa) results in the Spanning Configuration - Full size table

6.3 Mechanical testing
Results from mechanical testing are shown in Tables 3 and 4. Experimental testing indicated that the FH method had the highest performance in ultimate and first fracture applied load. PC masonry units had the next highest performance, and FP masonry units produced the lowest values in these same categories. The Spanning Configuration did not greatly affect the ultimate load to failure in any of the methods’ testing. The progression of steps to ultimate failure was similar between units. Initial cracks propagated from one surface through the full height of the unit, from the bottom surface to the top, or vice versa. As loading continued, more cracks initiated and propagated. Eventually, the masonry unit would reach what appeared to be the material failure stress, and rapidly shatter at multiple locations. This failure occurred at the same time stamp as the peak load in testing and is represented as the ultimate force/stress in the tables. At the point of ultimate failure, the surface area where the load was applied was typically smaller than the initial surface area because some broken sections of the unit were no longer supporting the load. The stresses represented by Tables 3 and 4 were calculated as follows:

With a smaller actual area at final failure than the idealized calculation, the applied stresses may have been higher than recorded in Table 3. Additionally, these stresses represent the applied values, and do not account for localized stresses at the failure points. Localized stress was expected to be higher, and was likely the cause of fracture initiation. The applied stress values were included to allow for comparison to similar testing performed by Oikonomopoulou (2019) on solid cast glass masonry and by Inamura et al. (2018b) on FH printed glass objects with different surface areas.
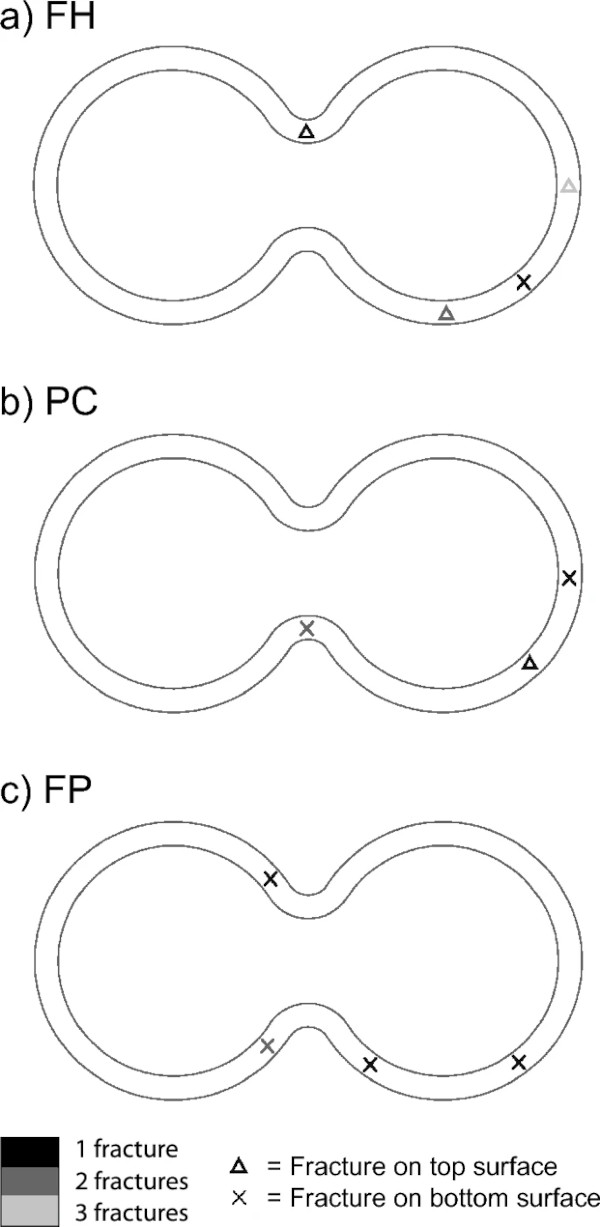
The data and tests also showed different crack initiation and propagation behavior between each fabrication method (Fig. 17). The force required to initiate a fracture in PC and FP was significantly lower than FH’s results. During testing, most of the FH units’ fractures propagated from the top surface, while in PC units, fractures mostly occurred at the bottom surface. In FP units, initial fracture always occurred at the bottom surface. During crack propagation, it was observed that a crack would propagate to a layer line, and then stop. At a higher load or energy point, the crack would later resume propagation. This indicated that a minimum energy threshold exists for crack propagation between vertical layers and that some level of anisotropy exists between deposition layers. In one PC mechanical test, a crack initiated at the cast to printed part interface and propagated horizontally through a layer line. This behavior was not observed in other units, but demonstrates a lower energy path for fracture may occur in between layers for certain loading parameters. High angularity in PC surfaces may have also induced shear loads, causing this horizontal fracture.
7 Discussion
In summary, three methods for producing glass masonry units using AM were developed. A masonry unit was designed and fabricated using each of these three methods of production. After testing each of their performances and evaluating all the results, it was observed that FH units yielded the highest load to failure, the shortest production time, and the most accurate and repeatable manufacturing process. The FP design demonstrated favorable outcomes in terms of production time and precision, but had a low first fracture strength. Its low mechanical failure strength could likely be attributed to rectifiable steps, such as the elimination of texture on the graphite build plate or of voids during side-by-side printing in the production process. Eliminating these defects should be the subject of further study. The PC process produced middling strength results, took far longer to produce, and had less accurate and precise geometries. The contributing factors to mechanical testing results, the producibility of each manufacturing method, circularity, and aesthetic considerations are discussed below.
For purposes of comparison, the load to first fracture will be used as the primary metric for assessing each method’s performance as opposed to the ultimate load to failure. Tables 3 and 4 show each method’s load to first fracture in the Crush and Spanning Configurations. FH units performed most favorably in the experimental characterization. FH units had the lowest stress concentration factor from surface roughness and lowest angularity between their faying surfaces. The large decrease in strength from FH to PC and FP units can be explained by a combination of phenomena observed during testing and the characterization testing performed. The much larger estimated stress concentration from surface finish and the surface angularity for PC and FP units likely contributed to a reduction in strength. Higher angularity may have contributed to eccentricity during loading and premature fracture. The machined build plate texture also likely increased the effective stress concentration factor to a much higher value than those reported in Table 2, further reducing the load to failure of the FP units.
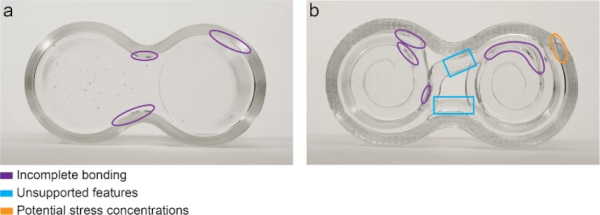
During mechanical testing, the difference in magnitude between the three methods’ first fracture strengths was far larger than expected. In addition to measured properties, the most clear difference between FH and the other units is that FH units did not have a glass interlocking element, and thus had no joint or connection from this element to the unit’s vertical wall. The overwhelming number of initial fractures during testing occurred at the bottom surface for both PC and FP units, as shown in Fig. 17, as opposed to the mixture of top and bottom surfaces for FH units. This suggests that fractures occurred at the bottom surface because of either an interaction with the surface, or localized stress concentrations and bending caused the ultimate tensile strength to be exceeded. Given the loading configurations, the interface between the interlocking features and sidewall likely affected the flow of stress, causing a concentration that contributed to failure. Features related to the manufacturing process also may have caused premature fractures in PC and FP units. These can be seen in Fig. 18, where poor connections and supported regions are highlighted. These regions may have been the cause of premature fracture, by inducing bending and allowing the localized ultimate tensile strength to be exceeded.
Other unexpected fracture behavior was observed. During testing, cracks paused between layer lines as the load increased. This crack propagation behavior may also indicate some level of anisotropy in the printed layers, and motivates a recommendation for more investigation for future work. Previous research has touched on this phenomenon in printed glass, but not with consistent enough samples or large enough sample sizes for conclusive results (Klein et al. 2015; Inamura et al. 2018a, b). Future studies investigating anisotropy would allow for a better understanding of this phenomenon. The jump in the energy required for fractures to propagate poses an interesting advantage in printed glass compared to cast or float glass. If cracks pause under constant loading at a specific layer, this may allow inspectors or a passerby to notice fracture prior to catastrophic failure. This behavior may be more similar to laminated float glass fracture and open an opportunity to incorporate early failure warnings and to design safe failure modes in AM glass.
Compared to previous studies in cast glass masonry and printed glass units, failure stresses in Tables 3 and 4 were lower. Oikonomopoulou (2019) units experienced first fracture at 135 MPa, while Inamura et al. (2018a) reported an ultimate strength of 147 MPa. Our results for FH Units show equivalent stress failure of 38 MPa at initial fracture and 96 MPa at ultimate failure. In the Spanning Configuration, however, the fracture strengths were 50 MPa at initial failure and 118 MPa at ultimate failure. These previous studies may have found different results for a multitude of reasons. Neither of these other studies records surface roughness nor angularity, so the relative differences between their samples and our’s, and these qualities’ effect on strength, cannot be compared. Differences in glass formulation could also have contributed to lower component strengths. The difference in geometry and stiffness between these three studies also may have significantly contributed to the relative strength of each. Oikonomopoulou et al. studied rectangular, fully-solid bricks, while Inamura et al.’s study tested hollow shapes with many different geometries. It is unclear what the ultimate cause of these differences in strength might have been, particularly in comparison to Inamura et al.’s results, which employed G3DP2 Inamura et al. (2018b). Further studies to isolate the cause of this reduction in strength are required for a more complete understanding.
In addition to mechanical strength, producibility was considered in our analysis. The FH manufacturing process is the most mature production method, utilizing established tool paths and post-machining practices for G3DP3 products. This is reflected in its low production time and favorable accuracy and precision. However, its implementation to a structure would rely on separate components to provide interlocking features and this additional production time is not accounted for in this study. Depending on this additional manufacturing time, FP could prove to be a faster production method, especially if the FP toolpath was optimized for time. The FP manufacturing method produced more precise and accurate units than the PC method in far less time by relying on only printing rather than a two-step process of printing and casting.
The PC method yielded poor accuracy due to slumping, and fractures due to thermal shock. The PC method’s additional risk and annealing time caused by the two-step process made it an unpromising production method for now. Despite this, analysis of the bottom surface in PC showed that it was not necessary to polish its surface to such a fine finish prior to casting. The high heat of the casting process caused a reaction with the graphite that may have caused local oxidation. The faying surface temperature appears to have exceeded the softening point of the glass, causing the oxidizing graphite to deteriorate the bottom surface of the masonry unit. In the future, a stainless steel mold with a releasing agent could be used to reduce the impact of oxidation on surface finish and allow for the production of a large number of units. Additionally, we considered but did not test a Cast-Print method, where the walls of a unit are directly printed on top of a previously cast glass interlocking feature. This order of construction could reduce oxidation, reduce the risk of fracture from internal stresses, and improve throughput, but posed a high risk of damage to the machine if the nozzle impacted the cast part.
Reducing the number of polishing steps in the PC process could decrease production time. Cold working was a small time contribution compared to annealing twice, as seen in Fig. 13, but required more manual intervention. Redesigning the PC method to include only one annealing cycle would greatly improve production time for that process.
The potential of circularity and visual appearance is also important if any of these units are to be utilized in construction practices. The separate interlocking components required to assemble FH units add time and untested variables to performance. From a circularity standpoint, the all-glass PC and FH masonry units have fewer components to separate and sort in a hypothetical deconstruction and recycling process. Additionally, mismatched coefficients of thermal expansion between the FH glass elements and their rigid interlocking components could cause fracture. Historically, the choice of a monomaterial glass masonry unit for building design and construction has been driven by aesthetic reason (Oikonomopoulou et al. 2018c). This preference is least present in the FH units, where a separate interlocking component may interrupt the visual coherence.
In conclusion, the FH unit’s performance shows the clearest path to immediate implementation in construction. However, with more development, the FP process could be a longer term, circular solution for an all glass building element.
8 Future work
Glass AM shows promise as a building production method in the construction industry. Future work would include improving upon the tested methods used in this paper, development of accurate Finite Element Analysis, further mechanical testing, the development of interlayers for a building system, demonstrating more varied geometries, and using other glass materials for production.
If the FH manufacturing method were chosen as a production strategy, the development of separate interlocking elements would be required. Using the FP method would require additional work to design and manufacture a masonry unit that can withstand similar loads to existing glass masonry products. This could involve a combination of altering the masonry unit shape and further development of toolpaths to mitigate stress concentrations in the bottom surface. Additionally, development of a printing methodology on graphite that avoids the grid texture on the build plate surface could allow for much higher load capacity. Glasses with a higher coefficient of thermal conductivity or higher melting temperature could also be utilized, allowing the glass to cool more quickly and avoiding the risk of localized deformation, slipping, necking, or elongation in the printed bead. The Cast-Print method could also be further investigated as an alternative to the PC method. Casting prior to printing would remove the risk of slumping the printed part which may yield more accurate results. Instead of casting the interlocking geometry, waterjet float glass could alternatively be fused and used in place of the cast part.
Developing an accurate FEA methodology for estimating the strength of a designed form would decrease the need, and associated cost, for experimental proof testing. FEA requires accurate modeling of unit geometry, which is difficult with FP units where the interlocking elements contain voids as shown in Fig. 18. More accurate mapping of the printed geometry is required.
Additional mechanical testing would better characterize the failure behavior and reduction in strength observed in PC and FP units. Crack propagation behavior during testing indicated anisotropy in the printed body between layers. It is recommended that a future study investigates this behavior with a large sample size of similar size bars, tested in different layer orientations using a four-point bending fixture to better understand this phenomenon. Future testing should also only test to initial fracture so samples can be retained for fractography analysis. This might allow for a better understanding of what caused initial fracture in this paper’s results.
For all of these masonry units to be utilized as a circular material requires the development of additional components of a sustainable building system. One aspect of this future system is a reclaimable interlayer system which eliminates glass-to-glass contact between masonry units as identified by Oikonomopoulou et al. (2018a) and further researched by Dimas et al. (2022). Current adhesives or mortar utilized in construction would not allow for glass to be easily deconstructed, recycled, or reused (Oikonomopoulou and Bristogianni 2022). Work in developing demountable interlayers could allow for implementation into a circular building system.
In addition to an interlayer system, the development of printed designs that are not identical and use the vertical space between faying surfaces for varied surface treatments or forms would leverage G3DP3’s ability to print highly varied objects without the cost of mold materials. Integrating these into a facade or compressive vault structure could leverage the high compressive strength of glass and build glass masonry structures at an unproven scale, but not cause outsized concerns in sustainability or waste production for varied forms. Printing larger forms such as beams and columns could also open new opportunities outside of masonry units.
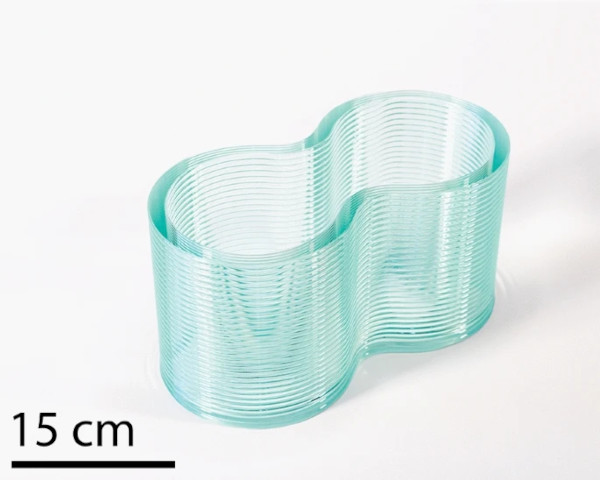
Printing with post-consumer recycled glass products would open the door to upcycling waste that might otherwise go to landfill or be downcycled. An example FH masonry unit printed in recycled float glass is shown in Fig. 19. Printing with these different glass materials could also open the opportunity to use the high silica (SiO2) content in lunar regolith as a feedstock for the construction of habitation modules on the Moon’s surface.
Many paths are possible, but results from this research prove that future work in producing construction components with glass AM is viable, and could be implemented with additional development.
Data availability
The data from this study are available from the authors upon reasonable request.








Comments
The study highlights the significant potential of glass additive manufacturing (AM) to revolutionize structural applications in the construction industry. Pool Company Raleigh NC