Source: Glass Structures & Engineering
Abstract
In structural glass design, an often-applied connection is a bolted connection subjected to in-plane tensile loads. Traditionally, the hole in the glass pane is manufactured by core drilling and conical edge finishing. An alternative method is by waterjet cutting the holes, resulting in cylindrically shaped holes. This research compares the edge strength of core drilled and waterjet cut holes. It focuses on in-plane tensile tests and consists of an experimental part in combination with a numerical part. In the in-plane tensile tests, peak stresses occur perpendicular to the load direction.
These stresses are found to be higher for waterjet cut holes (+ 13%) compared to core drilled holes. As a result, the characteristic ultimate load is lower for waterjet cut holes (− 16%). Furthermore, the influence of thermally toughening the glass is found to be more favourable for the characteristic ultimate load of specimens containing core drilled holes than it is for waterjet cut holes. Next to that, it was found that the ultimate load linearly increases with the panel thickness.
Eccentric loading, caused by insufficient bushing material or rotation of the bolt, only slightly decreases the ultimate load, provided that no hard contact between bolt and glass occurs. In addition, coaxial double ring tests were performed in the hole area, showing that waterjet cut holes result in larger stresses near the hole edge than core drilled holes. Furthermore, waterjet cut holes are found not to be perfectly round, while drilled holes are. This un-roundness negatively influences the ultimate load and the stresses in the glass; the larger the extent of un-roundness, the higher the stresses and the lower the ultimate load.
Also, the orientation of the un-round hole is of influence on the stresses and ultimate load for the tensile test. It is concluded that waterjet cut holes result in lower characteristic ultimate loads and higher stresses. Due to the different edge finishing, the ultimate load still is lower compared to core drilled holes, even if the waterjet cut holes are perfectly round.
Introduction
In structural engineering, the design of the details is of major importance for structural safety, comfort and aesthetics. For glass, this statement is supremely applicable. The development of structural details in glass connections is the main topic of this research.
A common type of a structural connection in glass is a through-bolted connection which is, for example, applied in so-called ‘spider glass’ details. Holes are typically drilled with a diamond core or a water-jet cutter. The former is a more traditional and also the most frequently applied method, using first a core drill, and a conical drill afterwards to finish the hole edges.
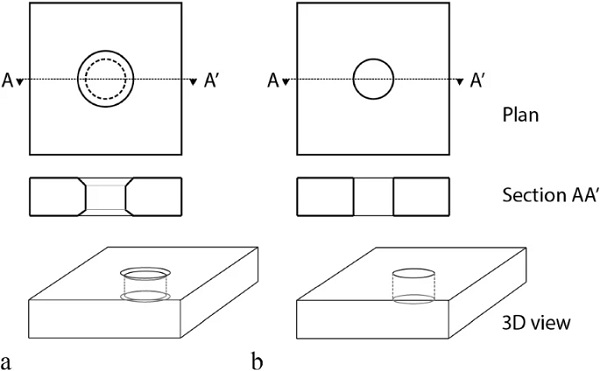
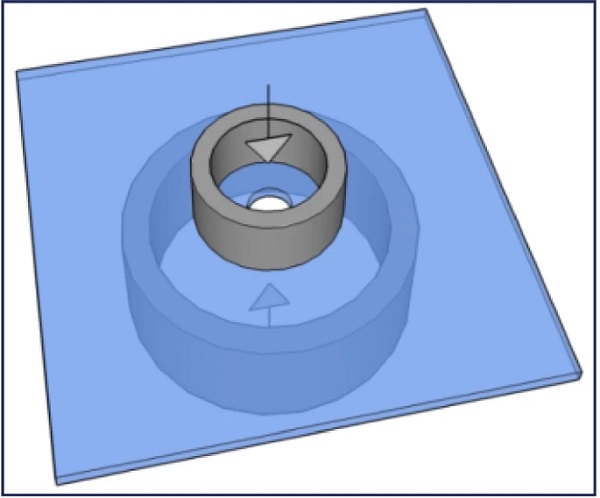
Current research on the latter method is relatively limited although this method has competitive advantages. It provides for a faster and more efficient production process, which will finally reduce the production costs. In Fig. 1, the difference in geometry is visualized. Since after waterjet cutting no conical finishing to reduce peak stresses at the edge is applied, the hole geometry is cylindrical. The current research, which is topic of this paper, focuses on the structural differences between holes produced by both methods.
In detail, research questions focus on the edge strength of waterjet cut holes in comparison to core drilled holes and on the influence of a number of parameters on the strength of the hole edge.
Literature
Bernard and Daudeville (2009) performed research on how an optimal strength for bolted connections can be obtained. This was done by determining stress states due to both thermal toughening and in-plane loading. As a result of this research, the hole geometry for which the thermal toughening process is most effective is determined. To be able to find the resistance in in-plane loading, experimental tests have been performed. They concluded that thermal toughening of the glass is the most effective way to achieve the highest resistance against in-plane loading.
Schneider (2004) did research on the glass strength in the hole area of annealed and thermally toughened glass. It focused on both core drilled and waterjet cut holes. In his research, he also compared glass specimens from different manufacturers. The bending strength in the hole area of the specimens was determined using a modified coaxial double ring test. The conclusion was drawn that the characteristic glass strength of thermally toughened glass in the hole area is not lower than in the infinite area. From these results, the assumption is made that crack healing plays an important role in the bending strength of thermally toughened float glass.
Finite element coaxial double ring calculations performed by Schneider (2004) have shown that the tensile stresses in glass panels have their maximum around the chamfers of holes. Results of the numerical research show that the surface compression stress near the chamfers of the holes is 10 to 15 percent higher than in the infinite area, but in the holes at half of the panel thickness, the surface stress is lower. Also, on the surfaces, close to the holes, in an area of about half the thickness of the pane, compressive stresses are slightly lower than in the infinite area of the pane.
Here, tangential membrane stresses at the edges of the holes use some of the surface stresses to get in equilibrium. Therefore, the glass strength for bending in the area of the holes should be approximately equal to the strength of the infinite plate. For in-plane loading with maximum stresses in the centre of the holes, the glass strength should be lower. An interesting outcome is that for waterjet cut holes after thermally toughening, the bending strength is in the same range as for drilled holes. Before, the waterjet cut holes showed the lowest values for the strength. Crack healing originating from the thermally toughening process might be the cause of this.
Research performed by ShivajiRao and Satyanarayana (2019) on abrasive water jet drilling of float glass, showed that abrasive water jet drilling is not recommended for drilling smaller diameter holes in float glass. The considered hole diameter is 5 mm. These small diameters are usually used for, among others, fixing handles for glass doors and sliding windows. During the water jetting process, a reduction in jet velocity occurs as drilling progresses. Due to this reason the jet is unable to machine the bottom end of the specimen as efficiently as the top end, which leads to variations in hole profile.
Method
Approach and parameters
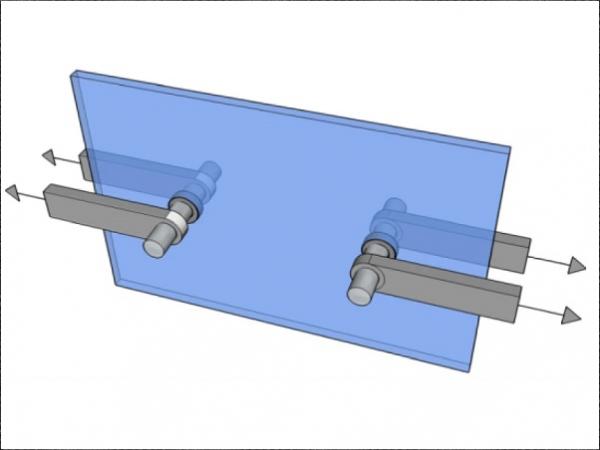
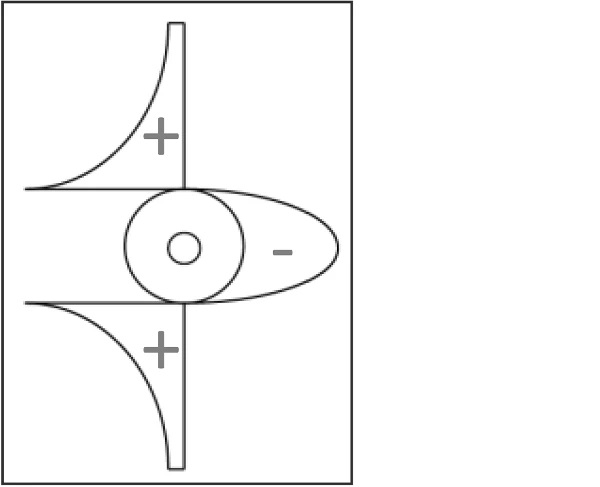
Since the main goal is to find the strength for the panels loaded by the self-weight of large façade panels, in-plane tensile tests have been performed (Fig. 2). A sketch of the load configuration is shown in Fig. 3. However, also a coaxial double ring test has been performed to account for the lateral load, i.e. wind load. The additional advantage of this test method is that the applied load causes a constant bending moment in the panel, and thus a constant stress state along the edge of the hole.
The coaxial double ring test is a standardized experiment prescribed in e.g. NEN 2608 (Glass in building—Requirements and determination method (2014)), to determine glass strength of panels without holes, and therefore is an often-performed experiment. A sketch of this experiment is shown in Fig. 4. The essential difference between both experiments is that using the coaxial double ring tests, average stresses on the surfaces can be determined. In contrast, using the tensile test, the local peak stress (illustrated in Fig. 2) can be determined.
Next to the two production methods and two experimental setups, several other parameters are important to consider in the comparison. To optimize the number of parameters, limit the number of combinations and maintain statistical significance, the following parameters are considered: panel thickness, hole diameter and pre-stress in the glass (annealed glass vs. thermally toughened glass).
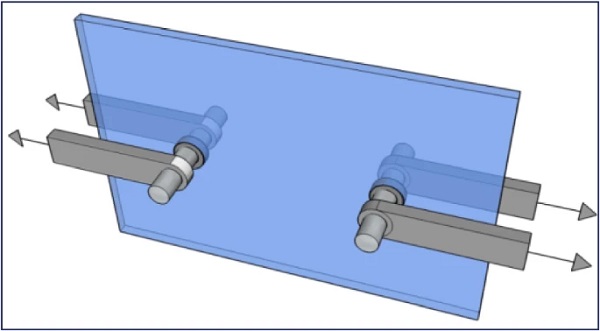
Eccentric loading due to insufficient bushing length and eccentric loading due to rotation of the bolt are also considered, to simulate practical situations, as illustrated in Fig. 5. An overview of the various test series is shown in Table 1. Twenty specimens are used per test series, which is relatively large but considered necessary to obtain statistically significant results.
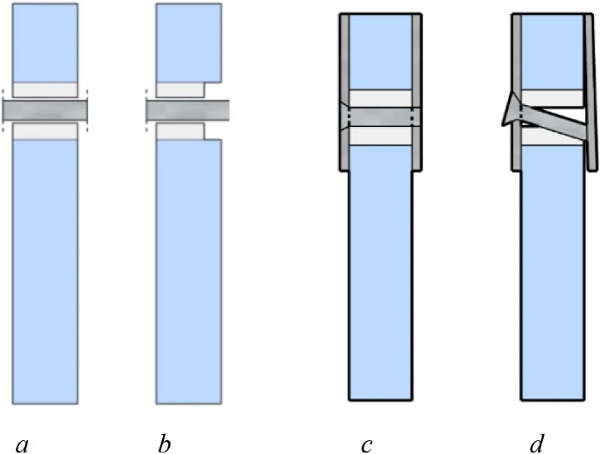
Table 1 Test series—overview
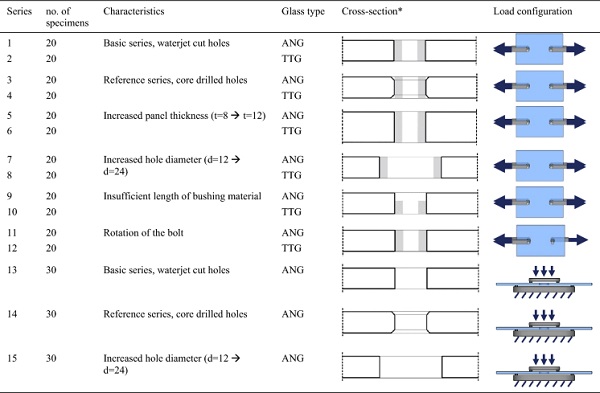
*Grey area = bushing
Materials
The applied dimensions of the specimens for in-plane loading are shown in Fig. 6. The lengths satisfy the minimum edge and end distances (emin=max{2.5t;2.0d}=48mmemin=max{2.5t;2.0d}=48mm) specified by Haldimann et al. (2008) and Maniatis (2006). To account for production imperfections, the dimensions are slightly larger compared to the minimum specified.
Since the edge distances in the specimens are chosen to be larger than the minimum described, the effect of the edges is excluded, and fracture occurs in 100% of the cases at the edge of the hole. The dimensions of the out-of-plane loaded specimens are given in Fig. 7, and the specimens contain only one centrally located hole. These specimens are subjected to a coaxial double ring test. The nominal hole diameter is 12 mm, except for series 7 and 15, where it is increased to 24 mm. The nominal glass thickness is 8 mm, except for series 5, where it is increased to 12 mm.
![Dimensions rectangular specimens [mm]](/sites/default/files/inline-images/Fig6_89.jpg)
![Dimensions square specimens [mm]](/sites/default/files/inline-images/Fig7_79.jpg)
The edges of the annealed glass specimens are seamed. The edges of the thermally toughened specimens are polished. The holes in the reference test series are manufactured in the traditional way (core). After using a hollow drill, a conical drill is used to chamfer the edges. Holes manufactured using a waterjet cutter are not further finished afterwards, in line with common practice. The edges of the waterjet cut holes seem to be less smooth in comparison with core drilled holes. The glass used is soda lime silica glass.
To perform an accurate research, the exact geometrical properties of each specimen are determined. For all measurements, checked and calibrated measuring equipment is used. The thickness of the glass panels is measured using a micrometre. The hole diameters are measured using an analogue bore gauge. The position of the holes is determined by measuring all lengths from a hole to the edge of the glass panel (perpendicular to the edge). This is done using a digital caliper.
The measurements of all three properties are taken to a rated 0.01 mm accuracy. The pre-stress in the specimens is measured using a SCALP-04 (Scattered Light Polariscope). SCALP uses scattered light to determine the stress distribution through the thickness. These measurements are considered necessary to detect possible differences between the several test series. These differences might influence the test results, and therefore these measurements can help in the discussion of the results.
The bushing prevents direct contact between the steel bolt and the glass. The used material for the bushings is PA6 (nylon 6/6). The dimensions of the bushing are determined based on the actual average dimensions of the holes in the glass, and not the nominal dimensions of the holes. This means that the bushing material fits, on average, best in the hole with minimal spacing, without introducing initial stresses in the glass. Based on the geometrical measurements of the hole diameters, the used outer diameters of the bushing are 11.7 and 23.7 mm for specimens with a nominal hole diameter of respectively 12 and 24 mm. The inner diameters are respectively 6 and 16 mm, corresponding to the bolt shaft diameters.
In-plane tensile tests
The mechanical test setup for the in-plane test is shown in Fig. 8.
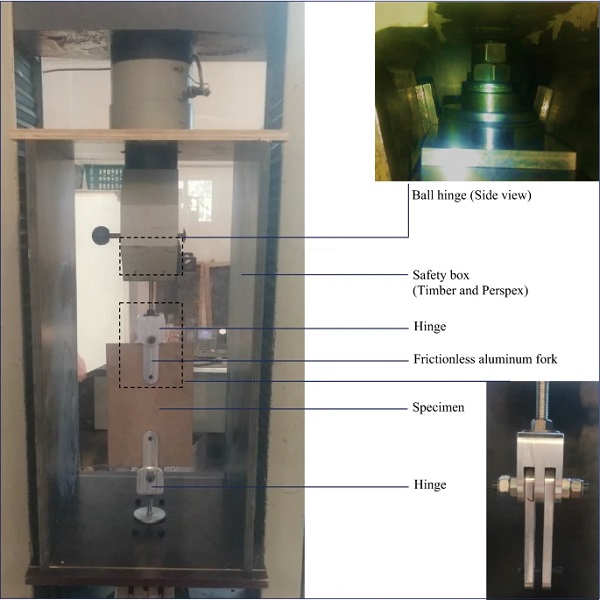
The used mechanical testing setup is a Schenck Trebel RM100. The applied load is recorded 1000 times per second. All connections between the setup and the specimen are hinges, preventing any initial eccentricity in the specimen. At the top and bottom, a ball hinge is used. Also, the aluminium fork can hinge with respect to the aluminium block and threaded rod. The distance between the two frictionless aluminium forks is slightly larger than the panel thickness, this ensures that the specimen moves frictionless, and at the same time that no bending in the bolt occurs.
Mocibob (2008) performed in-plane tensile and compressive tests on glass specimens. To measure the strain, the specimens were equipped with rosette strain gauges located at 0°, 45°, 90°, 135°, and 180° with respect to the load direction. This was done on both the front and back sides of the panel. Additionally, on both sides, one unidirectional strain gauge was applied in the infinite area. The choice for rosette strain gauges was made based on the compressive tests. Rosette gauges are usually used where complex stress field is predicted.
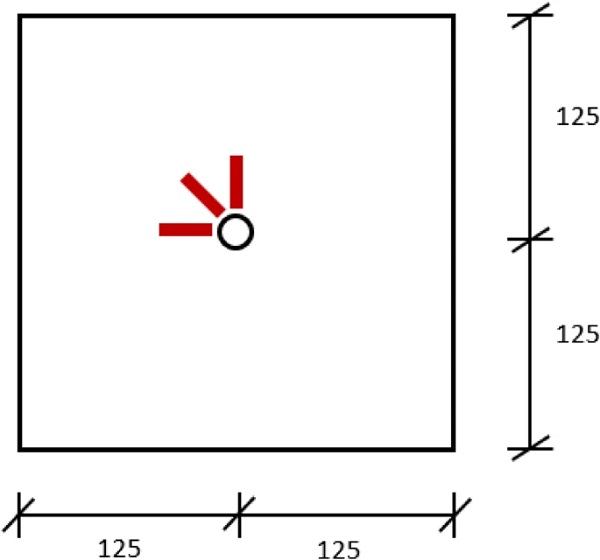
Based on this reasoning, the choice is made to apply unidirectional strain gauges on both sides of the hole (parallel to the load direction). The locations of the strain gauges are left and right of the hole and on both sides of the panel. They are positioned at 20 mm from the hole centre. In order to obtain the most accurate results, it is best to position the strain gauges as close to the hole as possible. However, regarding the applied test set-up, the smallest possible distance is 20 mm. This distance is kept constant for all specimens. Next to that, one strain gauge is placed in the middle of the panel (infinite area) on both sides of the panels, as shown in Fig. 9 by the red rectangles. The applied strain gauges have a gauge length of 6 mm.
![Location strain gauges a front side, b back side (all dimensions are in [mm])](/sites/default/files/inline-images/Fig9_49.jpg)
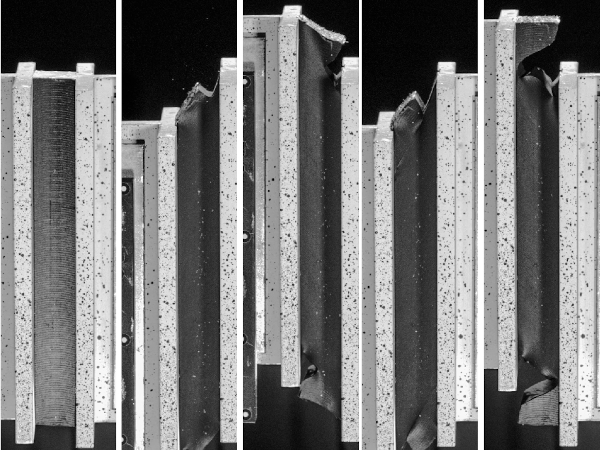
Using a high speed camera, the initial crack in the fracture pattern is determined. The view of the camera needs to be around the holes since the crack initiation is expected to be there. The area close to the hole is not visible because of the aluminium fork. Therefore, an adhesive foil is applied to the test specimens, which keeps the broken glass parts together. This can be used to show the full crack pattern and also to examine the cracks behind the aluminium forks (initial crack). Since the crack pattern develops very rapidly, the number of frames per second (fps) should be as high as possible. The highest possible value in combination with maximum resolution (512 × 512) is 5000 fps. These values are applied.
In four-point bending tests and coaxial double ring tests, the prescribed load rate is 2 ± 0.4 MPa/s by Haldimann et al. (2008). No codes or documents are found in which the load rate for in-plane tensile tests is described. Therefore, the choice is made to apply 2 ± 0.4 MPa/s. This means that for each specimen with different geometrical properties, a different load rate in [N/s] is found. This ensures a constant stress increase for each specimen type.
Co-axial double ring tests
In current European standards, there are two coaxial double ring test setups. The dimensions of the setup and corresponding specimens are shown in the first two rows of Table 2. Both setups are unsuitable for the current research. The first setup is not suitable for specimens containing holes because of the small diameter of the loading ring (18 mm).
The second setup is not suitable because of the large specimen sizes (1000 × 1000 mm). Haldimann (2006) came across this problem and used a more suitable setup. The choice of a loading ring diameter of 51 mm and a reaction ring diameter of 127 mm offers an ideal compromise: the surface area under tension is large enough to give meaningful results, while the required specimen size is at the same time small enough to enable the specimens to be inspected by microscopy, see the third row of Table 2.
Table 2 Comparison of coaxial double ring test geometries
The above-described dimensions of the setup are chosen based on previous experiences. Dalgliesh and Taylor (1990) used the same loading ring and reaction ring dimensions. Both tests were performed with direct steel-on-glass contact because this was found to give better results (less variance) by Dalgliesh and Taylor (1990). This principle is therefore also used in this research. The used material for the action and reaction ring is steel S235. The used specimen dimensions are 250 × 250 mm, based on coaxial double ring tests for specimens with holes.
The entire mechanical setup is shown in Fig. 10. The upper part of the setup consists of a load cell, to which the loading ring is connected as a hinge. This ensures that the load is applied equally distributed among the circle. The reaction ring is fixed to the bottom of the setup. The reaction plate contains a centre point on which the specimen can be aligned, ensuring that the hole is exactly in the middle of the ring. Again, for safety reasons, a safety box is constructed out of timber and Perspex.
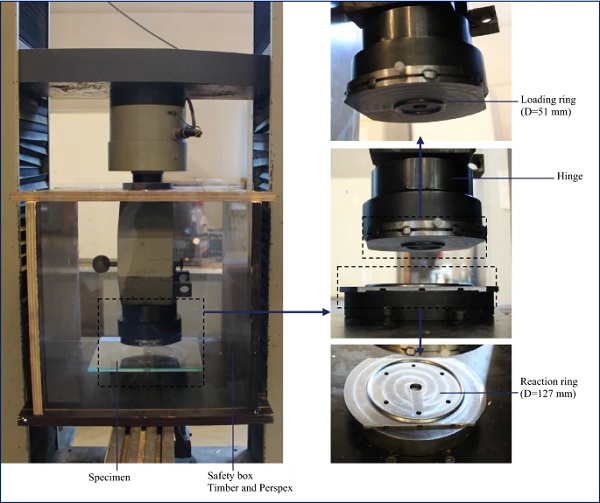
In coaxial double ring tests, the prescribed load rate is 2 ± 0.4 MPa/s (Haldimann 2006), this load rate is applied. The mechanical testing setup is similar as in the in-plane tensile test, and is described in 3.3.
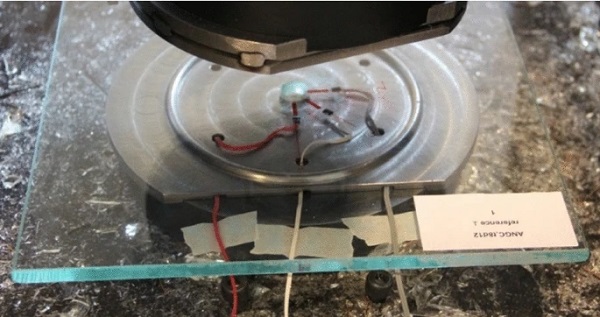
On the specimens subjected to the coaxial double ring test, also strain gauges are applied. Unidirectional strain gauges are applied to the specimens’ tension side (bottom side). Their position is at 0°, 45°, and 90° with respect to the vertical, see Figs. 11 and 12. Theoretically, for a perfectly round hole, the strains are equal for all three locations. However, since for waterjet cut holes, ‘elliptical’ holes exist, the difference in strain can be determined. For the specimens with elliptical-shaped holes, the strain gauges are positioned in such a way that one is located on the short side of the ellipse, one on the long side of the ellipse, and one in between. The direction of the maximum principal tensile stresses is radially from the hole centre towards the edges of the panel. The applied strain gauges have a gauge length of 6 mm.
Numerical study
For both experimental setups, also a numerical model is created in the finite element package Abaqus/CAE 6.13. The model for the in-plane tests consists of three parts: glass panel, bushing material, and a steel bolt, which all are solid and deformation is based on linear elastic material behaviour. The parts are assembled in such a way that geometries fit exactly (i.e. no initial spacing between the parts). Table 3 shows the properties of the parts.
Table 3 Part properties
Both interactions in the model, between bolt and bushing, and between bushing and glass, are surface-to-surface interactions caused by normal mechanical behaviour with hard contact. The master materials are the bolt and glass respectively, since the stiffer body should act as the master surface. The applied contact algorithm is the penalty contact method. Meshing is done on each part separately.
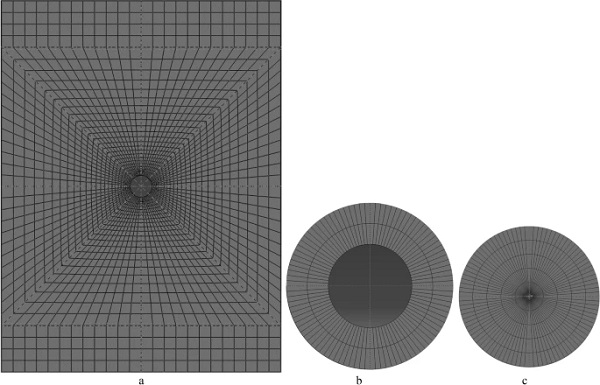
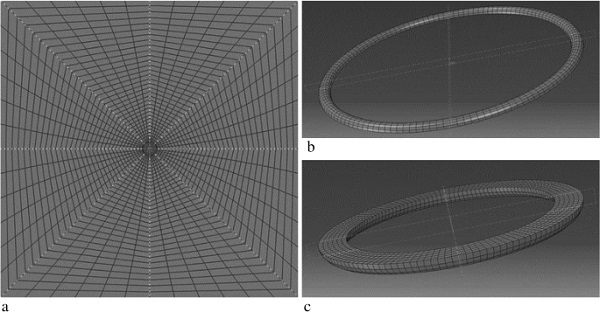
The mesh of a panel with a hole is radial under 45 degrees. Single-bias seeding is used towards the centre of the panel. In the circumferential direction around the hole, 96 elements are applied. Four elements are used over the depth of the panel. The aspect ratio of the glass elements is approximately 1.5 to 2, but maximum 3. The conical chamfer of the drilled hole is included in the model by applying a cylindrical chamfer, under an angle of 45 degrees, with a depth of 0.9 mm, equal to the specimens in the experimental research.
The mesh of both the bushing and bolt is radial and applied in such a way that the lines separating the elements are continuous over the several materials. To limit the computational time and maintain high accuracy, the model is cut at its line of symmetry, where the panel is clamped (displacement and rotation are prevented in all directions). The bolt is only allowed to move in the direction of loading. The numerical model is validated by test data (Fig. 13).
The model for the coaxial double ring test consists of three parts; an action ring, the glass panel, and a reaction ring, again all solid and deformable. The dimensions are in accordance with Haldimann (2006), and previously explained in paragraph 4.3. The properties of the glass panel are mentioned in Table 3, and the properties of both the action- and reaction ring are similar to the properties of the bolt, specified in Table 3.
Again, surface-to-surface contact is applied twice, with the steel ring being the master material in both interactions. Friction between loading ring and glass specimen and reaction ring and glass specimen is taken into account by tangential behaviour. Haldimann (2006) compared frictionless models to models including friction for coaxial double ring tests. He found that the friction model best met reality. The applied friction coefficient is 0.5. This value is based on the research of Castori and Speranzini (2016).
In this research also coaxial double ring tests on glass are performed. The mesh of a panel with a hole is radial under 45 degrees. Single-bias seeding is used towards the centre of the panel. The mesh of both the action- and reaction ring are radial and applied in such a way that the lines separating the elements are continuous over the different materials (Fig. 14).
Results and discussion
Ultimate load bearing capacity
The results best fit a Weibull distribution. Using this distribution, the 5% percentile values of characteristic failure load (Fk) can be determined, and these values can be compared to each other, see Table 4.
Table 4 Results characteristic loads
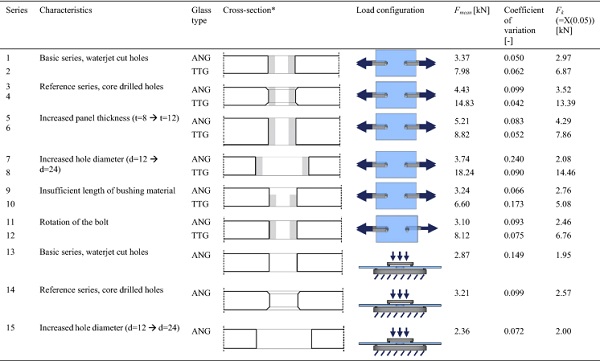
*Grey area = bushing
In Table 5, an overview of the characteristic failure loads of the main comparison is presented (i.e. the difference between core drilled holes (reference series) and waterjet cut holes (basis series). It can be observed that the failure loads for waterjet cut specimens are significantly lower. This is in relation to the higher stresses near waterjet cut holes compared to core drilled holes.
Table 5 Fk of waterjet cut with respect to core drilled holes
The maximum principal tensile stresses in the finite element model at the experimentally determined ultimate load are lower compared to the characteristic bending strength specified in the NEN 2608, which is 45 MPa. Therefore, the model seems to predict a higher ultimate load than the fracture load observed in the experiments. That can be caused by the presence of relatively large surface flaws in the specimens around the holes.
The maximum principal tensile stresses in the hole area of waterjet cut holes (at the location of the strain gauges) are, resulting from the model, 10% higher compared to core drilled holes at equal loads for the in-plane tests. The same result was shown by the values from the strain gauges.
The maximum principal tensile stresses at the edge of the hole are 13% higher compared to core drilled holes at equal loads. It is presumed that the cause of this observation is the difference of the presence of surface flaws between core drilled and waterjet cut holes. The flaws around the waterjet cut holes are presumed to be more severe and therefore higher stresses occur around the waterjet cut hole.
Unroundness
The waterjet cut holes seem to be somewhat elliptically shaped. This is confirmed with the measurements. The measurements of the hole geometry (Table 6) showed that the traditionally drilled holes are both more circular and more dimensionally stable. The difference between the standard deviation of the hole diameters is a factor 8 larger for waterjet cut holes compared to core drilled holes. Also, the difference between two diameter measurements within one hole gives a large difference. This difference is a factor 7 larger for waterjet cut holes compared to core drilled holes.
Table 6 Results measurements hole geometry
The unroundness of waterjet cut holes negatively influences the ultimate load. Depending on the orientation of the ellipse relative to the direction of loading, a larger deviation from the perfect circular hole shape (which is a nominal diameter of 12 mm) may result in a lower ultimate load. This can be explained by the fact that the more deviation from a perfectly round circle (i.e. the more elliptically shaped), the larger the extreme curvature is.
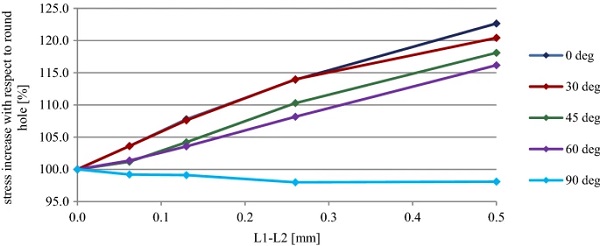
The negative relationship between the unroundness and the maximum stresses counts for all orientations, except for an ellipse in which the long axis is in line with the load direction. This means that both the shape and the orientation of the ellipse influence the stresses in the glass. The maximum principal stresses are largest for ellipses with the long axis perpendicular to the load direction.
That can be explained by the fact that the area of the hole with the largest curvature is in the region where the maximum principal tensile stress occurs. The more the ellipse rotates clockwise (respectively 30°, 45°, 60° in accordance with Fig. 15), this effect decreases, and the maximum principal tensile stresses decrease as well compared to the vertically orientated ellipse, see Fig. 16.
The effect of a horizontally orientated (90°) ellipse is positive compared to a perfectly round hole. That can be explained by the fact that with an increasing length of the long axis of the ellipse, also the curvature of the hole area where the maximum principal tensile stress occurs increases. It has been observed before that for larger curvatures (i.e. larger hole diameters), the stresses decrease. The dimensions of the bushing, and therefore also the contact area, is kept constant.

Besides the difference in shape between the two types of holes (elliptically shape of the waterjet cut holes), no difference on the surface of the glass panels can be observed.
Thermally toughening
The influence of thermally toughening the glass has a bigger positive influence on core drilled holes compared to waterjet cut holes. The presumption is that this is due to the difference in geometries between the two specimens. Looking at the cross-section in the hole area of the panel containing a waterjet cut hole, the initial compressive residual stresses occur near the surfaces and develop over a sharp corner.
For the core drilled holes, these corners have obtuse angles. This is expected to be more favourable. Since it is known that the thermally toughening process closes the surface defects, it is also presumed that the smaller flaws around core drilled holes are better closed in the thermally toughening process than the larger flaws around water jet cut holes (Fig. 17).

The relationship between the stress concentration factor and the hole diameter states that a larger hole diameter results in a lower stress intensity factor. This relationship corresponds to an in-plane tensile load.
Relation to codes
According to the NEN-EN 1288-5 (Glass in building—Determination of the bending strength of glass—Part 5: Coaxial double ring test on flat specimens with small test surface areas), the characteristic bending strength can be calculated using the formula:
![]()
However, the formula is only applicable to specimens without holes and if the diameters of the reaction- and load ring are respectively 90 and 18 mm or 60 and 12 mm. From this characteristic bending strength, the design bending strength (ultimate limit state) can be determined according to the NEN 2608 (Glass in building—Requirements and determination method).
The verification in the Ultimate Limit State (ULS) is intended to fulfill the structural safety, so it has to be carried out under very small occurrence probabilities of overloading and lower material strength. For structural glass, the safety assessment can be performed by a limitation of the stresses under relevant load combinations. In the in the NEN 2608 prescribed formula to calculate the design strength of annealed glass

no factor accounting for the zone is taken into account (zone 4 corresponds to the area around holes, where zone 1 corresponds to the infinite area). However, in the equation for the calculation of the design strength of thermally toughened glass

a factor kz is included to account for this difference in zones; a reduction of 10% is prescribed for the strength in the hole area. This value includes the reduction in pre-stress near holes. This is in line with the result of Haldimann et al. (2008) who found that the residual compressive stresses near the chamfer of the hole are significantly lower. Next to that, it is also recommended to correct for the type of edge, which is currently not considered in the code.
Since the results of the current research show lower values for the ultimate loads for waterjet cut holes, the real characteristic strength will also be lower. However, for all glass specimens, a characteristic bending strength of 45 MPa is generally applied. Therefore, it is recommended to account for a lower strength for waterjet cut holes by applying a correction factor in the design strength. This factor has to make a distinction between types of holes by applying a lower factor to waterjet cut (cylindrical) holes compared to core drilled holes.
Conclusions
With regard to the hole geometry, it may be concluded that he production of waterjet cut holes gives relatively large deviations in diameter. Next to that, it was found that the production of waterjet cut holes does often not result in perfectly round holes as is the case for core drilled holes (difference in deviation from a perfect round hole is factor 8).
Significant differences in specimen characteristic ultimate load were found. In annealed glass loaded in tension, the failure load for waterjet cut holes was significantly lower than for drilled holes. In annealed glass loaded in bending, this difference became even more pronounced. It was also found that the thermally toughening of glass is more advantageous for specimens containing core drilled holes in comparison with water jet cut holes.
For annealed glass specimens containing waterjet cut holes, loaded in tension, the ultimate load linearly increases with the panel thickness. For thermally toughened glass, this effect is found to be smaller. Next to that, it was found that an increased hole diameter increases the ultimate load for specimens loaded in tension while larger diameters decrease ultimate loads for specimens loaded in bending.
However, the influence on thermally toughened glass is larger than it is on annealed glass. With regard to eccentric loading, it can be concluded that the effect of insufficient bushing length, decreases the characteristic failure loads only slightly, while the compressive contact stresses increase mostly. This same conclusion counts for eccentric loading caused by rotation of the bolt. No breakage preference side was found, not explicitly the single loaded side (single arrow in Table 4 series 11 and 12), nor the double loaded side.
The maximum principal stresses and strains near the hole area, at the location of the strain gauges, at equal loads are larger for specimens containing waterjet cut holes in case of round holes. For specimens loaded in bending, this effect is found to be larger than the effect on specimens loaded in tension. Since it was found that waterjet cut holes appear to be somewhat elliptically shaped, this effect has been investigated closely.
The conclusion can be drawn that this unroundness negatively influences the ultimate loads. The larger the level of unroundness (i.e. the larger the difference between the lengths of the axes of the ellipse), the higher the stresses. This is true for all orientations of the ellipse, except for the case when the long axis of the ellipse is in line with the load direction. Furthermore, it is found that the presence of this unroundness increases the stresses to a larger extent in specimens loaded in tension, than in specimens loaded in bending.
Final conclusion
Waterjet cut holes result in lower characteristic ultimate loads and higher stresses. Even if the waterjet cut holes are perfectly round, the ultimate load still is lower compared to core drilled holes.
References
- Bernard, F., Daudeville, L.: Point fixings in annealed and tempered glass structures: modeling and optimization of bolted connections. Eng. Struct. 31(4), 946–955 (2009) Article Google Scholar
- Castori, G., Speranzini, E. Experimental and numerical investigation of the bending strength of glass. Challenging glass 5. universiteit Gent. (2016)
- Dalgliesh, W.A., Taylor, D.A. The strength and testing of window glass. Can. J. Civil Eng. (1990)
- DesignerData.: PA6 (EN). Retrieved 2019, from http://www.designerdata.nl/plastics/thermo+plastics/PA6?cookie=YES (2019)
- EN 1288-5.: Glass in building—determination of the bending strength of glass—part 5: coaxial double ring test on flat specimens with small test surface areas
- Haldimann, M.: fracture strength of structural glass elements—analytical and numerical modeling, testing and design. PhD, Ecole Polytechnique Federale de Lausanne (2006)
- Haldimann, M., Luible, A., Overend, M.: Structural Use of Glass, vol. 10. Iabse, Zürich (2008) Google Scholar
- Maniatis, I.: Numerical and experimental investigations on the stress distribution of bolted glass connections under in-plane loads. Doctoral dissertation, Technische Universität München (2006)
- Mocibob, D.: Glass panel under shear loading - use of glass envelopes in building stabilization. PhD thesis, Ecole Polytechnique Fédérale De Lausanne (2008)
- NEN 2608.: Glass in building—requirements and determination method (2014)
- Schneider, J.: Glass strength in the borehole area of annealed float glass and tempered float glass. Int. J. Form. Process. 7(4), 523–541 (2004) Article Google Scholar
- ShivajiRao, M., Satyanarayana, S.: Abrasive water jet drilling of float glass and characterization of hole profile. Glass Struct. Eng. 5(2), 1–15 (2019)
Author information
Affiliations
Department of the Built Environment, Eindhoven University of Technology, Eindhoven, The Netherlands
Kay Sanders, Freek Bos & Jan Belis
ABT, Velp, The Netherlands
Erwin ten Brincke
Department of Structural Engineering and Building Materials, Ghent University, Ghent, Belgium
Jan Belis
Corresponding author
Correspondence to Kay Sanders.


