
Date: 28 February 2018
The project is supported by the Federal Ministry for Economic Affairs and Energy from the Budget of the ZIM (Central Innovation Programme for SMEs).
The aim of the project is to develop a standardised and nondestructive testing method enabling the evaluation of the uniformity and height of the impressed stresses with singlepane safety glass (toughened glass) and heat-strengthened glass. For this purpose, the project partners have made use of methods dating back to the discovery by the French physicist Jean-Baptiste Biot in 1814.
Biot discovered the ability of a material to rotate the plane of polarised light. Rays of light passing through transparent media change their propagation velocity on penetrating the medium. The factor, by which the phase velocity of the rays of light is less than in a vacuum, is referred to as the refractive index. If a material is stretched in a particular direction, the distance between the molecules – and thus the speed of light – increases and the refractive index is reduced, while remaining virtually unchanged in a perpendicular direction. The refractive index can therefore vary in different directions. This process is known as birefringence – or anisotropy.
Glass that is cooled normally is optically isotropic, i.e., the refractive index of the rays of lights is the same in all directions of the 3-dimensional space – the light is uniformly radiated in all directions. If a transparent material is placed under stress, it becomes a birefringent medium – i.e. anisotropic. Under polarised light, the birefringences are perceptible as irisations, noticeable as light or dark areas or – if so-called retarders are additionally used – as coloured patterns. In the "Transparent glass" project, by using a defined polarised source of light, all the prestressed glass products are directly scanned at the outlet of the cooling area in the online process, and the path differences of the respective doubly refracted wavelengths measured and interpreted. By this means, the furnace operator immediately receives feedback as to whether intervention is required in the process control system by, say, changed ambient conditions.
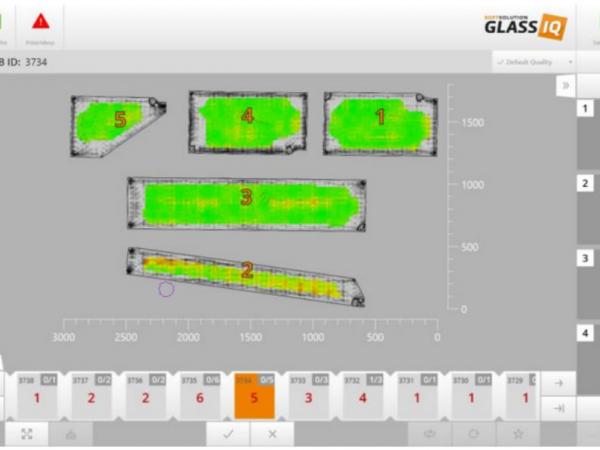
With the scan, the edge membrane stress is also measured, from which the impressed surface compression stress can be derived with high precision. This is a suitable method of measuring stress, which is today a valid non-destructive method for factory production control in accordance with the EN 12150-1 standard. The use of the inline scanner developed provides the manufacturer with optimal process reliability. The homogeneity of the stress distribution across the entire glass surface of each individual pane produced, as well as of the impressed stresses, is measured and documented. To provide an added value, a fault detection system has also been integrated into the inline scanner to detect glass defects, scratches and control the dimensional and contour accuracy. Figure 1: The thematically prestressed glass products are scanned and evaluated on the screen.
The research project runs to the end of November 2017. Still to be investigated by then are what interventions in the prestressing process lead to minimising the anisotropies without negative effects on the tensile strength values and fracture patterns to be ensured. The use of the Softsolution Inline Scanner offers several benefits in the production process:
▪ Optimisation of the thermal prestressing process
▪ Minimising anisotropies
▪ Measurement of the edge membrane stress for a glass thickness d ≥ 6 mm
▪ Reproducibility of quality
▪ Optimisation of the system maintenance intervals
▪ Fault detection through checking the dimensions and contour
▪ Documenting the results
Since natural sunlight always contains a certain proportion of polarised light, the stress fields are visible even without optical devices – depending on the installation position, the light conditions and viewing angle. The visually identifiable irisations and anisotropies have hitherto always been subjectively perceived. In this context, either the extent, to which the occasionally visible anisotropies are acceptable, could be redefined, or from what path difference (to be objectively measured) anisotropies are to be regarded as defects.
In the Technical Guideline No. 9 (Assessing the Visual Quality of Glass), anisotropies have always been regarded as more or less unavoidable phenomena in the production of toughened and heat-strengthened glass in thermal prestressing processes. The perception of irisation effects and the light and dark fields on the glass surface is assessed as possible and acceptable.
In the EN 12150-1:2010-11 product standard, it is assumed in the assessment that anisotropy is not a defect but instead a product-immanent, visible effect. This means that the visible stress fields, perceptible as light/dark fields – and in extreme cases – as coloured zones, are generally acceptable. It will take quite some time before the new insights provided by research and development have an impact in the entire production spectrum of thermally prestressed glass. Even with the insights gained from this project and the associated optimisation of production processes, the optical phenomena of anisotropies cannot be absolutely prevented and it will still be necessary to accept their presence.
Involved in this research project as industry partners are Softsolution GmbH from Waidhofen/Austria VitroDUR GmbH from Hachenburg. The cooperation with UNIGLAS GmbH & Co. KG enabled the effects of various types of systems to be determined using the scanner. The Flintermann GmbH and Egger Glas GmbH companies also made an essential contribution to its realisation. The hardly surprising result: the characteristics of the anisotropies are to a large extent system-specific.
The Online Scanner currently offers the following possibilities for monitoring the thermal prestressing process:
▪ Evaluation of anisotropies & edge membrane stresses in glass
▪ Control of glass quality: scratches, bubbles/inclusions, contamination, fingerprints
▪ Edge quality check (e.g. edge chunking)
▪ Dimensional & Position testing of external and internal contours, incl. drill hole diameter
▪ Fine tuning of the scan results through brightness and contrast
▪ Card-login system, to see from statistics what error rates occur per employee With the use of the Inline Scanner, it is possible to immediately assess the prestressed glass while still on the production line, and optimise the prestressing process by individual fine-tuning to the system and the currently prevailing ambient conditions. The non-destructive measurement of the stress states of prestressed glass thus represents a major advance for the reproducibility of toughened and heat-strengthened glass.
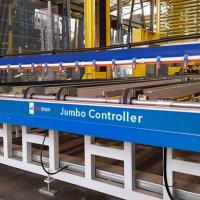
The line scanner connected to the toughened glass furnace www.glass-iq.com
Participating in the research project:
■ RWTH Aachen University, Institute for Steel Construction, Prof. Dr.-Ing. Markus Feldmann, staff members: Dipl.-Ing. Pietro Di Biase, M-Sc- Benjamin Schaaf
■ University of Applied Sciences Munich, Prof. Dr.-Ing. Christian Schuler, Laboratory for Steel and Lightweight Structures, staff members: M. Eng. Steffen Dix
■ Systems engineering and software development: Softsolution GmbH, Ing. Thomas Schuller, Ing. Hermann Sonnleitner, Andreas Hammerschmidt
■ Glass manufacturer VitroDUR GmbH, Heinz Schneider, Uwe Bergmann, as well as the subcontractors: Flintermann GmbH, Reinhard Gruber, Egger Glas GmbH, Philip Schuller, UNIGLAS GmbH & Co. KG, Thomas Fiedler
 600450







Add new comment