Authors: Jonas Rudshaug, Odd Sture Hopperstad & Tore Børvik
Source: Glass Structures & Engineering volume 9, 19–32 (2024)
DOI: https://doi.org/10.1007/s40940-023-00239-8
Abstract
Soda-lime glass is a brittle and transparent material that is known for its rapid and sudden fracture behavior. Since the use of soda-lime glass in protective structures is increasing, a more comprehensive understanding of this challenging fracture behavior is needed. The aim of this work is to investigate how the load level affects the crack propagation and to generate an experimental database for L-shaped soda-lime glass specimens with curved crack paths. We designed a repeatable testing procedure which reveals the crack propagation behavior of the specimen and allows for extraction of valuable experimental data. A total of 20 experiments were conducted on L-shaped soda-lime glass specimens subjected to a controlled displacement. High-speed cameras were used to monitor the crack propagation and the high-speed footage was post-processed using an in-house procedure to extract the crack path and speed data. We found a positive correlation between the measured initial crack speed and the load level at fracture. The crack propagation path followed four distinct stages and was also affected by the load level at fracture. With this experimental database, we have provided important insight into how the load level affects the crack propagation in soda-lime glass.
1 Introduction
Fracture is considered to be one of the most difficult problems in mechanics (Dally 1979). In the worst case, unstable crack propagation can lead to catastrophic failure of structures with the potential of inhabitant injuries and casualties. Brittle fracture is particularly difficult because of the limited deformations before failure and the rapid and sudden crack propagation. For brittle materials, like glass, fracture typically initiates in microscopical cracks, often referred to as flaws. Griffith (1921) was the first to propose a connection between fracture stress and flaw size back in 1921. Griffith formulated a fracture theory stating that for a flaw to become unstable, and fracture to initiate, the reduction in potential energy that results from an increment of crack growth has to overcome the surface energy of the material.
Irwin (1956) introduced the concept of energy release rate, and showed that the stresses and displacements near the crack-tip could be described by a single constant that was related to the energy release rate, i.e., the stress intensity factor. The expressions for the stress intensity factor vary based on the loading mode experienced by the crack. There are three types of loading that a crack can experience, referred to as mode I, II and III (Anderson 2005). Mode I loading is the case where the principal load is applied normal to the crack plane. This mode tends to open the crack and is usually called the opening mode. Mode II corresponds to in-plane shear loading and tends to slide the crack faces with respect to each other. Mode III loading is an out-of-plane shear loading. A cracked body can experience any of these modes, or a combination of them, which is typically referred to as mixed-mode loading.
When the potential energy reduction overcomes the surface energy of the material, fracture initiates according to Griffith (1921). At this point, the stress intensity factor is above its critical value and we have unstable crack growth. This unstable crack growth is particularly violent for brittle materials, such as soda-lime glass, exhibiting a dynamic fracture process involving fast propagating cracks. There are several important challenges regarding dynamic fracture characterization of soda-lime glass (Park and Chen 2011; Dondeti and Tippur 2020). First, the opening displacement at the crack tip is small, typically less than 100 nm (Dondeti and Tippur 2020). Second, the crack growth process is highly transient, with crack speeds reaching up to ∼ 1500 to 1600 m/s after a few microseconds (Schardin 1959; Dondeti and Tippur 2020). Third, the crack propagation typically involves branching. The propagation path and speed are important measures related to crack propagation. These measures provide key information about the material behavior and loading conditions, and are important for the development and evaluation of numerical fracture models. The crack propagation properties are affected by many aspects, including loading conditions, temperature, humidity, chemical composition, production method, and the presence of surface defects or impurities.
Many studies have been performed on amorphous brittle materials subjected to constant stress. Early theories suggested that the crack would accelerate until reaching the limiting crack speed assumed to be the Rayleigh wave speed of the material. Sharon and Fineberg (1996, 1999) and Fineberg et al. (1992) proved that the crack speed does not reach those levels. Fineberg and Marder (1999) addressed the status of the field of brittle dynamic fracture and presented three common methods for measuring the crack speed in experiments: optical methods, resistive measurements, and ultrasonics measurements. Optical methods are most straightforward, where high-speed cameras combined with post-processing methods are used to capture the crack propagation. Resistive measurements of the crack speed are done by use of a grid of thin electrically conductive strips that is adhered to the sample surface. In ultrasonic measurements, the running crack is perturbed by an ultrasonic wave generated from a sample boundary to map the crack position. The accuracy of all the mentioned methods is dependent on a combination of temporal and spatial resolution. One issue that arises is linked to how the crack speed measures are averaged between the sampling points both in the temporal and spatial domain (Ravi-Chandar 1998). The sampling point averaging may damp out possible peak crack propagation speeds, leading to loss of information.
Besides soda-lime glass, Homalite-100 and Polymethyl methacrylate (PMMA) are other amorphous brittle materials typically investigated with emphasis on fracture. Bradley and Kobayashi (1970), Kobayashi et al. (1974) and Dally (1979) used photoelasticity to monitor crack propagation in Homalite-100 and extracted the stress intensity factor along the crack path. Ramulu and Kobayashi (1985) investigated crack branching in Homalite-100 using photoelasticity and proposed a necessary condition based on a critical dynamic stress intensity factor and a sufficient condition of minimum characteristic distance for crack curving. Berezovski and Maugin (2007) proposed a mathematical description of the crack propagation speed of a straight brittle crack for Homalite-100. However, such an analytical model is not valid for curved, arbitrary crack propagation paths where the stress fields become complex.
Periasamy and Tippur (2012) introduced a full-field optical method called Digital Gradient Sensing (DGS). With DGS, they measured small angular deflections of light rays proportional to in-plane stress gradients in transparent solids. They further used the method in both static and dynamic investigations (Periasamy and Tippur 2013). Sundaram and Tippur (2016, 2018a, 2019) studied dynamic crack-interface interactions in PMMA bilayers after extending DGS. Recently, Sundaram and Tippur (2018b, 2018c) have used DGS coupled with ultrahigh-speed photography to characterize static and dynamic fracture of laminated glass. They were able to quantify fracture parameters including crack speeds, stress intensity factors, and energy release rates from their optical measurements at crack initiation and crack branching. Dondeti and Tippur (2020, 2023) compared three full-field optical methods to study dynamic crack evolution. They compared photoelasticity, 2D DIC and DGS with the conclusion that DGS is most suited, and used DGS to investigate mixed-mode fracture in soda-lime glass. Nielsen et al. (2009) initiated fracture in square tempered glass plates using a diamond drill. They investigated the fragmentation pattern and measured the crack propagation speed using high-speed cameras. Xu et al. (2011) developed a drop-weight experimental setup with high-speed cameras and a 4×4 multi-spark box to capture dynamic crack propagation in monolithic and laminated glass exposed to dynamic impact loading. Chen et al. (2013, 2014) used the same setup to measure the radial and circular crack propagation of PVB laminated glass subjected to dynamic out-of-plane impact loading. They reported increasing crack propagation speeds for increasing impact velocities. In the mentioned studies that involve glass specimens, the crack speed is not necessarily constant, but highly dependent on the specimen geometry and the boundary and loading conditions. However, the studies do not investigate how varying static load affects the crack propagation speed of soda-lime glass specimens.
As mentioned, the fracture initiation behavior of brittle materials, like glass, is governed by microscopic flaws. The flaws are randomly distributed on the outer glass surfaces, with varying shapes, orientations and sizes. For this reason, fracture initiation in soda-lime glass is stochastic in nature. Depending on the flaw distribution, the critical stress at fracture initiation will vary from specimen to specimen. The varying critical stress leads to varying critical load levels at fracture, which results in varying potential energy at fracture initiation. Following Griffith (1921), the amount of available potential energy at fracture initiation is directly linked to the amount of fracture surfaces opened during the fracture process. For a single, non-branching crack, this potential energy must govern the speed of crack propagation.
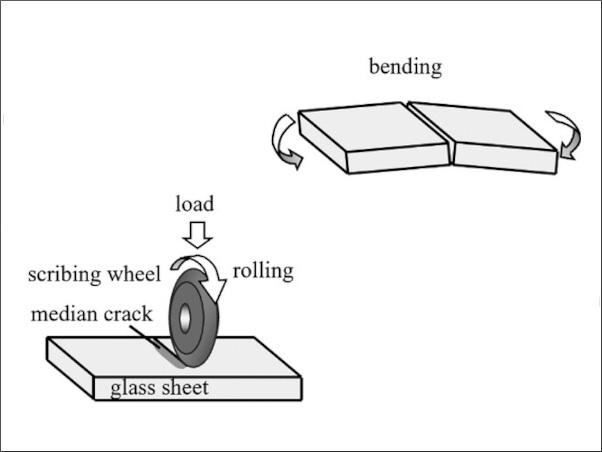
To investigate how different static loads affect the crack propagation properties of soda-lime glass, we need to fix the fracture initiation point. One way of doing this is to introduce an L-shaped specimen geometry with a sharp inner corner. The brittleness of soda-lime glass can make manufacturing of test specimens with inner corners challenging. Float glass plates are typically cut using a score and break technique (Nisar et al. 2013). To obtain more complex geometries, three methods can be used: hot airjet cutting, laser cutting and waterjet cutting. Hot airjet cutting is a two-stage process where the glass edge is scratched first, before the hot airjet is used to propagate the crack. A limitation with hot airjet cutting is that it produces a heat affected zone near the cut edge, generating residual stresses. Laser cutting techniques involve using a laser beam to melt and vaporize the glass, creating a clean cut. Laser cutting is highly precise and can be used to cut intricate shapes and patterns. To manufacture the L-shaped specimens tested in this study, we used the waterjet technique. Waterjet cutting is a cutting technique where a high pressure water beam, which can contain an abrasive material, is used to cut the glass plate. A benefit of waterjet cutting is that it does not introduce thermal stresses near the cutting edge. A drawback with the method is that the resulting edges become somewhat coarse. However, a coarse edge may increase the scatter in flaw size, resulting in the desired varying critical stresses at fracture initiation.
In this study we aim to provide valuable data on the crack propagation in statically loaded soda-lime glass specimens with varying load levels at fracture. The different critical load levels result in differences in the available potential energy at fracture, providing new insights into the crack propagation behavior of soda-lime glass. To investigate how both the crack propagation path and speed are affected by the load level at fracture, we design a new experimental setup including L-shaped specimens and perform 20 experimental repetitions. With the L-shaped specimens, we introduce a sharp inner corner and fix the fracture initiation point, making tracking of the crack propagation possible. The L-shaped specimens are loaded to trigger a non-trivial, curved crack path. We aim to provide a consistent experimental database from the 20 tested glass specimens that can facilitate the development of numerical models.
2 Experimental setup
This study aims to investigate how varying load levels at fracture affect the crack propagation of soda-lime glass in a controlled environment. To fix the fracture initiation location, we introduce a geometrical singularity in the form of a sharp inner corner in the glass specimen. In this way, we make sure that the stress intensity is critical at the same point for each experiment. This allows us to focus our high-speed cameras on a small region so that we can increase the filming frequency. With this setup, we are able to gather data on the crack propagation and force level at fracture.
2.1 Test setup
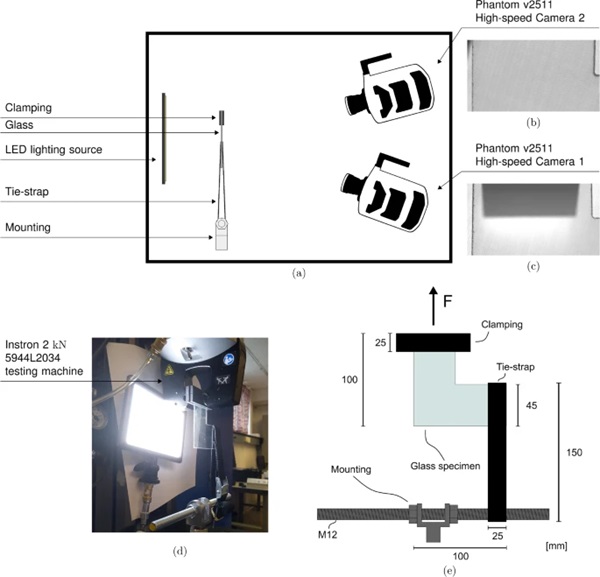
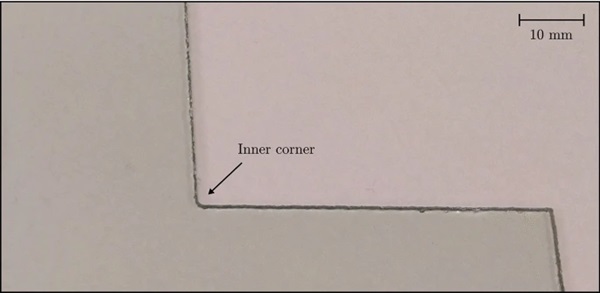
The experimental setup is presented in Fig. 1. The setup consists of an L-shaped glass specimen, a tie-down strap, a threaded steel rod, an Instron universal testing machine, a LED lighting source and two synchronized high-speed cameras. A total of 20 glass specimens with a thickness of 1.8 mm were cut from larger glass plates using a waterjet to the L-shaped geometry seen in Fig. 1c. The glass plates tested in this study are typically used in automotive windshields. Waterjet cutting was used to make the inner corner as sharp as possible. One drawback with the waterjet cutting is that the resulting edge finish is somewhat rough, see Fig. 2. The resulting inner corner is not perfectly sharp, but slightly rounded with a mean radius of ∼ 1.05 mm and a standard deviation of ∼ 0.10 mm. However, the rough inner corner introduces a scatter in flaw size, which facilitates varying critical stresses. The glass specimens were clamped on the top using a clamping device with a rubber surface and restrained by a polymer tie-strap on the right-hand-side. Some basic mechanical properties and the chemical composition of soda-lime glass are presented in Tables 1 and 2.
Table 1 Basic properties of soda-lime glass (Haldimann 2006) - Full size table

Table 2 The chemical composition of soda-lime glass (Haldimann 2006) - Full size table

We loaded the specimens with an Instron 2 kN 5944L2034 testing machine, shown in Fig. 1b, in two loading dependent stages. At the start of the experiment, until the load level reached 50 N, we applied a loading rate of 10 mm/min. After the load level reached 50 N we reduced the rate to 1 mm/min. We chose this loading procedure to reduce the execution time for each experiment. The LED source is placed behind the specimen to provide sufficient background lighting conditions for the crack to be visible in the high-speed camera footage. Two Phantom v2511 high-speed cameras (Adept 2022) were used to capture the crack propagation in the L-shaped glass specimen. The cameras were placed at an angle to the glass surface in order to enhance the visibility of the propagating crack. The field of view was reduced to 49.8 mm × 27.0 mm using a camera resolution of 384 pixels × 208 pixels to obtain a filming rate of 200,000 fps, resulting in a spatial resolution of 7.7 pixels/mm and a sampling rate of 5 μμs. Figure 1a shows an illustration of the high-speed camera placement with the view from Camera 1 and Camera 2, respectively.
2.2 Tie-down strap
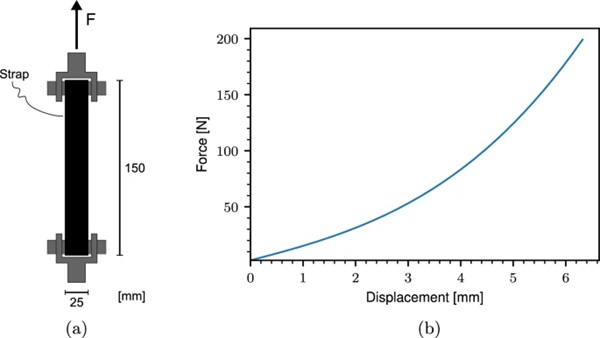
We used a tie-down strap to restrain the upward displacement of the right-hand-side of the glass specimen. The tie-down strap is a flexible polyester webbing which is strong in tension and typically used to mount objects during transportation. The flexible nature of the strap is beneficial in the present loading situation because it allows the strap to wrap around the glass specimen, ensuring in-plane loading. The mechanical behavior of the tie-down strap in the force range of the experiments was obtained by performing a simple tension test with the setup shown in Fig. 3(a). The resulting force-displacement curve is presented in Fig. 3(b). As expected, the tie-down strap exhibits a non-linear behavior.
2.3 Testing procedure
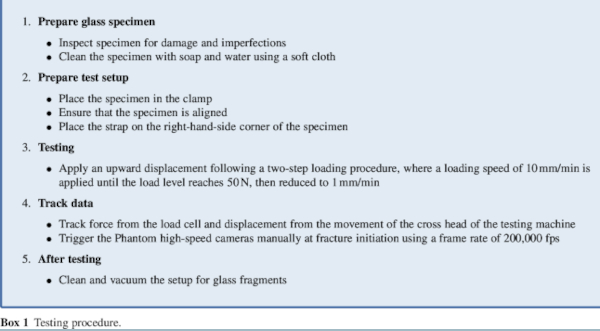
The experiments were conducted using an Instron 2 kN 5944L2034 testing machine at SIMLab, NTNU. We performed all the experiments indoors at a room temperature of 23ºC. To ensure reproducible results we followed a strict testing routine described in Box 1.
2.4 Crack propagation
We retrieved the crack propagation data from the resulting time lapses gathered by the high-speed cameras. Due to the discrete nature of the high-speed footage, we are restricted to consider the average incremental crack velocity, approximating the crack propagation velocity, v(t), by


where v¯(ti) is the average crack velocity between image frames at time ti−1 and ti, ΔXi=Pi−Pi−1 is the vector representing the incremental crack growth, connecting the crack tip positions Pi−1 and Pi from time ti−1 to ti, respectively, and Δti=ti−ti−1 is the time increment. To obtain global coordinates from the image coordinates we utilize the known specimen geometry to generate a transformation matrix, T, given by

where px and py are the spatial pixel resolutions in the local image x and y directions. By assuming a uniform spatial pixel resolution, p=px=py, we use the transformation matrix to compute the global coordinates X=(X,Y) from the local image coordinates x=(x,y) through the transformation
![]()
By careful manual tracking of the crack tip, we estimated for all specimens the crack tip positions P={Pi|i∈N,0≤i≤n}, where n is the number of increments with visible crack growth. Figure 4 presents the procedure for obtaining the crack tip positions. First, in Fig. 4a, the position of the crack tip is selected through visual inspection at time ti−1. In Fig. 4b, at time ti, the crack propagates beyond point Pi−1. Then, in Fig. 4c, the position of the crack tip at time ti, Pi, is manually selected. Finally, the incremental crack growth ΔXi is approximated as the vector connecting Pi−1 and Pi.
The presented procedure is performed in an in-house Python program with a graphical user interface to facilitate repeatability. It is worth mentioning that we only use the high-speed footage from Camera 1 for the crack propagation measurements. The angle between Camera 2 and the propagating cracks was found to be too small to properly detect the crack tip at some locations along the crack path, making the crack paths nearly invisible during parts of the crack propagation. The difference is shown in Fig. 5.
3 Experimental results
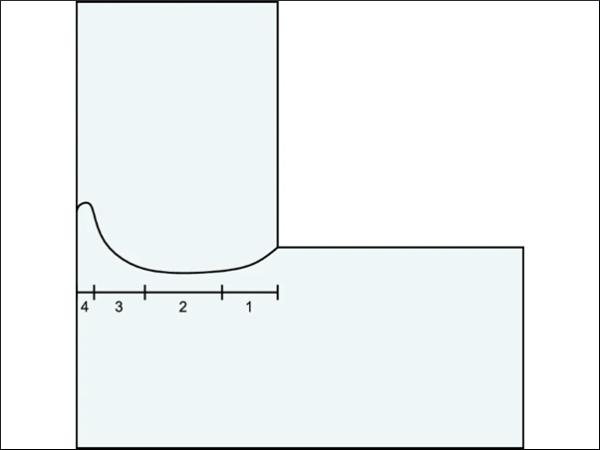
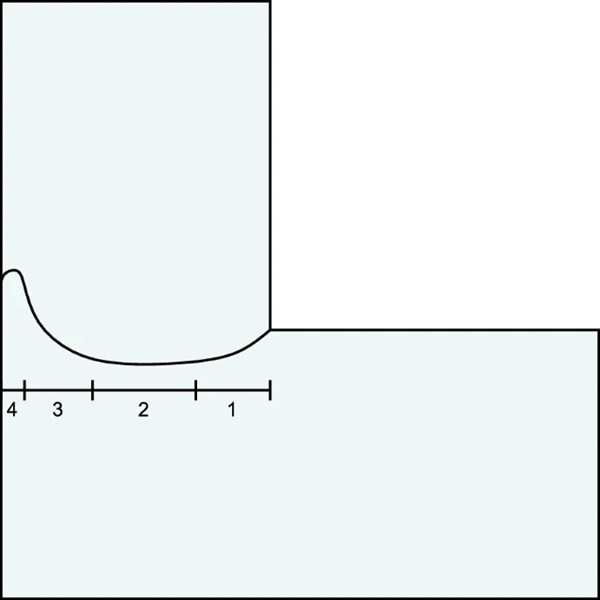
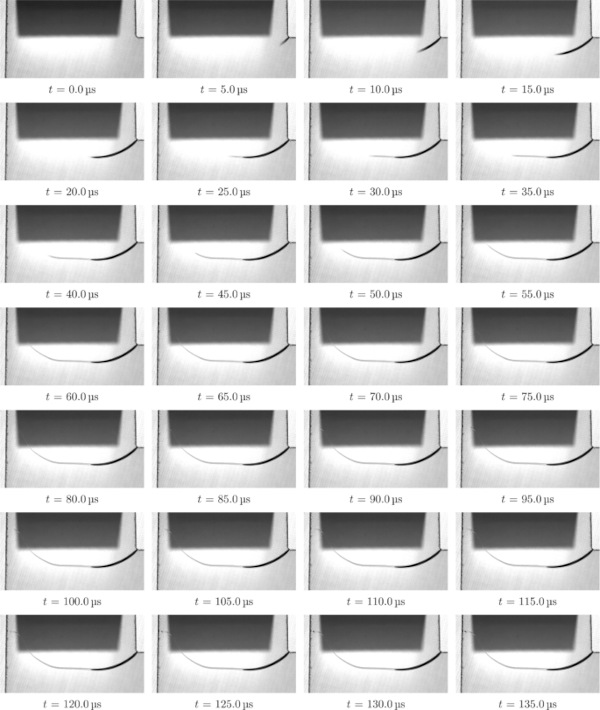
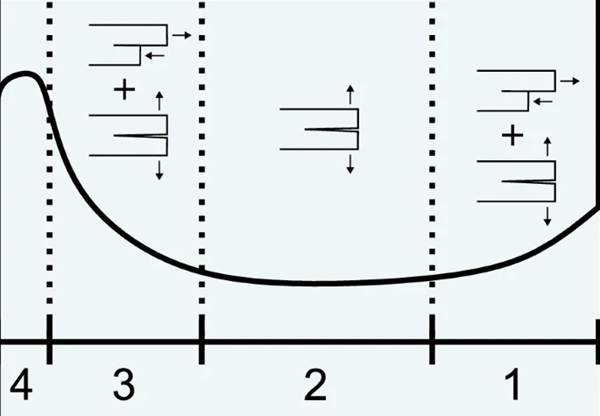
The post failure state of the L-shaped glass specimens is presented in Fig. 6. We note small variations in the crack propagation paths, which all initiate in the sharp inner corner and follow the four stages presented in Fig. 7. In stage 1, the crack initiates in the sharp inner corner and starts propagating inclined slightly downwards. In stage 2, the crack path straightens up midway through the specimen. When the crack has propagated closer to the outer edge, it enters stage 3, where the crack propagation path inclines sharply upwards. Finally, in stage 4, the crack path straightens up again right before reaching the outer edge. A typical time-lapse of the crack propagation is presented in Fig. 8. For the displayed specimen, the crack propagation process is in stage 1 for the first 20 μs, in stage 2 for the period 20-40 μs, in stage 3 from 40–95 μs, and in stage 4 for the final 40 μs.
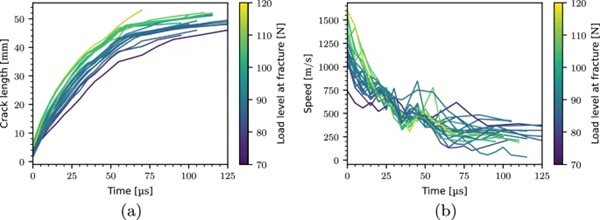
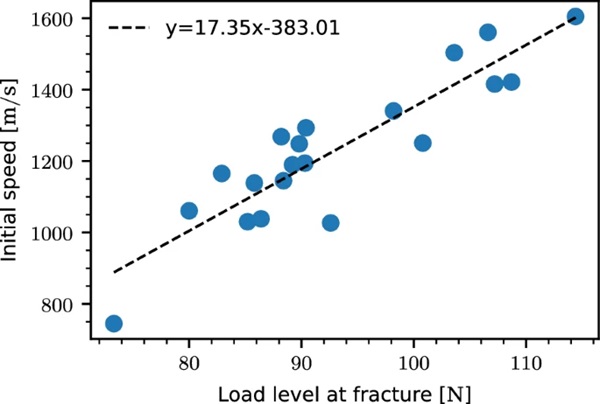
On average, the number of crack propagation sampling points for each experiment is 25, with a crack propagation time of ∼ 125 μs and a path length of ∼ 50 mm. This results in an average crack propagation speed of ∼ 400 m/s for the entire crack path. Figure 9 presents the temporal evolution of the crack propagation speed and length colored by the load level at fracture. We see that the crack propagation speed decays in an exponential manner and that the measured maximum speeds exhibit a large spread, varying from ∼ 750 to ∼ 1600 m/s. From Fig. 9b we note that the initial crack length is up to 8 mm for some of the experiments. This is an artifact of the discrete sampling procedure, where fracture initiates in-between two discrete sampling points. In this case, we do not have any information about the fracture initiation time. For that reason, we have chosen to start the speed measurements at the first full crack growth increment, ensuring that we measure a true average between sampling points. The choice of starting the speed measurements at the first full crack growth increment is also the reason why we do not see any initial crack speed ramp up. The line coloring, related to the load level at fracture, indicates that the fastest propagating cracks occur in the specimens that fail at the highest load levels. Figure 10 presents the initial crack propagation speed versus the related load level at fracture, and confirms that the load level at fracture affects the initial crack propagation speed. We note that the correlation seems to be linear.
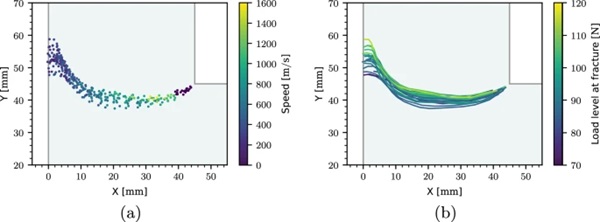
The measured crack tip positions, Pi, from all the experiments colored with the related measured crack propagation speed are shown in Fig. 11a. There is a low spatial spread in the sampling points, indicating consistent boundary conditions and specimen preparation. We note the earlier discussed decay in crack propagation speed from the inner corner towards the outer edge, which is clearly visible in the plot. The zero-velocity crack tip positions closest to the inner corner are the starting points for the corresponding speed measurement of the specimen. Figure 11b presents the measured crack propagation paths colored with the related critical load level at fracture initiation. We find a clear correlation between the critical load level and the crack path, where the crack paths shift upwards with increasing critical load level.
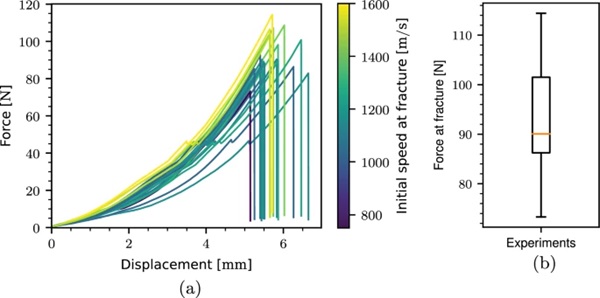
Finally, the force-displacement curves from all the experiments colored with the related initial crack speed at fracture are shown in Fig. 12a. The distribution of the load level at fracture is presented in a box plot in Fig. 12b. The load level at fracture is spread from ∼ 75 to ∼ 115 N, and is dependent on the conditions at the inner corner. By inner corner conditions, we refer to the combination of the inner corner radius, influencing the nearby stress field, and the size of the flaws present at the inner corner. In combination, these features determine the critical load level. The specimens with the most detrimental combination (large flaws and small radius) at the inner corner are likely to fail earlier than the specimens with less detrimental conditions (small flaws and large radius). The variations stem from the specimen preparation, where we used a waterjet to cut out the geometries. The two-step loading is clearly visible in the force-displacement curves because of the small force drop at a load level of 50 N. The drop occurs as a part of the switch in loading speed. The force-displacement curves exhibit a significant spread in the stiffness up to the 50 N mark. The stiffness variation is presumably linked to the mounting of the specimen and tie-strap, more precisely the third bullet point in item 2 in the testing procedure, see Box 1, and how tight the tie-strap is mounted to the specimen. As the load level increases, the spread in stiffness decreases. After the 50 N mark, the mean stiffness is ∼ 35.87 N/mm with a standard deviation of ∼ 3.08 N/mm.
4 Discussion
The gathered crack paths and crack speeds imply that the experimental setup provides consistent data. We can conclude that the proposed experimental testing procedure described in Box 1 produced an experimental database that captures how the load level at fracture affects the crack propagation of L-shaped soda-lime glass specimens. However, we note that the temporal and spatial resolution of the setup affects the crack propagation speed measurements. The coarseness of the temporal crack propagation curves in Fig. 9a clearly illustrates that some information, like the initial crack propagation speed ramp up, is not captured. This issue could be resolved by using high-speed cameras with better temporal and spatial resolution with improved lighting conditions.
We also note that the cracks consistently follow a path similar to that presented in Fig. 7. The curved crack path may indicate a mixed-mode crack propagation, combining opening (mode I) and in-plane shear (mode II) modes, as reported by Dondeti and Tippur (2023). Figure 13 illustrates the proposed combinations of the fracture modes for the three first stages. The convex shape of the curved path seen in stage 1 and 3 may stem from the mixed mode I and mode II loading at the propagating crack tip, where the lower part of the crack tip is both opened and loaded in-plane. In stage 2, a small or non-existing mode II loading may be why the crack path is close to flat. The potential in-plane shear loading in stage 1 and 3 may lead to frictional energy dissipation, which will affect the crack propagation speed and contribute to the exponential decay that we observed in the measurements. To study this further, it would be interesting to use DGS to obtain in-plane stress and stress intensity fields.
If we consider the measured initial crack propagation speeds, it is clear that the specimens which reached the highest critical load levels obtained the highest initial crack propagation speeds, see Fig. 10. This behavior implies that there is a positive correlation between the potential energy level and the crack propagation speed, which seems reasonable considering the larger amount of available elastic energy for creation of new surfaces. Depending on the flaw distribution of the inner corner, the load level at fracture, and thus also the potential energy at fracture, varies. As for the initial crack propagation speed, we find that the varying critical load level at fracture influences the crack propagation path, shifting the path upwards for increasing critical load level. The upward shift of the crack propagation path seen for the stronger specimens might be linked to the increased specimen deformation at fracture initiation, which slightly alters the stress field and thus also the crack propagation path.
The timing of the discrete temporal sampling points with respect to the crack initiation makes it necessary to start the crack speed measurements at the first full visible crack growth increment. The sampling interval of 5 μs is also probably too coarse to capture the initial crack speed ramp up, which can be as rapid as 2-3 μs (Dondeti and Tippur 2020). Because of this we were not able to obtain speed data for the initial crack speed ramp up. As mentioned earlier, this could be improved with better temporal sampling resolution. However, we were able to capture the post ramp up behavior accurately. The evolution of the crack speed is interesting. The measured initial speed varies from ∼ 750 m/s and up to ∼ 1600 m/s, which is within the maximum speed of ∼ 1500 to 1600 m/s reported in the literature (Dondeti and Tippur 2020), and there is an exponential decay during the remaining crack evolution. The reason for this behavior is that the level of available potential energy to drive the crack decreases during the crack propagation.
The stochastic nature of glass fracture is clearly visible in the presented box plot of the load level at fracture, see Fig. 12b. The measured strength varies from ∼ 75 N to ∼ 115 N, meaning that the strongest specimen is ∼ 53% stronger than the weakest specimen. This large spread has a two-fold explanation. Fracture initiates when the stress intensity factor exceeds the critical stress intensity factor of soda-lime glass. The stress intensity factor depends on both the stress state and the orientation and shape of the present flaws. Depending on the radius of the inner corner, the stress state will vary, with higher values if the radius is sharp and lower values if the radius is large. Both the radius of the inner corner and the orientation and shape of the present flaws will vary from specimen to specimen, explaining the observed spread in strength.
In the experimental setup, we used a polymer tie-down strap to restrain the right-hand-side of the specimen. As this strap is much softer than the glass specimen, the total experimental displacement is governed by the tie-down strap. This makes it hard to generate a repeatable stiffness response for the entire experiment even though we followed a strict testing procedure, see Box 1, as the tie-down strap is loosely placed over the glass specimen in the beginning of the experiment. However, as the load level increased, the spread in the stiffness in-between the experiments decreased, resulting in similar stiffness level at fracture.
5 Conclusion
We established a new experimental database on L-shaped soda-lime glass specimens with curved crack paths which reveals how the critical load level affects the crack propagation behavior. The established database provides consistent and repeatable crack propagation data, providing new insights into the crack propagation behavior of soda-lime glass. The measured crack propagation speed exhibits a exponentially decaying evolution, starting at speeds ranging from ∼ 750 to ∼ 1600 m/s. We found a clear positive correlation between the initial crack propagation speeds and the corresponding load level at fracture. In addition, the load level at fracture also affected the measured crack propagation path. The crack propagation path can be divided into four distinct stages of different curvature, propagating with varying fracture modes.
From the study, we draw the following main conclusions:
- The proposed experimental setup has proved to be reliable and allows for extraction of important data such as crack path, crack propagation speed and load level at fracture initiation.
- The initial crack propagation speed correlated positively with the load level at fracture.
- The crack propagation speed decreased exponentially with the crack length.
- The crack propagation path was affected by the load level at fracture.
Data availability
The raw/processed data required to reproduce these findings cannot be shared at this time as the data also forms part of an ongoing study. However, the data used to support the findings of this study may be made available from one of the authors upon request.
References
Funding
Open access funding provided by NTNU Norwegian University of Science and Technology (incl St. Olavs Hospital - Trondheim University Hospital) Funding was provided by Norges Forskningsråd (Grant Number: 237885).
Author information
Authors and Affiliations
-
Structural Impact Laboratory (SIMLab), Department of Structural Engineering, NTNU – Norwegian University of Science and Technology, Trondheim, Norway
Jonas Rudshaug, Odd Sture Hopperstad & Tore Børvik
Corresponding author
Correspondence to Jonas Rudshaug.
Ethics declarations
Conflict of interest
The authors declare that they have no known competing financial interests or personal relationships that could have appeared to influence the work reported in this paper.


