Authors: Steffen Bauer, Ines Butz, Elmar Strassburger, Martin Sauer & Stefan Hiermaier
Source: Glass Structures & Engineering, volume 7, pages569–602 (2022)
DOI: https://doi.org/10.1007/s40940-022-00190-0
Abstract
In this paper we present a novel test methodology for the generation of varying degrees of pre-damage in small soda-lime glass cylinders by dynamic loading in combination with a subsequent contactless damage quantification. In the first step, 13 glass specimens are placed in demountable aluminum confinements. The confinements are then impacted by flyer plates at different impact velocities between about 70 m/s and 400 m/s. Two high-speed cameras are used to investigate the velocities and the planarity of the impacts. Afterwards, three-dimensional visualizations of the recovered specimens are generated using conventional CT-imaging at a micro-CT-device and phase-contrast imaging at a beamline of a synchrotron. A concept is developed to determine the crack volumes by means of a region-growing algorithm.
For five selected specimens, the mean total crack volume is determined as a function of the impact velocity. The developed methods are a first step to improve the predictive power of existing numerical simulation models of glasses and ceramics in scenarios with high velocity impact or ballistic penetration. In the specimens, defined, quantifiable damage is generated that can later be characterized, e.g. in triaxial compression tests, to obtain damage-dependent yield curves. This concept turns out to be a significant improvement in comparison to the characterization tests of previous studies, which used loosely poured glass quartz powder or specimens that had been pre-damaged quasi-statically without quantification of the degree of damage.
Introduction
Silica-based glasses are a well-established material used as main component of windowpanes. The most prevalent type of glass is soda-lime glass (SLG), since it is relatively inexpensive and simple to manufacture. Despite its brittle nature, it can be well suited also as main component of a transparent armor, particularly if several sheets of glass are combined with transparent polymer layers. These “glass laminates”, used as vehicle windshields or windows in buildings, can withstand low-velocity impacts without shattering. A typical low-velocity impact is for example wind-borne debris, which can impact with a velocity of more than 40 m/s in extreme cases (Zhang et al. 2013). If the thickness of the glass laminate is thick enough, it can even withstand fragments or rifle bullets impacting with high velocities in the order of up to 1000 m/s.
The continuous enhancement of ballistic threats places increasing demands on the protective capabilities of transparent armor systems. Especially for the use in military vehicles, the improvement of the armor is challenging due to strong restrictions on the available space and weight. In order to further enhance the transparent armor and support the development of new designs, it is essential to predict the response of SLG to dynamic impact. However, this objective cannot be achieved by means of a purely experimental approach, since the material behavior is very complex. Instead, it is more efficient to use a combination of ballistic tests and numerical simulations. For the simulations, constitutive material models are needed, which describe the material behavior under various loading conditions. In order to set up and calibrate these models, basic characterization experiments with various, well defined loading conditions are required.
It is well known that the mechanical response of glass is significantly different under quasi-static and highly dynamic loading rates (e.g. Grujicic et al. 2008; Hild et al. 2003; Strassburger et al. 2005a, 2007a), although the bulk mechanical parameters are the same. SLG typically fails by the propagation of only a few discrete cracks when loaded quasi-statically. In contrast, a large number of micron- and sub-micron-size cracks is generated under dynamic loading, which results in a substantially larger degree of damage and comminution. The different crack densities can be attributed to the released energy in the fracture process. In both cases, however, the cracks are presumably emerging from pre-existing flaws (Grujicic et al. 2009). These flaws are typically small surface cracks (≤ 20 µm) introduced during the manufacturing or finishing process (Freiman 2012) and during cleaning and maintenance of exposed surfaces.
In an impact process, complex failure patterns occur, including radial cracking, ring cracking and the development of a fracture conoid, as reported by Chaudhri et al. (Chaudhri and Liangyi 1989). They further observed a comminuted region of SLG with particulates and powder ahead of a projectile. Mescall et al. previously deduced the existence of such a highly stressed and finely comminuted volume from computations (Mescall and Tracy 1986; Mescall and Weiss 1984). This so-called Mescall zone was later also observed in impact tests and simulations with silicon carbide ceramic (Shockey et al. 1990; Klopp and Shockey 1991). Chocron et al. (2008) concluded that although the material is failed, it is kept in place by inertia and by the confining intact material. Moreover, its elastic constants (Young’s modulus, Poisson’s ratio, etc.) are almost unchanged.
Several studies have focused on visualizing the onset and propagation of damage in transparent materials. Senf et al. (Senf et al. 1994, 1995) developed edge-on-impact experiments, which enabled the observation of crack nucleation and propagation in single glass plates. This procedure has later been continued and improved by Strassburger et al. (Strassburger et al. 2005a, b, 2007b, 2010; Strassburger and Senf 1995). The more complex morphology of damage in multi-layer glass laminates was studied by Bless et al. (Bless and Chen March 2010) for high velocity impact (1118 m/s).
Strassburger et al. also developed an experimental technique, which facilitated the visualization of damage propagation in a complex laminate target during projectile penetration (Strassburger et al. June 2014). A combination of high-speed imaging, photonic Doppler velocimetry (PDV) and numerical simulations revealed a clear correlation between damage propagation, glass layer deformation and projectile position.
For some brittle materials, the transition from the intact to the failed state is accompanied by a phenomenon that is often referred to as “failure wave” or “failure front”. The assumption of its existence rationalized some of the conflicting results of previous studies. However, the nature of this phenomenon has not yet been conclusively understood. Recent investigations on the failure front phenomenon include for example publications of Bauer et al. (Bauer et al. 2021) and Joshi et al. (Joshi et al. 2021).
Promising alternative methods of visualizing the internal fracture process are techniques based on X-ray CT. Several studies (e.g. Chen et al. 2014; Luo et al. 2012; Hudspeth et al., 2013) have demonstrated that experiments observed by phase-contrast imaging (PCI) are well suited for the visualization of cracks in brittle materials even in highly dynamic events. For example, Chen et al. (2014) conducted edge cutting on borosilicate glass while monitoring the time-dependent failure process with high-speed X-ray PCI capabilities.
For several glasses and ceramics, different researchers (e.g. Shockey et al. 1990; Partom 1998; Bourne et al. 1999; Behner et al. 2008) have found that a penetrating projectile is not in direct contact with intact material but instead with pre-damaged, failed material. As a result, the penetration resistance of a glass target is strongly influenced by the residual strength of the comminuted material, the friction between the comminuted particles and the confining strength of the undamaged, surrounding material. Here, the residual strength of the failed material is strongly dependent on the confining pressure (Shockey et al. 1990; Dannemann et al. 2012; Chocron et al. 2013; LaSalvia 2001; Curran et al. 1993).
Therefore, an adequate constitutive material model for SLG under high velocity impact needs to describe the glass strength as a function of the hydrostatic pressure, strain, strain rate, temperature and state (intact, partially failed and failed). Further, the model must describe the transition from the intact to the failed state.
For the understanding of ballistic penetration processes, the characterization of the shear strength of intact and damaged SLG is of special importance.
Several studies have addressed this topic by conducting dynamic and quasi-static loading tests. The dynamic experimental techniques comprise planar plate impact tests (PPI) (Bauer et al. 2021; Alexander et al. 2008; Bourne et al. 1998; Espinosa and Xu 1997; Simha and Gupta 2004), pressure-shear plate impact tests (PSPI) (Sundaram and Clifton 1998; Clifton et al. 1998; Kettenbeil 2019) and split Hopkinson pressure bar tests (SHPB) (Holmquist et al. 1995). Quasi-static techniques comprise confined pressure tests and uniaxial compression and tension tests (Dannemann et al. 2012; Chocron et al. 2013, 2010; Shockey et al. 2009; Failed 2006).
The literature data exhibits significant scatter and is contradictory in some cases (Walley 2014; Gorfain et al. 2016). Particularly with regard to ballistic impact scenarios against SLG, it is essential to characterize failed glass with a degree of damage similar to that of the highly comminuted Mescall zone (Shockey et al. 2008). However, the pre-damage generated in published confined pressure tests, e.g. by Dannemann and Chocron et al. (Dannemann et al. 2012; Chocron et al. 2013), is most probably lower (Chocron et al. 2009). Here, pre-damage was created by means of a thermal shock or quasi-static (~ 10–3 s−1), cyclic pressure loading. In contrast, pressure/shear loading tests on beds of loosely poured glass quartz powder, such as the tests of Shockey et al. (Shockey et al. 2009), yield too low values for the residual strength, since larger, interlocking particles are missing and the generated pressures do not reach those imposed by a penetrating projectile.
This paper presents a novel test methodology to dynamically generate different degrees of pre-damage in small SLG cylinders in combination with a subsequent contactless damage quantification by means of micro-CT and PCI. In the first step, the SLG specimens are placed in demountable aluminum confinements. The confinements are then impacted by a flyer plate at different impact velocities between about 70 m/s and 400 m/s. Afterwards, the confinements are removed and the damaged glass cylinders are recovered. Here, a 0.5 mm thin aluminum sleeve is retained around each cylinder, in order to prevent the disintegration of severely damaged specimens. This concept turns out to be a significant improvement in comparison to the characterization tests of previous studies, which used loosely poured glass quartz powder or granular silica sand. In the final step, micro-CT-imaging and PCI are used to generate a three-dimensional visualization of the damaged glass specimens. Here, segmentation algorithms of the analysis software “Mango”, developed and provided by the Australian National University, are used to determine the mean crack volumes of selected specimens. As far as the authors know, this is the first time that this characterization technique has been used to quantify the degree of damage of glass specimens.
Note that the characterized specimens described in the following were further investigated by Bauer (2021) in triaxial compression tests to obtain yield curves as functions of the hydrostatic pressure and the degree of initial pre-damage. These yield curves were then used to improve a material model for SLG for use in numerical simulations.
Dynamic generation of damage in confined SLG cylinders
Experimental setup
The setup is designed such that damage can be created inside a confinement, while making sure that the specimen can subsequently be extracted without rearrangement of the glass fragments. This way, the damaged specimen can be examined using CT and loaded in further characterization tests.
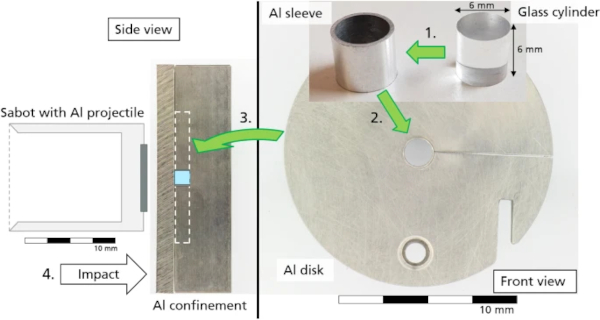
Small specimen cylinders were cut from a 1.5 m long commercial grade SLG bar with a diameter of 6 mm, which was purchased from the German wholesale glass company “GLS Spezial- & Farbglashandel GmbH”. The demountable confinements and the projectile plates were made of aluminum EN AW 2007 T4 (Al F34-F37). The setup procedure is illustrated in Fig. 1 and described in the following:
- First, the SLG cylinder is placed in an aluminum sleeve with a wall thickness of 0.5 mm. The initial heights of the sleeve and the cylinder are a few millimeters larger than 6 mm to allow for a surface adjustment in step 3 by means of grinding and polishing.
- The SLG cylinder with the aluminum sleeve is clamped inside the center hole of a large aluminum disk, which provides the lateral confinement. The disk has a diameter of 60 mm with a central hole of 7 mm diameter. The clamping of the specimen can be slightly adjusted. For this purpose, a thin slit is cut in one side of the disk. The slit width is then adjusted by a fixing screw after the specimen is in place.
- The disk is placed in a depression inside a large aluminum confinement. The confinement consists of a 100 mm × 100 mm × 25 mm block and an 8 mm thick cover plate. The disk has two screw holes, which allow for the mounting inside the block. Before the cover plate is mounted on top by four additional screws, all other components of the confinement together with the SLG cylinder are grinded and polished to ensure a flat surface. The final height of the SLG cylinder is 6 mm.
- To induce the shock wave and generate the pre-damage inside the SLG, an aluminum projectile impacts the cover plate of the confinement. The projectile consists of a 3 mm thick aluminum disk with a diameter of 30 mm, which is placed in front of a hollow, 60 mm long polycarbonate sabot.
A total of 13 tests were conducted out of which twelve were selected for further CT analyses. Table 1 gives a summary of all tests. The projectiles were accelerated by means of a single-stage gas gun with a bore diameter of 48 mm, which was driven by compressed air or helium as propellant gas. The first columns list the test number and the length of the used gun barrel. Columns 3, 4 and 5 give the information on the used propellant gas, the filling pressure and the measured impact velocity. In the last two columns, the characterization technique, that was subsequently applied, is indicated by an “X”.
Table 1 Test matrix for the generation and characterization of pre-damaged SLG specimens - Full size table
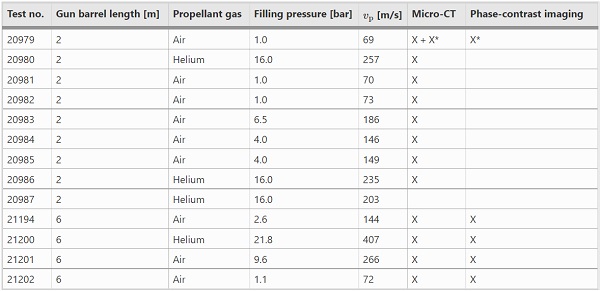
Figure 2 shows a photograph of the test facility with the 6 m gun barrel.
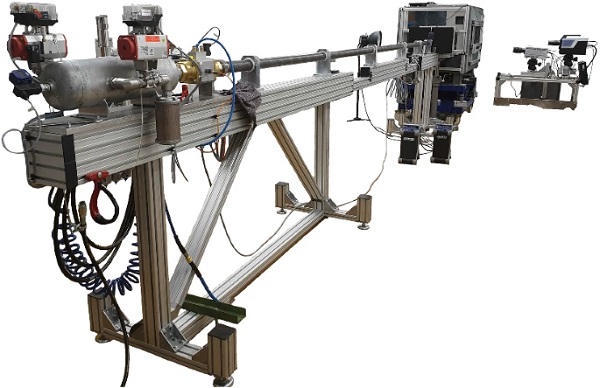
In all tests, the impact velocity of the projectile was measured by means of two light barriers, which were positioned near the muzzle of the gun barrel, where four small holes were drilled into the barrel. In addition, all tests were accompanied by high-speed video camera observation. On the one hand, the videos allow for a further measurement of the impact velocity. On the other hand, the videos provide essential information on the planarity of the impact and the movement of the projectile and the confinement after the impact.
The two cameras allowed for recording images at two different orders of magnitude of frame rates. The top camera was an ultra high-speed camera with a preset frame rate of 200,000 frames per second and 400 × 250 pixels, yielding a spatial resolution of 0.36 mm per pixel in our setup. The used settings enabled the recording of up to 128 images resulting in a total observation time of 640 µs.
The bottom camera was a Photron high-speed camera with a lower preset frame rate of 15,000 frames per second. Depending on the settings, between 150 and 450 images were recorded in each test resulting in a total observation time of up to 30 ms.
After the impact, the confinement box was softly caught and stopped in a pile of rags to prevent additional damaging of the SLG during the deceleration.
Experimental results
In order to investigate if the impact of the projectile was sufficiently planar, the high-speed images of the ultra high-speed camera (200,000 fps), recorded around the time of the impact, are closely examined. Figure 3 illustrates a selection of six images recorded during the impact of test no. 21202. The high-speed photograph in the middle of the first row shows the projectile and the confinement 10 µs before impact. The width of the gap between the surface of the projectile and the confinement is constant across the whole impact surface. Therefore, within the measurement uncertainty of the camera setup (0.36 mm pixel size), no discrepancies from a perfectly planar impact are observed. The symmetric deformation of the polycarbonate sabot in the subsequent images and the homogeneous illumination of the sabot caused by the impact flash (see photograph at 10 µs after impact, Fig. 3) also indicate that the impact was planar.
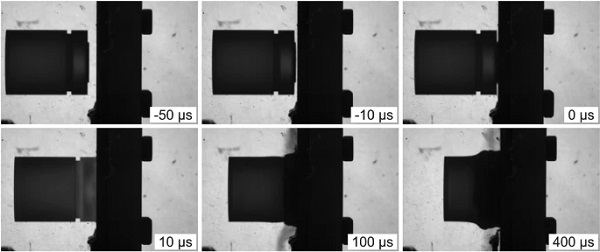
In all 13 tests, no deviation from a planar impact was observed.
While the videos with the high capture rate provide crucial information on the planarity of the impact, they do not show the movement of the projectile and the confinement several milliseconds after the impact. The post-impact behavior is therefore analyzed in the high-speed videos of the Photron camera, which had a total observation time of up to 30 ms.
Figure 4 shows a selection of six Photron images from test no. 21201. In this test, the impact velocity was 266 m/s. Since the absolute point of time of the images is of no further importance, the denoted times are arbitrarily set to be 0 ms at the last image before impact.
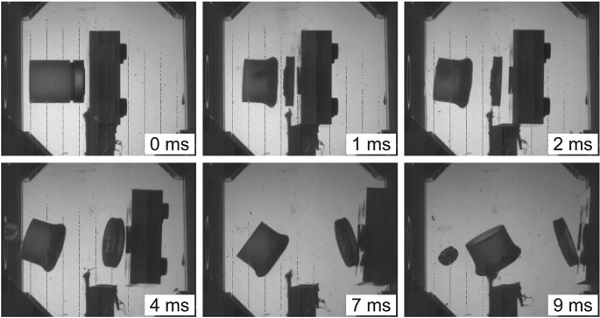
After the impact, the aluminum plate remained in contact with the confinement. This lead to further contacts between the front part of the sabot and the aluminum plate with the confinement (e.g. at t = 9 ms). However, since these parts were flying with almost the same velocity, these contacts are marginal and are not expected to increase the damage of SLG specimen any further.
The confinement block was quickly detached from the layer of glue within the first few milliseconds after the impact and accelerated to the right. Outside of the field of view of the camera, the confinement was later softly caught and stopped in a pile of rags to prevent additional damaging of the SLG during the deceleration.
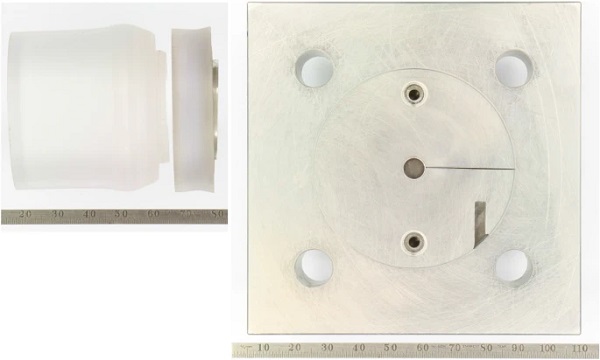
Figure 5 shows a photograph of the recovered sabot and the aluminum plate on the left side. On the right side, a photograph of the recovered confinement, after the removal of the cover plate, is displayed. The pre-damaged SLG cylinder is visible in the center of the confinement appearing dark since the internal crack surfaces diffuse the light.
Analysis of cracks by means of transmitted light photography and X-ray computed tomography
A further significant improvement, compared to previous studies, is the contact-free investigation of the pre-damage prior to a possible measurement of the residual strength. An extensive CT test series is carried out in order to analyze and quantify the crack volume in the pre-damaged SLG cylinders. X-ray CT scans are conducted at two different facilities, at a micro-CT device of the Ernst-Mach-Institut and at the synchrotron beamline of the Paul Scherrer Institut.
For the identification of the crack volume, a software tool developed by the Australian National University (ANU) is used. Utilizing the advanced 3D image processing and segmentation techniques of the software, an analysis method for the SLG specimens is developed. As a result, the pre-damage of selected specimens is quantified and parameterized.
Results of the transmitted light photography and a microsection
In order to get a first estimate of the generated damage, the recovered SLG specimens were placed on top of a bright light source and transmitted light images were taken. Figure 6 shows the images of twelve specimens. The crack areas inside the SLG specimens diffract the transmitted light leading to a darker appearance of regions with a higher crack density. The images are arranged by rising impact velocities from left to right and top to bottom. At the lowest impact velocities of about 70 m/s, only a few crack areas are visible. Large areas appear bright indicating that the impact generated only a coarse fragmentation. At higher impact velocities, the amount of visible crack areas significantly increases. At the highest velocities, above 250 m/s (pictures in the bottom row), the SLG specimens are strongly fragmented and a dense network of crack areas is visible.
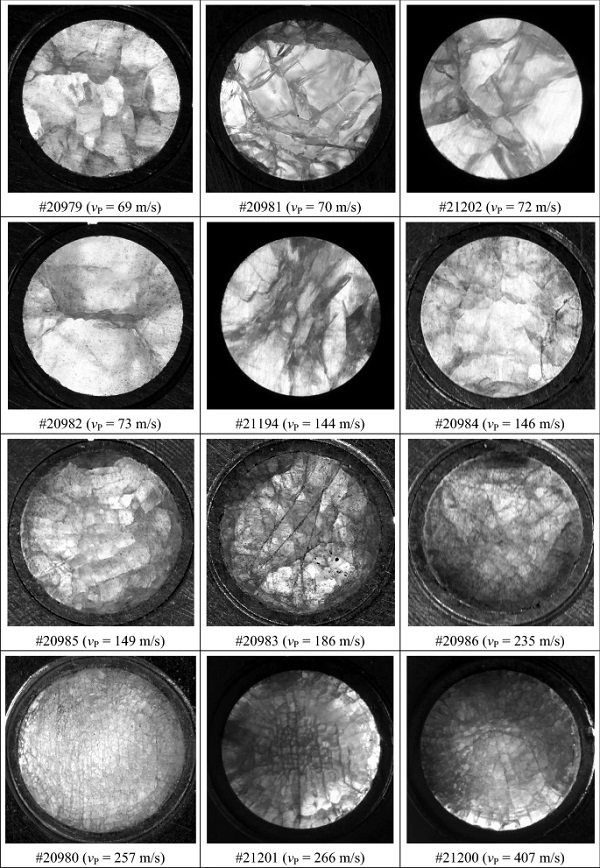
Although these transmitted light images clearly show the dependence of the impact velocity on the generated degree of damage, they are not suitable for a systematic quantification. The amount of the transmitted light is strongly dependent on the position and orientation of the crack areas as well as the position of the light source and the camera settings. Furthermore, in some cases, a thin layer of aluminum residues, attached at the SLG surface, obstructed the light transmission.
In order to gain a direct insight into the damaged SLG and visualize the positions and orientations of the crack areas, a microsection of one specimen was made. This was done for the specimen of test no. 20987, which has been impacted at vP = 203 m/s. The damaged SLG cylinder was taken off the aluminum sleeve and covered with transparent adhesive. After the adhesive had infiltrated the cavities and had been cured, one half of the specimen was polished down. The result of a transmitted light image of this microsection is illustrated in the left photograph of Fig. 7. The crack areas appear dark spreading over the whole specimen.
Fewer cracks are visible on the left side of the central region. The surface, which was facing into the direction of the impact, is located at the upper margin of the picture. At the opposite side of the specimen, at the bottom of the picture, a heavily fractured layer of glass with a thickness of about 0.2 mm is missing. This part was lost during the extraction from the aluminum sleeve due to the severe fragmentation in this region and the related loss of integrity. The black circles below the specimen are cavities of air trapped inside the adhesive.
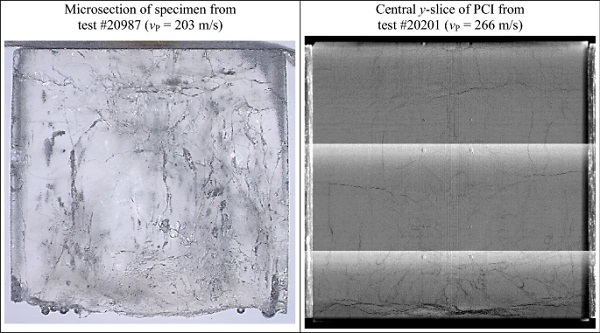
The presented method of taking a microsection enables a better visualization of the pre-damage, however, the specimen is destroyed in the process making a characterization of the residual strength in a subsequent triaxial pressure test impossible. Furthermore, for a defined quantification of the whole volume, other methods are required. A more advantageous method is therefore a contactless and non-destructive determination of the total crack volume by means of conventional X-ray CT and PCI. These characterization techniques are presented in the next section.
For comparison, an exemplary result of the PCI is illustrated in the right image of Fig. 7. The image shows the central y-slice of the PCI from test specimen #20201 that was pre-damaged at vP = 266 m/s. Both illustrated specimens have a similar degree of pre-damage. In the PCI, the cracks appear as dark, fine lines, while the intact glass appears as brighter areas. In both pictures, the density of horizontal crack areas is high at a distance of about 1 mm to the top surface. In the central part, larger regions with only few crack areas are present. Near the bottom surface, the crack density is significantly higher than in the central and upper regions and a large number of horizontal crack areas are apparent.
Principles of the CT methods
In order to get a contactless and non-destructive determination of the total crack volume, tomographic experiments were conducted at two different CT facilities. The objective of the CT is to create a three-dimensional image of a specimen. On the one hand, high-resolution absorption-based X-ray CTs were carried out at the Fraunhofer EMI by means of a micro-CT system. On the other hand, PCI measurements were conducted at a synchrotron beamline of the Paul Scherrer Institut (PSI). X-ray CT is a method of generating image data by means of X-ray transmission. An in-depth description of the principles is provided for example by Buzug (Buzug 2008) or Goldman (Goldman 2007a, b). For additional information on the PCI method, the reader is referred e.g. to Chen et al. (2014); Zernike (1942); Gureyev and Wilkins (1998).
Conventional absorption radiography with a micro-CT system
The micro-CT system used here is an in-house system of the EMI, which has been developed and manufactured by the Fraunhofer EZRT in cooperation with the company MacroScience Technology GmbH. The system generates polychromatic X-rays with a bremsstrahlung spectrum specific to the material of the X-ray tube. For the examined glass specimens, the micro-focus-source was operated at 80 keV source voltage with an operating current of 75 µA. The illumination time for a single image was set to 4 s. For each specimen a total of 1200 projections were recorded each averaged over 8 images.
This yields a total illumination time of more than 10 h per specimen. With these settings, a voxel resolution in the range between 3.6 and 3.8 µm was achieved (a voxel is a three-dimensional pixel). Figure 8 shows a picture of the experimental setup within the micro-CT system. For each specimen, a stack of nearly 1800 TIF files was reconstructed. Each file represents a horizontal slice of the scanned specimen, containing roughly 1800 × 1800 voxels with 16 bit gray scale values. The resulting data size for a complete scan of one specimen is about 8 GB. This comparatively low data size enables short analysis times.
However, with the resulting images of the conventional absorption radiography, a quantitative evaluation of the degree of damage is very difficult. The analyzed specimens contain fine crack structures that exhibit relatively low density differences. In addition, the aluminum sleeve surrounding the glass cylinder lowers the achievable contrast. Furthermore, distinct beam-hardening (Seibert and Boone 2005) and ring artifacts (Hsieh 2009; Schulze et al. 2011) are present, which obscure the crack structures.
Phase-contrast-imaging at a synchrotron beamline:
The second illustration method for the damage characterization used in this work is the PCI. This method is superior to the conventional absorption-based imaging for the visualization of edges or cracks in the specimens. The PCI enhances the contrast of interfaces between the features inside the specimen (edge enhancement). The method takes advantage of the circumstances that the X-ray phases change as they pass through the specimen. The different wave fronts interfere and overlap with each other, which influences the measured intensity at the detector. As the absorption and the diffraction of the beams are energy-dependent, an essential requirement for the PCI method is a monochromatic X-ray source.
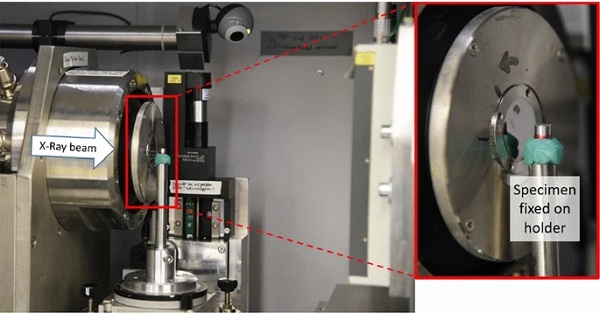
The PCI measurements were performed at the TOMCAT (Stampanoni et al. 2006) (Tomographic Microscopy and Coherent rAdiology experimenTs) X02DA-beamline of the SLS synchrotron (Swiss Light Source) at the PSI. The SLS features a 2.4 GeV electron storage ring of 288 m circumference providing continuous high flux, high coherency, monochromatic X-rays (Böge 2002). A 360°-eccentric rotation was used in order to get a horizontal field of view of about 8 mm. The vertical field of view is energy-dependent and was about 2.4 mm with a set energy between 30 and 40 keV. With these settings, a voxel resolution of 1.65 µm was achieved. Five selected specimens were scanned at three different vertical positions in order to cover the total height of 6 mm. Figure 9 shows a photograph of the experimental setup within the beamline. The specimens were placed on a movable and rotatable specimen holder as shown enlarged on the right side of the figure.
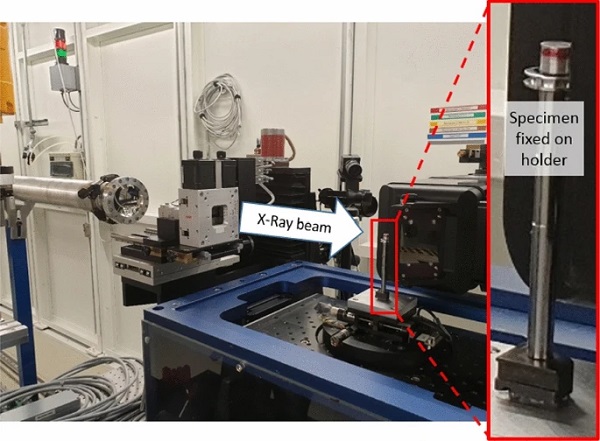
Each scan had a measurement time of about 20 min resulting in a stack of 1462 reconstructed horizontal slices. The images were provided as 32 bit gray scale images containing 4201 × 4201 voxels. The resulting data size for a complete CT reconstruction of one specimen is about 288 GB as opposed to the 8 GB of the micro-CT at EMI.
The PCI data is 36 times larger than the micro-CT leading to a much more time-consuming analysis. However, the higher resolution in combination with the edge enhancing reconstruction allowed for a significantly more detailed evaluation of the degree of pre-damage.
Image processing
In order to quantify the degree of damage, the CT data is processed and analyzed. This is done in detail only for the phase-contrast images. The quality of the micro-CTs is insufficient to quantify the degree of damage by means of the segmentation algorithms. However, the results of the micro-CT are suited for a visual comparison increasing the sampling size.
An exemplarily tomogram reconstructed from the PCI is illustrated in Fig. 10. The figure displays a virtual vertical cut through the center of the pre-damaged SLG specimen from test no. 21202. At each position, the gray scale value of the voxel is connected to the X-ray absorbing properties of the related material. The damage inside the SLG manifests as air-filled cracks, which appear noticeably darker as the surrounding material. The aluminum sleeve appears as bright voxels on the left and right side of the image. In addition to the dark cracks, some other dark structures are visible near the horizontal rotation axis in the center of the cylinder. These are mainly tomographic artifacts, which are generated during the reconstruction process.
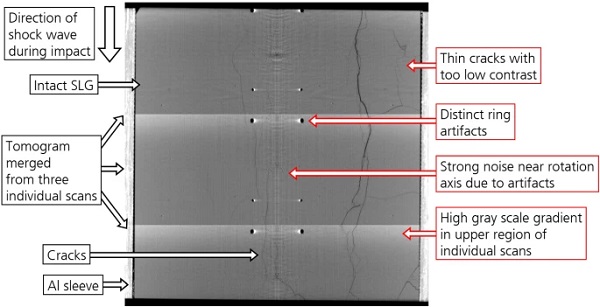
Since the vertical field of view of the synchrotron detector is not large enough to fit in the whole specimen, the final image is merged from three individual CT scans. Each scan can cover a height of up to 2.4 mm, which allows for a small overlap between adjacent scans. These overlaps ensure that the scans comprise the whole specimen and they are manually removed during the subsequent merging process.
The gray scale value distribution can differ significantly between the different scans. In addition, there is a significant gray scale gradient within each scan, causing the voxels in the upper region of the tomogram to be much brighter than the other voxels. These circumstances impose a major challenge for an automated quantification of the degree of damage. However, a systematic analysis process has been developed, which allows for a semi-automated quantification.
The plausibility of the results of the semi-automated quantification is checked for each specimen by a visual comparison of the original tomogram and the separated crack patterns. This additional quality check is carried out since the human eye is specialized in finding patterns and is therefore able to identify the crack patterns more successfully than the automated algorithms.
In order to characterize the degree of damage of the pre-damaged SLG specimens, the cracks have to be identified and separated in the tomograms. This process is challenging due to the aforementioned issues, i.e. reconstruction artifacts, gray scale gradients and noise. Therefore, an analysis software is required, which allows for 3D image processing as well as advanced segmentation techniques.
For this purpose, the software tool “Mango” (Medial axis and network generation) has successfully been used, which has been developed by the Australian National University (ANU) in collaboration with the German Friedrich-Alexander-Universität. Mango allows for a high parallelization of tasks, which is crucial for the processing of the 288 GB large synchrotron data sets. It is specially designed to handle tomographic data from X-ray tomography (Sheppard 2019; Sheppard et al. 2004). The software is running on the Fujitsu Primergy cluster “Raijin”, which is located at the campus of the ANU and managed by the high performance computing center NCI (National Computational Infrastructure) (Duff-Tytler 2013).
Within the scope of this work, access to Mango was granted as a collaborative arrangement with the department of applied mathematics of the ANU.
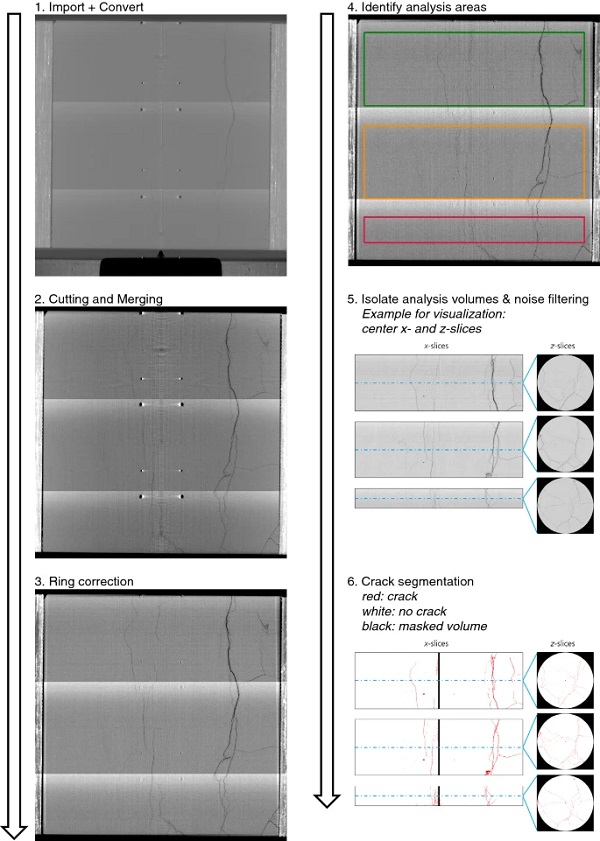
First, the image processing tools of Mango were used to prepare the images by removing reconstruction artifacts and unnecessary information. Figure 11 illustrates an entire process chain of the image processing exemplarily for the specimen of test no. 21202. The process can be divided into the following steps:
- The stack of TIFF files from the PCI was imported into Mango and converted from 32 bit float grayscale images into 16 bit unsigned integer grayscale images.
- Overlapping areas, of the three individual scans, were removed and the resulting images got merged.
- A ring correction algorithm was applied to remove the majority of the tomographic artifacts. The algorithm calculates the mean gray scale value of each ring around the rotation axis and normalizes this value to the mean gray scale value of the whole sample.
- Analysis volumes were identified (colored rectangles in the top right image of Fig. 11). Only the damage inside these volumes was analyzed and quantified later. The rest of the specimen volume was being neglected. The degree of damage of the total specimen was then extrapolated from the analysis volumes. Therefore, the volumes had to be selected in such a way that they were representative of the whole specimen. This means that they had to be sufficiently large to cover a majority of the total specimen volume and that the crack density inside the analysis volumes should not differ significantly from the crack density in the residual specimen volume.
- All voxels outside of the analysis volumes were either removed directly or covered by a geometrical mask (black areas in the middle and bottom right image of Fig. 11) excluding these voxels from the subsequent analysis. Afterwards, an iterated bilateral de-noise filter was applied, smoothing the image by reducing the noise in the gray scale values.
- The segmentation process was carried out. This process separates the image from 65,535 different gray scale values down to only two values, representing the intact glass and the cracks. The method of choice is a region-growing algorithm called “Converging Active Contours” (CAC). The CAC process is in principle an enhanced, multi-step version of a simple thresholding segmentation. The CAC segmentation is noise tolerant and produces rather smooth interfaces. It is therefore well suited for the identification of the crack planes in phase-contrast images. The bottom right image of Fig. 11 shows an exemplary segmentation result; voxels identified as glass are shown in white and cracks are shown in red.
In the first step of the CAC process, each voxel is classified as “glass”, “crack” or “undecided”. This is achieved by choosing two threshold values for the gray scale intensity. In the second step, some of the voxels, which had been mistakenly identified as “glass” or “crack” in the first step, may be reassigned as “undefined” by defining two additional gray scale gradient thresholds. The objective of this process step is to reduce the number of initially mislabeled voxels. These mislabeled voxels can be present in particular next to the boundaries of cracks and reconstruction artifacts, where the gray scale intensity varies significantly. In the third step, the amount of “undefined” voxels is reduced by defining four additional tight thresholds. This is necessary since the final step is very time consuming and strongly depending on the amount of “undefined” voxels. In the final step, the regions “glass” and “crack” simultaneously grow towards another, this way resolving the “undefined” region. The growth is controlled by a speed function depending on the local gray scale gradients. The higher the gradient is, the slower is the growth. Since phase boundaries exhibit a high gradient, the growth of an arriving region is slowed down, enabling the other region to arrive at the boundary as well.
The result of the CAC process is a 3D tomogram, in which each voxel belongs either to the phase “glass” or to the phase “crack”. The positions and the amount of the “crack” voxels are subsequently evaluated to determine the degree of damage.
For each analysis volume, a set of CAC thresholds was determined individually.
There are two reasons for the necessity of using analysis volumes as opposed to using the total specimen volume. On the one hand, there is a significant gray scale gradient in vertical direction within the individual scans of each specimen, as illustrated in Fig. 10. On the other hand, most images exhibit a dark artifact halo in the fringe areas after the ring correction, as described above (top right picture in Fig. 11).
To ensure comparability between the analyses of the different specimens, the size and relative positions of the analysis volumes are chosen to be identical. This is realized by determining the largest mainly artifact-free volumes in each specimen first. Afterwards, the analysis volumes are defined to be the intersections of the essentially artifact-free volumes in all specimens.
Table 2 provides a summary of the evaluated analysis volumes. All volumes have a diameter of 5.57 mm. The top volume has a height of 1.86 mm and is 0.32 mm away from the top surface of the specimen, which is facing into the direction of the impact. The middle volume has almost the same height, positioned 2.69 mm away from the top surface. Finally, the bottom volume is only 0.65 mm high, positioned 0.46 mm away from the bottom surface.
Table 2 Definition of analysis volumes - Full size table
The combination of all three analysis volumes covers 63% of the initial SLG volume (cylinder with 6 mm height and 6 mm diameter). Neither in the fringe areas, near the aluminum sleeve, nor in the areas between the different analysis blocks, significant differences of the crack patterns within the specimens are apparent. Therefore, it is assumed that the chosen analysis volumes are sufficiently representative for the estimation of the degree of damage.
In addition, the extent and position of the analysis volumes are identical for all specimens, as mentioned above. The analysis results are therefore well suited to be compared with one another, which is one of the main objectives of the scans.
Results of crack identification
The identification of cracks by means of the CAC analysis was done for all PCI data. As summarized in Table 1, five SLG specimens were analyzed by PCI, each pre-damaged at a different impact velocity.
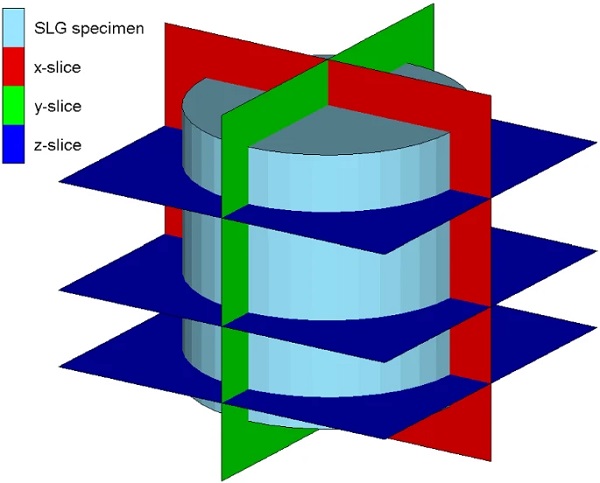
For the visual comparison, five cross sectional views are generated for each specimen. Figure 12 schematically illustrates their positions in the SLG specimen. A horizontal slice is positioned at the middle of each of the three analysis volumes. In addition, two vertical slices are generated, which are perpendicular to each other. In the following, the horizontal slices are referred to as z-slices and the vertical slices as x- and y-slice. The position of the x- and y-slice is randomly determined by the positioning of the specimen on the holder in the X-ray CT and therefore not linked to the specimen orientation during the impact test.
The final separation results for the crack identification are arranged in Figs. 13, 14, 15, 16 and 17. The figures show the final PCI tomograms of the analysis volumes together with the corresponding separation images. In the separated images, all voxels identified as “crack” are displayed in red. The “glass” voxels are shown in white and the masked areas, which are excluded from the analysis, are colored black.
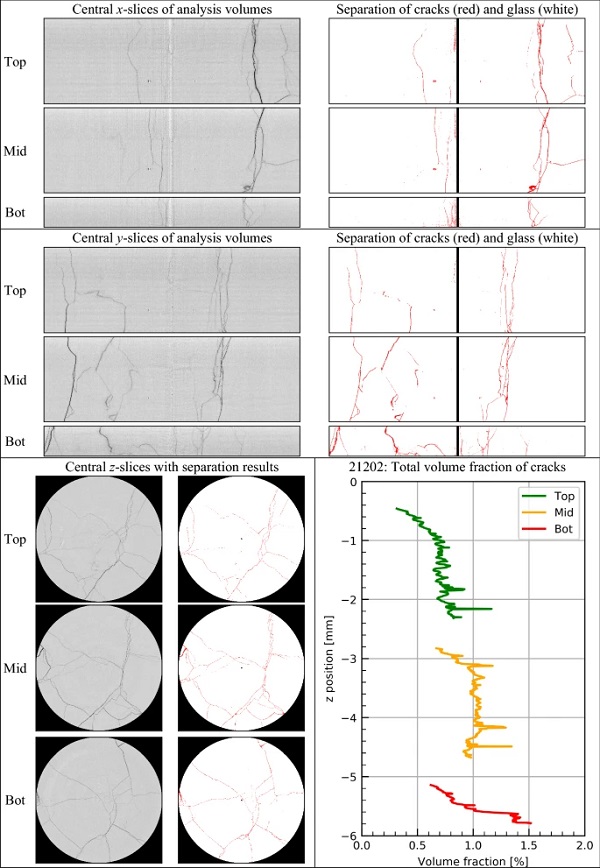
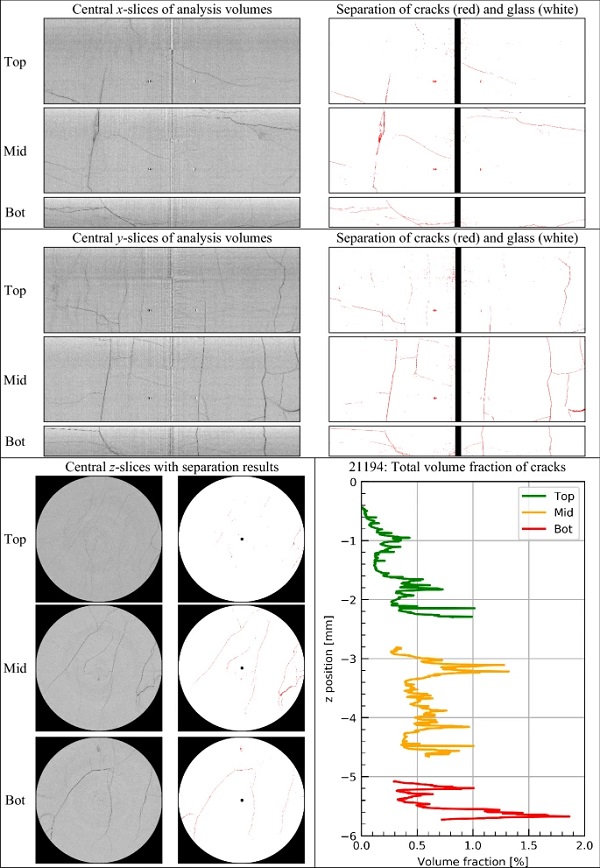
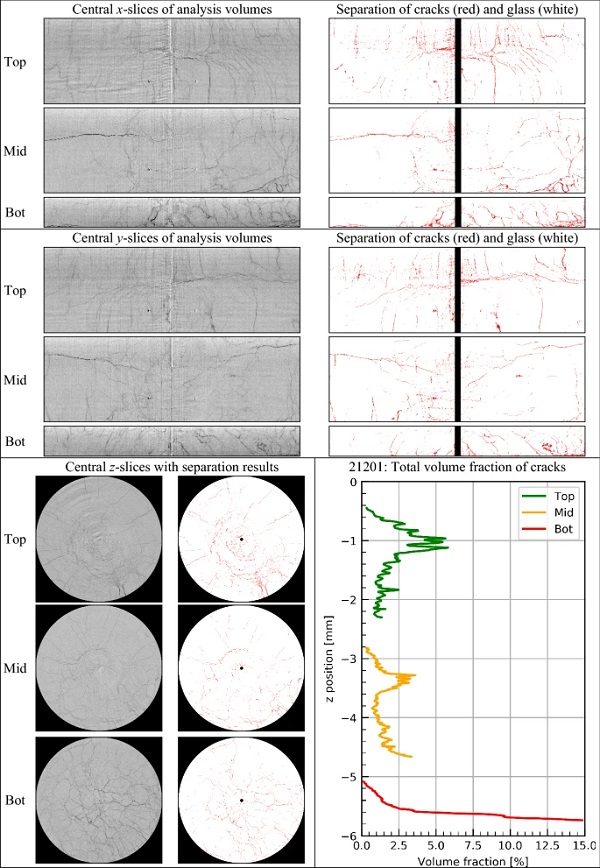
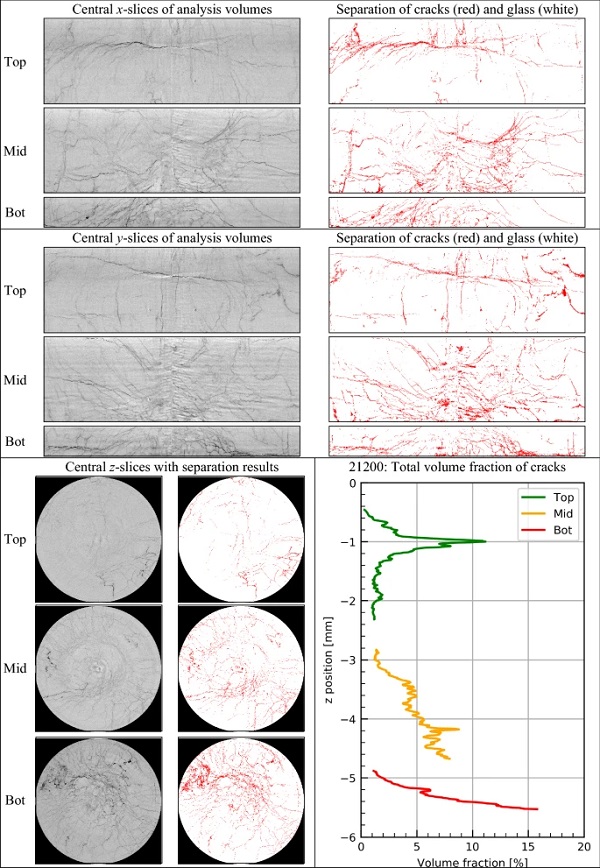
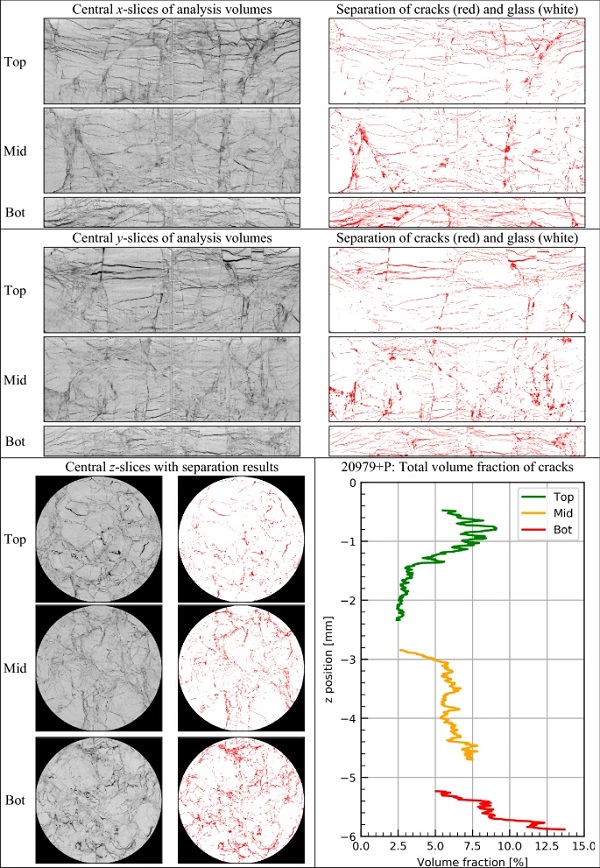
The illustrated slices are taken from the positions indicated schematically in Fig. 12. The images in the first row of each figure show the x-slices. The y- and z-slices are illustrated in the second and third row, respectively. On the bottom right side, the total volume fraction of cracks Vf,c is presented in a diagram as a function of the z position. Vf,c(z) is calculated by dividing the amount of “crack” voxels at position z by the total amount of voxels within the analysis volume at the same z position. Note that the analyses volumes are not completely free of artifacts. The gray scale gradients, which occur particularly at the upper boundaries of the analysis volumes, influence the Vf,c(z) values such that lower values are sometimes obtained, leading to the impression that the distributions are discontinuous.
The different impact velocities have generated significantly different degrees of pre-damage, as summarized in Table 3. At the lowest impact velocities, only few isolated cracks are apparent. At 72 m/s (Fig. 13), these crack areas are mainly oriented in the vertical direction. At 144 m/s (Fig. 14), additional horizontal cracks are present. At the high impact velocities of 266 and 407 m/s (Figs. 15 and 16), the crack density is significantly higher within the entire SLG. In addition, the amount of horizontal cracks at the bottom of the specimens is considerably larger.
Table 3 Summary of crack separation results of the PCI data - Full size table

The highest crack density is visible in the specimen that was subjected to a high quasi-static load (about 3.4 GPa maximum axial compressive stress and about 1.4 GPa maximum radial compressive stress) in a confined pressure test after the dynamic impact (Fig. 17).
The resulting gray scale tomograms as well as the segmented tomograms contain a lot of information. An ambitious approach would be to describe the morphology of the crack patterns by means of Minkowski functionals. This method emerged from the field of statistical physics, aiming to quantify the geometry of an object by intrinsic values like the volume, the surface area, the average mean curvature, the Euler number or similar quantities (Mecke 2008; Armstrong et al. 2019).
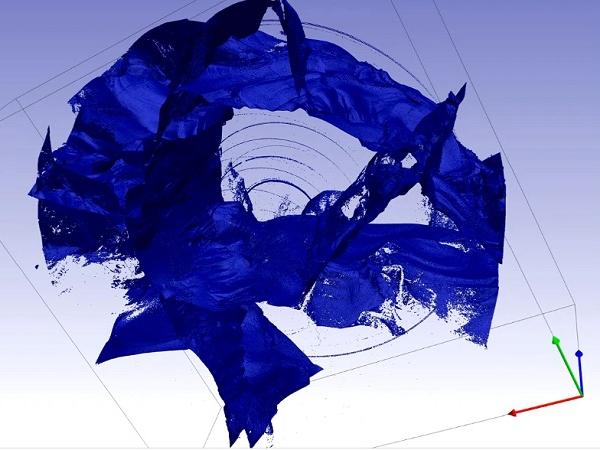
The software Mango provides tools to perform a Minkowski analysis with segmented data, however, in case of the presented results, it turns out that such an analysis is not possible. Because the separated crack areas are incomplete. Figure 18 shows a 3D model of the separated cracks in the middle analysis volume of specimen no. 21202. The model was created only for visualization purposes from a stack of segmented DICOM-images (Digital Imaging and COMmunications in medicine) using the software Scan-IP. It was generated by meshing the surfaces of the identified crack volumes with 172 million triangular surface elements. The incompleteness of the crack areas is visible, for example, in the lower right region. As the crack areas are not closed surfaces, the calculation of a surface, a surface to volume ratio or a degree of branching are unsuitable.
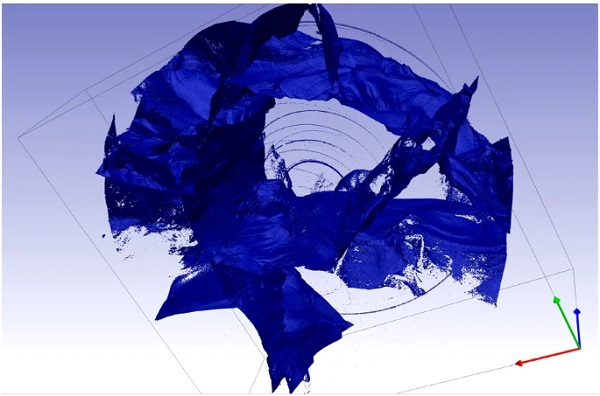
However, the total crack volume is rather slightly affected by the missing crack voxels. For the further analysis, in order to obtain a simple scalar measure for the degree of damage that was created in the samples, the total volume fraction of the cracks Vf,c is used. This can be done since similar damage features are present in all specimens and the crack density does not vary significantly within each specimen. For numerical simulations, the damage value can also be linked to the mechanical damage in material models, see e.g. the models of Johnson and Holmquist (1995); this has been realized in Bauer (2021).
In order to characterize the damage in each specimen, a mean total volume fraction of the cracks V¯f,c is calculated by taking the arithmetic mean over all z positions within the analysis volumes of the specimen.
A compilation of the evaluated Vf,c(z) of all five PCI scans is shown in the left diagram of Fig. 19. Specimen no. 21202 was pre-damaged at the lowest impact speed of 72 m/s. The corresponding Vf,c(z) is illustrated as a dark blue line and varies only slightly. The dashed line of the same color indicates the resulting mean value of V¯f,c=(0.9±0.2)%. This result is also visualized in the right diagram of Fig. 19 and summarized in Table 4. The given error refers to the systematical measurement error s∗(V¯f,c). s∗(V¯f,c) is estimated from a parameter study, in which the influence of the CAC parameters on Vf,c is investigated. This procedure is presented in Appendix B. For completeness, the statistical error s(V¯f,c) is also listed in Table 4.
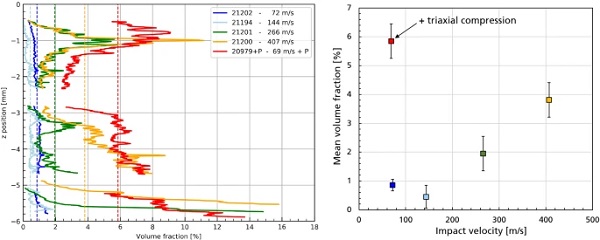
Table 4 Summary of PCI results: mean total volume fraction of cracks V¯f,c and corresponding measurement errors. The statistical error s(V¯f,c) is the calculated standard error of the mean value and the systematical error s∗(V¯f,c) is estimated by a CAC parameter variation (Appendix B) - Full size table
The resulting Vf,c(z) and V¯f,c of specimen 21194 are shown as light blue lines in Fig. 19. This specimen was pre-damaged at 144 m/s. Here, a large amount of cracks could not be identified correctly in the separation process leading to a low mean value with a comparatively large systematical measurement error of V¯f,c=(0.5±0.4)%.
The specimens pre-damaged at higher impact velocities exhibit a significantly higher amount of cracks. Vf,c(z) and V¯f,c of specimens 21201 (vp = 266 m/s) and 21200 (vp = 407 m/s) are shown in Fig. 19 as green and yellow lines, respectively. Near the bottom surface of both specimens, a sharp increase of the crack density is evident. Specimen 21200 has a higher mean value of V¯f,c=(3.8±0.6)% in comparison to specimen 21201 that has a mean value of V¯f,c=(2.0±0.6)%.
The highest amount of cracks is observed in specimen 20979 + P. This specimen was pre-damaged with an impact velocity of 69 m/s and subsequently subjected to a high quasi-static load in a confined compression test, prior to the PCI analysis. The resulting Vf,c(z) and V¯f,c are illustrated by the red lines in Fig. 19. The resulting mean value of V¯f,c=(5.9±0.6)% is 2.12.1 % larger than the mean value of the specimen that was impacted at the highest velocity.
Due to the limited measurement time, only five specimens were analyzed by PCI with a subsequent determination of the total crack volume. To increase the sample size, the micro-CT scans of twelve specimens were visually investigated and the center x-, y- and z-slices were compared to each other.
A compilation of all CT slices can be found in Appendix C (Figs. 21, 22, 23, 24, 25 and 26). An important result is that the micro-CT data was not suited for a quantitative analysis of the crack volume in the analyzed specimens. Most of the cracks generated at high velocities (230–400 m/s) could not be identified visually or by a segmentation process.
However, the micro-CT data was well suited to supplement the PCI data of the specimens pre-damaged at lower velocities (70–190 m/s). In these specimens, most of the cracks visible in the PCI slices were also apparent in the micro-CT slices. Therefore, the crack patterns could be described qualitatively. Similar observations apply to the cracks generated by the loading in a confined compression test.
As a result, the micro-CT data increased the sampling size, which allowed the identification of specimens with representative crack patterns. In particular, a comparison of the specimens pre-damaged at 140–190 m/s indicated that specimen no. 21194 is not representative for this velocity range.
Summary
In a typical ballistic impact scenario, with a projectile impacting a transparent armor, the resistance of the armor is strongly governed by the strength of the material in front of the projectile. In case of SLG, the material in front of the projectile is already pre-damaged when interacting with the projectile. The presented work provides the first steps to determine the material properties of dynamically damaged glass that determine its ballistic resistance during a ballistic impact and similar load cases.
First, a novel method is presented to dynamically generate damage in confined SLG cylinders. For this purpose, confined SLG cylinders are loaded by a plane shock wave, initiated by the impact of an aluminum plate at a defined velocity. This is done in a new way: the SLG is encapsulated in a demountable aluminum confinement. The confinement holds the SLG fragments in place, which are generated during the damaging process. This is essential, since the residual strength of the damaged specimen, which is determined in separate experiments, strongly depends on the friction between the fragments.
A total of 13 tests with impact velocities between 69 and 407 m/s have been conducted. Two high-speed cameras with frame rates of 200,000 and 15,000 frames per second were used to observe the impact processes. In order to get a first estimate of the generated damage, the recovered SLG specimens were placed on top of a bright light source and transmitted light images were taken. The transmitted light images clearly showed a dependence of the generated degree of damage on the impact velocity. At higher impact velocities, the amount of visible crack areas increased significantly.
Second, a new method is presented for a contactless, non-destructive quantification of the damage by means of X-ray CT. An extensive test series has been carried out in order to analyze and quantify the crack volume in the pre-damaged SLG cylinders. X-ray CT scans were conducted at two different facilities, at a micro-CT device at EMI and at a synchrotron beamline at PSI. In terms of contrast and resolution, the resulting three-dimensional CT images, which were obtained by means of phase-contrast imaging, turned out to be clearly superior in comparison to the common absorption-based imaging obtained by micro-CT.
For the identification of the crack volume, the software tool “Mango” was used. This tool has been developed by the Australian National University in collaboration with the German Friedrich-Alexander-Universität. The advanced 3D image processing and segmentation techniques of Mango were used to develop an analysis method for the SLG specimens. As a result, the pre-damage of selected specimens was quantified and characterized. At the lower impact velocities of 72 and 144 m/s, a coarse mesh of cracks was identified consisting primarily of vertical crack areas. In contrast, higher velocities of 266 and 407 m/s resulted in a fine mesh of cracks and a higher degree of fragmentation.
Total volume fractions of the cracks of (0.9 ± 0.2) %, (2.0 ± 0.6) % and (3.8 ± 0.6) % were found to be representative for impact velocities of 72 m/s, 266 m/s and 407 m/s. A further increase of the volume fraction to a value of (5.9 ± 0.6) % was observed in a specimen, which had been pre-damaged by impact at 69 m/s and had undergone a compression cycle in a MTS machine. As far as the authors know, this is the first time that this characterization technique has been used to quantify the degree of dynamically generated damage of glass specimens.
The developed methods can be used to improve the predictive power of existing numerical simulation models of SLG, with the focus on highly dynamic impact scenarios. By conducting triaxial compression tests with the pre-damaged and quantified SLG specimens several yield curves can be obtained, which are functions of the hydrostatic pressure and the degree of initial pre-damage, as shown by Bauer (2021). Thanks to the results shown here, the degree of pre-damage could be quantified on a physical basis.
Finally, it is noteworthy that the novel test and analysis methods are not restricted to the characterization of SLG only. In principle, the new concepts expected to be applicable to other brittle materials, such as other glasses, ceramics or rocks.
References
Acknowledgements
The authors would like to acknowledge Robert Middleton and Dr. Anna Herring from the ANU for granting access to the computational facilities and software of the ANU and for their support during the data processing. The assistance of Thomas Wünsch, Enrico Pauly and Peter Herud in operating the impact facility and the assistance of Ralph Langkemper in operating the micro-CT facility is gratefully acknowledged. The authors would also like to acknowledge Dr. Margie Olbinado and Dr. Federica Marone from the PSI for conducting the PCI at the X02DA-beamline at PSI.
Funding
Open Access funding enabled and organized by Projekt DEAL. This work was funded by the German Ministry of Defence.
Author information
Authors and Affiliations
Fraunhofer Institute for High Speed Dynamics, Ernst-Mach-Institut, Ernst-Zermelo Straße 4, 79104, Freiburg, Germany - Steffen Bauer, Ines Butz, Elmar Strassburger, Martin Sauer & Stefan Hiermaier
Corresponding author
Correspondence to Steffen Bauer.
Ethics declarations
Competing interests
The authors have no competing interests to declare that are relevant to the content of this article.


