Date: 18 January 2019
It is suitable for use in many conventional profile systems as standard.
Reliable guidance with custom routing drawing
Roto supplies a routing drawing that is tailored to the profile system for every “Solid C” component set. This drawing clearly specifies the routing and drilling tasks that must be performed on the frame and sash profile to allow that hinges to be installed with a perfect fit. Each door hinge is inserted into the 9.1 mm holes provided and secured with four countersunk aluminium blind rivet nuts, before being pressed in with rivet nut setting pliers.
A 45° chamfer on the nuts ensures precise positioning. Before installing the hinges, a hinge support casing is firstly inserted in all three routed areas to cover them, thereby enhancing the appearance. Depending on the frame profile selected, the hinge supports are locked at an angle of 45° or 90° using the Roto adjustment key provided. After the door profile has been mounted in the hinge supports, they are secured with locking wedges.
Height adjustment module below the bottom-most hinge
At the position where the bottom-most hinge will be installed at a later point, a height adjustment module is firstly inserted, which provides a particularly convenient way of adjusting the height after the door is installed.
This module is fixed to the door hinge using the direct fixing screw provided, which Roto developed as a self-locking screw specifically for this application. Then a cover is attached and secured with a hex key screw. This is used to adjust the door at a later point.

Sash hinges
Two blind rivet nuts are inserted and pressed into the holes provided on each door leaf. Following this, the sash hinges are inserted at the three specified positions. If the Roto logo is visible on the sash hinge, this means that the hinge has been inserted correctly. It is now impossible for the locking pin that holds the sash hinge in place to fall out. The hinge in turn is attached using two countersunk screws at the top and bottom of the sash hinge.
Joining the sash and frame
Now the sash can be mounted in the frame by lowering it until it engages in the hinge supports. An audible “click” lets the fitter know that the sash has locked into position. Then the adjustment key is used to insert an anti-jemmy device in the opening provided beneath the hinge support on the door leaf.
Lateral and height adjustment
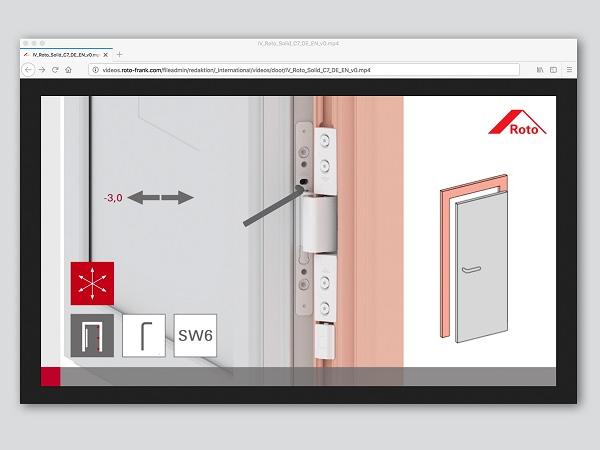
For lateral adjustment, a hex key can be used to move the doors above the opening beneath the Roto logo 3 mm to the left or right on all sash hinges. To adjust the height, the screws on the frame hinges have to be undone slightly. Using the height adjustment module on the bottom-most hinge, the sash can then be raised by up to 4 mm or lowered by up to 2 mm. Then all screws are retightened to a tightening torque of 7 N/m.

Gasket-compression adjustment
The penultimate screw on each hinge on the door leaf must be undone to increase or reduce the gasket compression. The gasket compression can be adjusted by 1.2 mm in both directions by opening the screw using a hex key. This screw then also has to be retightened.
To unhinge a sash, the anti-jemmy device on the three door hinges has to be removed using a screwdriver and the locking mechanisms must be released using the adjustment key. To do so, push the adjustment key into the opening and turn by it up to 45°. The door leaf can now be unhinged.
Installation training – live or by video
Roto also demonstrates online how installing the door and adjusting the “Solid C” is particularly simple: an installation video guides the viewer through each step of the installation process in detail. Fitters can use a QR code for direct access to the website www.roto-frank.com and installation video via smartphone.
Roto recommends that you take a sales document with this QR code with you to the construction site. On request, Roto Aluvision staff can also provide training in production for manufacturers of aluminium doors who work with “Solid C”. The adjustment instructions and information about the installation set are also available to download from the manufacturer’s website.
 600450


Add new comment